Saturday, June 30, 2012

S'mores Popcorn Recipe and B-day Movie Night!

Hello! 

A few days ago was my friend, Margarita's birthday.... she wanted to have an outdoor movie night to celebrate and so I made a fun and yummy popcorn mix to take!

Now, I know that I've shared this yummy and delicious popcorn mix...

But today I'm sharing a more summer appropriate recipe...
{S'mores Popcorn Recipe and Photo courtesy of Nest of Posies via Pinterest}

Here's what you do...

Grab 1 box Golden Grahams, 1.5 bags popped popcorn, mini-marshmallows and 1/2 bag semi sweet chocolate chips and 1/2 bag milk chocolate chips.


While popping your popcorn, put 1/2 box Grahams and 1/2 bag mini marshmallows in a bowl.  Add popped popcorn (I had to do this in 2 batchs) and mix well.

Lay the mix onto 2 cookie sheets.  I didn't bother lining my sheets, I'm a rebel like that.

Melt your chocolate chips.  I put mine in a microwave safe measuring cup for 1 minute, stirring every 30 seconds.  I let my little helper stir the chocolate with lots of "It's super HOT, Buddy" warnings from Me!  He was also my taste tester - you can't believe how demanding that job is!


Drizzle your chocolate over the mix.  I used a spatula to drizzle, it worked great - ignore the giant globs of chocolate.  Just pretend it's all delicate drizzles!


Oh ya.  Put in fridge until chocolate is hardened.  Put in bowl to serve.  Expect "ohhs" and "ahhs".  Feel like you're an amazing chef, stand a little taller.  Yes, you're amazing.

Here's some shots from the movie night...

Hammock full of kids!

Popcorn Machine - isn't that cool?  Thanks to the Bday Girls Bro!

Adam and Mia - again, Hammock time!

What?  This is his Undercover Police Car. 

Maya, Mia and Adam - ready for movie (I know, the photo is horrible)
Margarita (the Birthday Girl!) and her boy, Mateo!

Movie night was so fun, we're planning on doing lots more of them this summer!
Have a great weekend!
Andrea


Thursday, June 28, 2012

Tinsel Letters

Good Morning!

Yesterday I shared my USA banner, and I confessed that the letters were a pain in the butt happy challenge, so today I'm going to share the few steps that it took to get me from point A to B.

Here's a reminder of what the banner looked like...

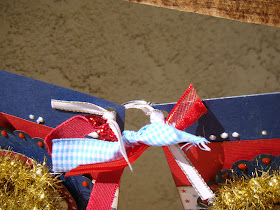
and a close up of the letters...

and an even closer close up!

I have been hoarding saving this wired tinsel for something special.  I have it in red, baby blue, soft pink, white, gold and silver.    Yes, I'm a collector.  Anyways - my Mom used silver accents on her banner so I decided to use gold so that our banners would look different, since I designed the layout of our banners to be identical. 

So, as I said, I went to my stash and found large Basic Grey chipboard letters that I'd been SAVING for just the right time; here's the naked "a"...


and here's the "u" that I tried to paint with gold stickles...


Now, it doesn't look too bad, but I would've had to paint numerous coats on each of the letters and I'm sure that I would've gone through my entire tube of gold stickles on one letter and been irritated that I had to go get more!  So, now, the tinsel...


I do like the way it looks, but since my chipboard letters weren't hug, the tinsel kind of makes it look a little messy.  I think this would be super cool on larger letters, I'll try to remember to do this for other holidays.  The baby pink or baby blue would look very sweet spelling out a new babies name too!

So that's it!  The process. 

And since I'm so into Patriotic projects right now, here's a list of fun looking USA Swag!


Patriotic Sangria by  punchbowl.com

United States Decor by blog.silhouetteamerica.com

Patriotic Goodie bages with Washi Tape by testoccasion.com

Patriotic Wreath (love the denim) by joyeverafter.squarespace.com

American Flag Pallet Art by www.mom4real.com

There's so many more, and I have so many red, white and blue recipes on Pinterest, I would need a whole post just for that!

Have a great day today!  I know I will!
Andrea


Wednesday, June 27, 2012

USA Banner!!!

Good Morning!

Well, the banner is one day late but, hopefully, worth the wait!

My parents came over on Sunday, my Dad was helping Alan with the restoration of his Jeep and my Mom needed me to put extenders in her scrapbook.  So, since all of the boys were happily tinkering in the garage, my Mom and I sneaked off to Collective Journey, our local scrapbook store!

I had been wanting to make a 4th of July banner to hang from our mantle, so I grabbed some patriotic paper from WeRMemories while we were there, enough for my Mom and I to each make a 5 pennant banner!  Here's mine, I'm hoping to get a photo of her's later this week!


I used solid blue, red and white cardstock along with lots of ribbons, Viva Pearl Pens, chipboard letters, gold wired tinsel, fussy cut cards from WeR's paper, Glossy Accents, glitter tulle and punches


I made my pennants 4x6" and scallop punched the bottoms of them.  I used a large punch for my scallop circle and glued glittery gold tulle to the back.  the Airplane and Freedom pieces are fussy cut from the patterned paper and popped up.  I made my little firecracker by rolling a piece of scrap paper into a tube and gluing the end down.  I then cut a little piece of wired tinsel and glued to the inside of my paper tube.  I cut off the excess so that it would look like a fun little sparkler!  The red dots around the circle are made my by red Viva Pearl Pen.  The white dots above the stripe paper are made from my white Viva Pearl Pen.  The gingham ribbon at the bottom of the banner pennat comes already ruffled so it's easy to just glue on!  I added Glossy Accents on the airplane, over the word FREEDOM and on the points of the firecracker!


Now, I struggled challenged myself with the letters!  I planned on using a QuicKutz font, but they just weren't the right size.  I really wanted the letters to be backed with chipboard, so I opted out of using my Silhouette Cameo since it doesn't cut chipboard and I didn't want to try to cut the letter by hand.  I ended up going to my stash and finding a pack of old chipboard letters that I liked.  They were plain, so I knew I'd have to find a way to cover them.  I didn't have any gold glitter (What?  I know), but I had gold stickles so I tried painting it on, but it wasn't thick enough and it just looked blah and messy.  I was staring at my supplies that were all over my crafting area and I kept looking at the wired gold tinsel.  I grabbed it and started wrapping it around the chipboard letters... I really like the look, but it's bushy and it kinda makes it hard to see the letters... but I went with it.  If I find or think of something better, then I might switch it out, we'll see!


I did my other end card similar to the first one I shared.  I used fussy cut little cards, added my firecracker and lots of glossy accents.  I used my red Viva Pearl Pen for the red fireworks on the little card and it really added just the right amount of umph!


I put all the cards of my banner together with Binder Clips and tied ribbon onto the clips.  Viola!  A Red, White and Blue banner perfect for the 4th of July!  I have some small wooden plaques that I picked up from the Target $1 aisle that I'll put on the mantle with the banner hanging below!

I hope you enjoyed this banner and maybe you'll be inspired to make one for your home too!
See you tomorrow!
Andrea

Monday, June 25, 2012

Pinned Up Monday!! Today's for the kiddos!

Good Morning!

Today is Pinned Up Monday - yay!  Today I'm sharing a fun and easy activity that you can do with your toddler.  And you probably have everything needed in you cupboard!  I found this on Pinterest and pinned it to my "For the Kiddo's" board - which is chalkful of fun activities, crafts and educational printables for Adam and I to do this summer!

{Kaleidoscope Rice courtesy of momtastic.com via Pinterest}

This was super easy to make.  Here's what you'll need...

Ziplock bags - we used sandwhich size but you can use larger if you're going to make larger amounts.
Vinegar
Rice
Food Coloring
1 Cup Measuring Cup
Tbsp Measuring spoon
Small cups to mix your food coloring in

Oh ya, and a willing assistant who fakes his smiles no matter how hard I try to get him to give a realy smile!

I poured 2 Tbsp of vingar into the glass bowl/cup, then Adam squeezed a few drops of the food coloring into the vinegar and stirred.


We created all of our colors first, that way I could put it all away as we went.  He then scooped up 1 C of white rice and put it in the plastic baggie - we had 4 colors so we made 4 baggies of rice.  Yes, it was a little messy for him to handle the rice and yes, I did consider just doing it for him and skip the mess, but I figured that a quick vaccum was worth him having a little more independence.

(I know, it's a blury shot - but hes scooping rice)


He then held open the bags while I poured the food coloring mix in.  Yep, I don't mind a little rice on the flour, but cleaning up food coloring did not sound like my idea of fun!


We then sealed the bag and went to town mixing the color into the rice.  This was a fun step for both of us.


I lined a cookie sheet with wax paper and we laid our rice out on it to dry.  We set it outside in the sun, it was dried after nap time (we made if in the late morning). 


I love when an activity keeps going and going...  so, I grabbed a few pieces of scratch paper, Adam's glue stick and pencil, a small plastic bin with a few random toys in it and a mason jar with scooper and we went outside to play with the rice.

First, I let him create a rice jar - do you remember doing that with sand?  I do.  So, I let him use a small measuring cup (I can't remember if it was 1/3 or 1/4 Cup) and one of my mason jars...


He scooped and scooped...


Color after color... and he narated the whole process, which is pretty cute.  He also pressed it in, because he needed that...


And here is our rice jar.  Which he was promptly ready to dump out.  So we moved on...


I grabbed this plastic bin and put different toys in it.  This was a good sensory, recall and guessing game.  I showed Adam all of the toys in the bin, then asked him to close his eyes.  I then poured the rice into the bin and he had to feel and grab the different objects in the bin.  I had him guess what they were and I wrote down the results, I starred the correct guesses and wrote down the incorrect ones.  It was pretty interesting, he did really well.


And last, we made rice art.  Adam drew pictures on his paper and then used his glue stick and rice to color his picture in.


And that was that.  We had fun play that I was educational at the same time - my favorite part of the project was the guessing sensory game (he made me do it too!), his favorite part was layering it in the jar.  He said he liked making a rainbow - which was such a cool way of looking at it!  I love hearing his explanations, it makes me look at things differently! 

So, that's it for me today!  I'll see you tomorrow with a fun 4th of July banner!
Andrea