Monday, August 27, 2012

Pinned Up Mondays! Game Warden Fort

Good Morning!

Thanks for visiting today!

Well, today's Pinned Up Inspiration is something fun, easy and super cheap to make for your favorite Fort lover!  Here's my Pinspiration...

{Photo courtest of countryliving.com via Pinterest}
 
When I first saw this, I LOVED the idea!  Talk about a cool, easy and lasting project.  They took a few inexpensive, white, pull down shades and drew a store front on them - I believe the shades are tension shades, so they stick between the legs of the table.

So, Adam asked me to make a Game Warden Fort for him the other day.  Now, I love me a good fort, but I hate the mess and the impermanence - once you're done with it that day, you're done.  So, I went into the garage to find some big cardboard boxes... we only had one and it wasn't remotely big enough.  Then I remembered the above pin and created this...


  I have a HUGE roll of kraft paper that I use to wrap my packages in, so I grabbed it and started cutting "walls"...

To make them the go from the floor to the table, I had to tape two sections together with masking tape.  I then turned them over and, per my Warden's instructions, started drawing his Warden Station.


Here's the front door... of course, it has his name on his Station door and I also went online and found the Warden badge, printed and cut it out and taped it to the front.  Adam told me that the Station had bricks on the bottom of the building, so I drew those along with a door/hinges, knob and key lock.


He wanted windows on the side of his station, so I drew them on and then cut them out.  He was very specific, he was 2 rectangle windows on the 2 sides.


I printed 2 Fish and Game Headers from the Fish and Game website and taped each of them onto each of the side walls - we don't want any confusion on what type of Station this is!

The back of the station has another door, the Exit door.  I was told that it's the Emergency Exit, but I made a mistake and just wrote Exit.  The doors are cut up the sides but still attached at the top, so it's more like a flap than a door, but it hangs well and I hope that he has less of a chance to pull it all down.

I tapes each of my walls to the underside or edge of our dinning room table.  I think that, after today, I'll tape them to old gift wrap and towel rolls so that they store nicely and will be reusable.

This took a little bit of time and effort, but I think it'll get A LOT of use around here.  You can do the same thing, just change the theme to whatever your child is into!  A grocery store, beauty salon, Police Station, Fire Station, Super Hero Hideout... the options are endless!

Have a great day!
Andrea (and Game Warden Adam)

Friday, August 24, 2012

Back-to-School Easy to Take Breakfast!

Good Morning!

Thanks for visiting today!

So, Adam is finishing his first week of school... 2 out of 3 days that I take him, he was late.  What do we do in the morning?  I don't know, really... but I do know that the time seems to go faster this year than it did last!  Maybe it's my Mommy Exhaustion "resting my eyes" on the couch for the first 1/2 that we're "awake"...

Anways, I like Adam to have protein for breakfast but (obviously) don't have time to prepare a good breakfast for him everyday!  So I was trying to figure out a way to get a protein packed, yummy breakfast that I can make in bulk and store in the fridge and then reheat while we're running out the door that Adam can eat in the car on the way to school.  Phew - talk about a run-on sentence!

I remembered seeing these on Pinterest -

(Photo courtesy of casiburcham@yahoo.com)
 
I revisited the recipe and made a few alterations to reflect what I had on-hand.
 
I grabbed frozen sausage links and heated them in the microwave.  Set your oven to 350 degrees.  Mix together your pancake mix (I used the box mix), leave out a little of the water it asks for and add syrup to the batter.  Sprinkle a small amount of the dry pancake mix on a plate.  Line a baking sheet - you're now ready!
 
 
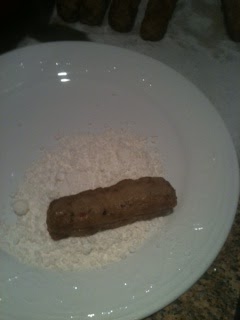
Grab one of your sausage links and roll it in the dry pancake mixture...


Now dip your sausage link in the pancake batter and shake a little to get the drips off.


Lay your batters link on the lined baking sheet and repeat with all of your links.  Leave plenty of room between links because the batter will spread and puff up!


Bake at 350 for 12-14 minutes. 


Remove from oven and let cool.  If you're not taking these in the car, dip them in warmed syrup!  If you are taking them in the car it's okay, remember putting the syrup in the batter?  They'll still have a hint of the sweet syrupy taste!

Toss them in a baggie and give to your little one - they were all done by the time we got to school!  I put the remainders in a container in the fridge.  I'll reheat them in a moist paper towel in the microwave on school mornings!

Have a great, syrupy sweet day!
Andrea

Wednesday, August 22, 2012

Gift and Card Set

Hello!

Thanks for visiting.

We're half way through our first week of school... there have been fits, crying, working, playing, sewing and yawns.  I'm not going to tell you who did what, but I will admit to the tears after dropping Adam off on Monday.  I don't know why the 1st Day of School makes a mess of me when my little boy runs into class without a glance backwards... maybe it's because he's my only?  Because I often think about every 1st time is also the last time.  It's hard knowing that, no matter how much you'd love to have more children, and no matter how blessed you feel to have one, that this is it.  The days are just going by too quickly with him, even the bad days.

Okay!  That's enough of that!

So, today I wanted to share a cute shower gift that I made for my friend to give. 

You may remember this Name Plate that I made for Adam...


Adam loves seeing his name on his door.  He's asked for different ones with different pictures on it.  He's been asking for a police one for some time now...  Anyways, I remembered loving all of the personalized items that we received from friends and family when Adam was little, so I thought a Name Plate for the new Baby would be perfect!

The theme for the nursery is a Lion, so I kept that in mind while formatting the sign.  I put the baby's first and middle name on the sign and outlined it all - I really like the outline, it helps everything look clean.


I also made a matching card for the gift, keeping with the Lion theme.


The Lion is from my Silhouette and it is just so sweet!  The card is based on a sketch, I wish I would've moved the notebook piece of paper down some, I think I would've liked the card more then.


That's it!  If you ever wanted to create a similar sign, you could always use die cut letters and modge podge or stickers or even die cut vinyl.

Have a great day!
Andrea

Monday, August 20, 2012

Pinned Up Monday!

Hello!

Thanks for stopping by... especially with my lack of posts last week (insert sheepish grin).

I know there are bloggers out there, the kind of blogger that I aspire to be, who have a slew of back-up posts ready at any given moment for those weeks that are hectic, crazy, exhausting...  I, obviously, am not one!  So, thank you for your patience!

Okay, so onto Pinned Up Mondays!

I saw this photo on Pinterest months and months ago...

{Photo courtesy of savoryrecipe.blogspot.com via Pinterest}

And I thought, "I NEED to do this EVERY YEAR for Adam!".  I love that it says what he wants to be when he grows up!  So cute!  And here's my interpretation...


I had him write his name and I wrote down when he thought was important. 
"1st day of Preschool. My best friend is Rachel.  I'm 4 1/2 years old.  I want to be a game warden when I grow up.  I'm in the Yellow Class."  I wanted to include his measurements, but he assured me that you can see how big he is!


His tough guy face.

His "Game Warden" face.

Me begging him to smile nicely...

Me, still begging.  He told me that this is as nice as he can do. 


But this one is my favorite.  I wish I hadn't cut off his head... it's hard to react fast when you get 1 sweet smile that looks like your child!

Have a great day!
Andrea (and Adam)


Tuesday, August 14, 2012

Cakewalk Mini Album Class

Hello!

Thanks for stopping by!

I'm sorry I didn't post yesterday... this is the week before Adam goes back to school, and we're in full swing with doctors visits, meeting the teacher and having a little bit of fun before he goes back!

And speaking of fun... take a look at this mini album that I created from October Afternoons Cakewalk line!  The paper was so inspiring, it has a fun 50's, vintage vibe to it - I love the colors and designs, if you haven't seen this line, you need to find it - I think you'd love it!


I used QuicKutz Mini-Album dies for my book - it was from the Santa's Workshop release a few years back... Don't forget to use ALL of your supplies, even if they're a little older!

I used bags, flags, buttons, tickets, tags, pinwheels, tulle, punches, rhinestones, ribbons, stickers, popcorn boxes, paper bags... and so much more in this book - it was a labor of love that I had to share, so I decided to teach a class on it!


It's such a fun book!  Perfect for birthday's or celebrations!  You can change some of the stickers if you want a different theme than birthday.


Call Collective Journey (909)793-2200 to sign up.  The class is this Sunday, August 19th.

Thanks for taking a look!
Andrea


Friday, August 10, 2012

Shout Out and Dandelion Deals

Good Morning!

Thanks for visiting!

First, I want to say a big "Thank you!" to my parents and husband for helping me package and ship more than 400 pillows for the latest groopdealz feature!  Below is a photo of the final batch, ready to go out!


A big thank you to my dad for always keeping my wits up - Dad, you constantly challenge my smart mouth!  And thanks for letting me critique your wrapping style - the good thing is that you can only get better from here.

A big thank you to my Mom for letting Dad and I tell you what to do!  I know it's hard for you, but you rolled your eyes grinned and bared it well!  And thanks for always thinking I'm great, even when I'm not!

A big thank you to my seriously handsome husband for putting up with fabric, pillow covers, sewing machines, washi tape, packages, etc. that cover our house the majority of the time!  And for looking so good while you put up with it!

And a HUGE thank you to Mrs. Annaguey & Co. for working so hard, giving invaluable advice and always having my best interest at heart!

Phew!  Oh, and thanks to my parents for bring chocolate cake over while we packaged!

And last, today is the final day of my Dandelion Deal!  Even if you don't want to purchase a chevron pillow cover, you should go check out the site, it's a great concept and they're lots of cool items on it that might just float your boat!

Have a great weekend!
Andrea 

Thursday, August 9, 2012

QuicKutz by Lifestyle Crafts Projects!

Hello!

Thanks for visiting today!

I figured that I should probably share some papercrafts - it's been a while, and I've been busy cutting and pasting, but just haven't shared!  So, it's time to show the fun I've been having with the Maritime Release!

So, for Page's Die Club project, I created this banner.  I used nesting labels for the pennants and added "knots" and the letters are Deisel Font.


I also made another banner, similar to this one, for Collective Journey's samples...


I used the same idea, but did a different dies - the pennants are another style of Nesting Label Dies


I used the 2x2 anchor, whale, crab and lobster dies to add a pinch of cuteness to the banner.


I made this cute card with the Compass Die, a Nesting Lable Die and Carnival Font.  The outside says, "You Are" and the inside, "Where I belong".

And last, you might remember a version of this project from a previous post...


The Hamburger Container Mini Album!  I just love the idea of using a container box as a mini-book cover!


I used the Sailboat and Nesting Pinking Circles along with the Rope boarder for the top of the container...


And here's the inside pages...


The lobster is in here too - can't leave any cuties out!

So that's it for the Maritime Release!  It's a fun, nautical, cute release that you can use for a variety of projects!  Check out the Lifestyle Crafts Blog to see more projects!  Or stop into your favorite scrapbook store to see what samples they've created using this release!

Have a great day!
Andrea