Photobucket Photobucket Photobucket Photobucket Photobucket Photobucket

Monday, March 12, 2012

Pinned Up Monday!

Good Morning!

I hope that everyone enjoyed their weekend... I had an interesting weekend... I broke my ankle!  Yup.  So, on top of the slipped vertebra in my lower back, I'm hobbling around in an air cast.  Which is an improvement, I was on crutches over the weekend, which wasn't feeling very good with my back!

Soo, when I first became best friend with Pinterest, I saw this...
And I immediately thought of my BFF, Jen.  She's originally from here (CA) and now resides in Kentucky.  I thought that it would be cute to make state pillows for people that love where they live and/or where they came from.

I thought that a state loving pillow cover could be very fun, so I made a few to sell in my shop!  I used my Silhouette Cameo and Flocked Heat Transfer for this - I love the way it turned out!  Take a look!


I used my yellow and white chevron fabric and sewed the cover first.  I formatted the state on my Silhouette and then added the heart.


I really really really like the look of the gray and yellow!  Since my BFF is in Kentucky, I made a KY pillow for her, I thought that the 2 pillows would look good together...
I thought that I would like the yellow on red, but the red pattern is noticeable through the state and I am not a fan of that!  I may do another layer of the yellow on top of the yellow state - I think I can do 3 layers of the heat transfer...

The best part is that I can do all of the states!  And some countries!  I love my Silhouette!  I'm planning on sending these pillow across the country tomorrow!

Hope you enjoyed my Pinterest moment!
Andrea


Friday, March 9, 2012

Change in Plans...Budget Bathroom Makeover Day!

Good Morning!  Happy Friday!

I love Fridays - Friday's kinda feel like the weekend... Friday's seem like a fun day, like you really shouldn't work at work on Friday or, if you're a SAHM like me, like you should do something fun with your little on Friday. 

I was planning on posting about the table decor from the shower today, specifically a burlap table runner that my AWESOME and SWEET Sister-In-Law, Christine, made for me for the shower!  Holla to great SIL!  But, the pictures didn't do the tablescape justice, so I was going to reset the table outside in natural light and take the pictures... but didn't get around to it yesterday, so I'm sharing something different today!

BATHROOM MAKEOVER DAY!  Yay!

When we moved into our home 3.5 years ago, I loathed the extra bath.  Everything in it was original to 1981 except for the tub.  Not that the tub is anything special. at. all.  I painted the bathroom during nap, well, kinda painted, about 2.5 years ago.  I painted it a very light blue because we had leftover paint from the playroom.  I never finished painting - I never cut in or did the corners... it was u.g.l.y.  The vanity was a gross brown, the mirror was a full wall mirror that sat directly over the ugly counter.  The light fixture was probably from 1971 - I think the home builder was using old supplies or something because that fixture couldn't even have been pretty in 1981!  Anyway, the bathroom was disgusting and, since we only have 2 bathrooms (the other one is in the Master Suite), it was finally at the top of my to-do list.

So, my A-MA-ZING husband tackled it a few weeks ago.  I don't have BEFORE pictures (bummer), but I'll walk you through the transformation.

So, as I mentioned before, the vanity cabinets in the bathroom were origionally a gross, ugly brown.  So, instead of buying a new cabinet/sink combo (some day we will), the husband refinished it.  It took A LOT of coats of white paint to get it looking nice, I think probably 7-8?  But I love the clean white look of it.  We found some door and drawer pulls that we'll get when we have a little extra change, but it's okay without them for now.  Also, it's hard to tell, but that yellow rug is microfiber!  It's fun and so soft!  Love it!  Got it from Home Goods for $14!


Onto the mirror.  As I mentioned before, we had a full wall mirror in there.  Now, since we are makeover-er's on a budge, we tried really hard to reuse the mirror.  My Mother-in-law brought over some old frames that we could reuse and the DH bought a glass cutter.  He tried 2 different times to cut the glass down and each time, part of the mirror broke off.  Bummer.  So, we bought this mirror at Home Goods for $35.  It fit's perfectly.  It's not a bright white, like the cabinet, but it has a really nice thin yellow pinstripe all around it, which ties in perfectly.  The light fixture, well, it came from the trash.  Looks like someone else threw it away because it didn't have the light covers.  Ridiculous.  Such waste.  So, the DH dug it from the trash and we bought new covers for $8 from Home Depot.


And this is my favorite part of the bathroom.  The DH put up beadboard on the only almost full wall.  We painted it the same white as the cabinet.  And we painted the whole bathroom green.  It's Spring Moss by Behr.  Adam picked it out... and I love it too!  I wanted a fun, youthful bathroom but I really didn't want a themed bath, like a toystory and rubber duckie bath.  I wanted this bathroom is be useful for years. 

The "FRESH" letters I got from Joanns.  I think they were $1.98 each.  They were plain wooden letters, so I painted them gray and painted the edges white and then sprayed a high gloss coat on them.  I'm not sure about the gray... I might end up painting them white or decopauging them.  I don't know... what do you think?  I really wanted old, metal, vintage letters in different sizes and colors, but, remember, makeover-er on a budget!


I bought this old crate for $4 from a Vintage Flea Market - Matilda's Mouse.  I love that it says ACME on the crate.


I found this french flash card at Miltida's Mouse too - I thought it would be perfect since it was a faucet.  I stood it up in an old floral form that I've had for a while - found at a yard sale for $1!


I painted the inside of the crate a bright yellow.  It's called Summer Sun by Behr.  I then put an old yellow Bingo Card, a jar full of old clothepins and a vintage party horn in the crate as well.  We often have Bingo Parites in the bath!  Okay, not really, I just picked them because they're yellow.


I bought this CD Wooden crate from Joann's and painted it Egg Yolk Yellow by Behr.  I added an old, metal #3 sign since there's 3 of us.  I stood the 3 in another floral form.


I also found an old, folding ruler and put it in the top opening of the CD Crate - just because I liked it.


And sitting on top of the crate is an old Water Dept. Light - it was in the garage and super dirty so I grabbed Simple Green and a scrub brush and went to town.  It's as clean as it's going to get.  But I think the Water Dept. Light, the French Faucet Flash Card and the Beadboard are my favorite parts of the bathroom.  Oh, and the shower curtain, which was on sale at West Elm.  They also have a yellow and white stripe one, but I wanted the grey neautral in case we ever change the bathroom.

  And last, I cut this "Get NAKED" from my Silhouette in yellow vinyl.  I used the transfer paper and centered it on the tub.  Just in case someone needed direction for the bath. 

That's it!  Oh, and the yellow/gray and white striped towels are DKNY and I found them at, yep, Home Goods.

Have a great weekend!  I'll see you next Monday for Pinned Down Monday!
Andrea

Thursday, March 8, 2012

A few more Shower decor ideas...

Today I'll be sharing 2 decor projects that I made for the shower... it seems that if something stands still long enough in my house, I'll decorate it.  I'll find a way to cover it with flowers or fabric or sparkles.  Don't fall asleep on the couch around here, you'll wake up with a new hair-do and your clothes may have been modified!


I found this bird cage at Tai Pan Trading Company, which is a store in Ontario that is all about home decor and seasonal decor.  They typically have great prices and fun decorating ideas.  If you live in the area, it's worth a trip! 


So, I grabbed the plain cage (which was $15 - not bad!) and tried to think of how I would use it... I wanted to add flowers to it, but I didn't want something permanent so I grabbed some tulle ribbon and wrapped it in a semi-circle around the cage.  I then grabbed my hot glue gun and went to work.  I used the left over flowers (from the Dollar Tree) and glued them to the tulle.  I cut strips of burlap and tied them onto the bars of the birdcage.

For the inside of the cage, my MIL found a tall standing birds nest.  It was too tall, so she cut off about half of the sticks.  I grabbed more burlap to add around the base of the "nest".  I cut a strip of burlap and then pulled a string from the center of the strip and pulled it so it gathered the burlap into ruffles.  I then took a paper plate and hot glued the nest to the center and then glued the ruffles around the base of the nest onto the plate so that the base of the bird cage would be nice and full and I wouldn't have to worry about it getting messed up and me having to fix it every time we moved it!

The next project that I'm sharing is a spring tree...


My husband gave me this tree for our anniversary - he's hung candy from it because I had asked him to plant a candy tree in the backyard.  I've kept it around, you've see it used for Thanksgiving and Christmas - it's an awesome prop for seasonal decor!


I grabbed more left over flowers and leaves and, luckily, they fit right onto the branches!  No hot glue needed, which was great because I didn't want anything permanent on the tree!  We tied more raffia and hung crystals from the different branches.  I punched out small hearts with a Fiskars punch and then sewed them together create a long, heart banner.

And last, I rested the embroidered tree truck with their initials against the trunk of the tree.  Pretty cute, huh?  I had planned on hanging it, but I liked the look for the embroidered tree on the real tree.  I also added more ruffled burlap along the base/stand of the tree along with little spheres of grass.  We threw some crystals in there to add some bling.

That's it!  A bird cage and a tree that are all decorated for Spring! 
Tomorrow I'll be sharing the table decors and a great, inexpensive runner!
Andrea

Wednesday, March 7, 2012

Pretty and Simple

Good Morning,

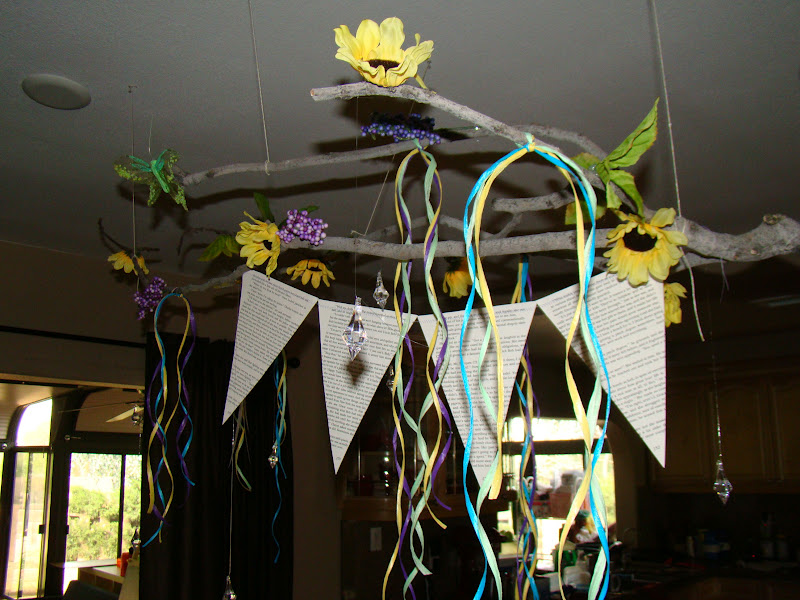
Today I'm going to share my favorite decor from the Bridal Shower... it's easy to make and you can change it to fit any season!

Ughh, I can't stand when a photo doesn't do justice - our dinning room has very little natural light and makes everything look like we live in a cave!  These branches were so cute and sweet and EASY!  I loved making them!  The most expensive thing on them was the raffia!  Can you believe it?


I grabbed a few branches from my Brother's backyard, (they have all kinds of trees that are constantly being trimmed!), bought the flowers from the Dollar Tree and cut and sewed the book page pennants from an old book of mine.


I hot glued the flowers and leaves to the branches and hung faux crystals from fishing line from the branches to add extra sparkle.  I tied on the raffia and the pennant banner and then we suspended the branches from the ceiling on either side of our dinning room light fixture.


If you were sitting under the branches for the shower, this is what you'd see when you looked up. 

I'm planning on keeping these pretty little things up through spring.  They're over our dining room table and it's nice to walk in and see a burst of spring in a normally boring dinning room.

I do need to give credit where credit it do, tho - I didn't come with this idea, Collective Journey's talented  Decorators, Deana and Shelly, came up with this idea a while back and just change the decor that hangs from the branches for the different seasons and themes of the store.

All in all, if you want a fun spring or shower craft that is inexpensive and easy to make, these are for you!  Each branch cost well under $5 and you can get most of your supplies at the Dollar Tree and outdoors!

Have a great day!
Andrea


Tuesday, March 6, 2012

The Writing's on the... Plate? Chalkboard Plate

Hello!

I'm back today to share another quick, inexpensive and reusable decor idea!

If any of you have seen my Etsy shop, you know that I love me some chalkboard paint!  In fact, I enjoy the flexibility of chalkboard paint so much, that I've constantly been thinking of different ways to use it!  Back in December, Target had a 2 pack of red plate chargers in their $1 aisle, so I grabbed them, not really knowing what to do with them, but knowing that I'd be a fool to pass them up.  Surely I could come up with something!


I had also purchases some chalkboard paint by Martha Stewart.  For my signs I use Krylon's Chalkboard Spray Paint, and since I had them both on hand, I decided to do a comparison between the two.

"In this corner, we have the queen of DIY, Martha Stewart Chalkboard Paint...!"
"And in this corner, we have the Kwickest of them all, Krylon Chalkboard Spray Paint..." 
I used the MS paint and used a sponge tipped brush to apply it.  It took 5 coats, leaving an hour between each for drying time.  You could see the sponge brush strokes, which I wasn't a fan of.  It also didn't really have a chalkboard finish, it was a little shiny instead of super flat.

The true test was when I wrote on it.  I grabbed an piece of chalk and wrote - it was fine, although the chalk didn't seem to move smoothly.

 
And when I was writing, a piece of the paint chipped off.  I'm sure I could have avoided this if I'd sanded down the platter or primed the platter first.  Also, when I erased the chalk from the platter, you could still faintly see the writing, which I wasn't a fan of.

Next, I tried the Krylon Chalkboard paint.  I took it outside and spray painted it. I gave it 2 coats with about a 1/2 hour in between coats.  I couldn't actually find a re-coating time on the canister, so I just guessed by looking at the paint as it was drying.


I liked the finish of this platter better.  I liked that it was just a smooth finish, nothing noticeable about it.

I forgot to mention, that whenever you use chalkboard paint, you need to prep the surface after it's painted BEFORE you write on it.  You just take a piece of chalk and rub it all over the surface, then erase.  After that, you're ready to write.  I liked the way the chalk wrote better on this platter, but I still had the problem of being able to see the writing after I'd erased it.  It didn't seem as noticeable to me, but you may be able to take care of this with water.

All in all, I like the Krylon Chalkboard Spray Paint more than the Martha Stewart Chalkboard Paint.  It just had more pros.  I'm sure that there's times that you'd want a chalkboard paint that you can apply more precisely with a brush than a spray can, but if your project could use either, I'd go with the Krylon.

Here's what I used my platter's for at the shower...

As a sign to greet guest's as they came to the door...

And as a sign with instructions at the "Beauty Bar".
 For the Shower Favors, we had a "Beauty Bar", where we had muslin bags that you could fill with all sorts of fun, mini beauty products.  We had the following:
Lip Gloss
Chapstick
Body Lotion
Bath Fizzes
Hand Sanitizer
Emery Boards
Nail Polish

The chalkboard sign said, "Please grab a bag and fill with lots of goodies - Thank you!"

I'll keep the signs and just change the saying's for the different seasons.  You can stand them up in plate stands all over the house. 

That's it for today!  I'll see you tomorrow to share my favorite shower decor!
Andrea

Monday, March 5, 2012

Bridal Shower

Hello!
Happy Monday... and  Pinned Up Monday at that!

Well, we had the future Sister-in-Laws shower here Saturday and I think it went beautifully!  The food was wonderful, the games were fun and, most importantly, I think the bride-to-be had fun! 

Through the next week I'll be sharing different shower decor that I made and share how you can make them too!  But today I'll be sharing a fabric banner that I made with a little inspiration from Pinterest and a local store, Collective Journey!

Here's the Pinterest inspiration...

{From kinsereventcompany.blogspot.com via Pinterest}

I love this whole look - the soft colors are beautfiul.  

The other banner that I saw like this was at Collective Journey - it's in the front of their store and is mixed with a paper pennant banner.  Their cielings are so much higher (which I didn't take into consideration) than the ones in my dinning room, which is where I orginally planned to hang the banner from but, after the fabric banner was made, I realized that it would be way too heavy in my dinning room, which is naturally dark.  I decided to move it into the family room... take a look...

We have a vaulted ceiling in our family room and it's pretty wide.  We couldn't decide how to hang it at first, I thought I had plenty of banner and that I could zig zag it across the width of the room, but after we laid it out, it only would've gone across 1 1/2 times, which would've looked silly.  So, we came up with this idea. 

The banner is made from strips of fabric, about 1" to 2" wide.  We have lots of different colors represented in the banner; yellow, purple, tan, canvas, teal, lim green... I've estimated that it's roughly 37 yards of fabric.  Yep.  You may be thinking that's a lot of strips... and you'd be right!  the first 8 yards of fabric were cut into 1" strips, the other 29 yards were torn out of impatience! 

It's a super simple banner to make, you simply grab fabric in colors/patterns that you enjoy.  Grab some clothesline and cut to the desired length.  Then tear your fabric into strips - it's up to you how wide your want the strips.  I think the length is also up to you, but mine are about 18-20" long.  Then tie your strips of fabric onto your clothesline - I didn't bother knoting the fabric.  Then just push it down until it's tight against the other strips that you've tied on.  Keep going. 

Now, you could leave more space between your strips and your banner would be less full, but I wanted a very full banner, so I left NO room between strips.

I'm going to leave this banner up for spring/Easter - it was way too much work to use for only 1 occassion!  Thankfully it's Spring and Easter is right around the corner, so I don't have to ask my husband to take it down and put it back up!  Everyone is happy!

I'll be back tomorrow to share more!
Have a great Monday!  And remember, if you'd like an invitation to Pinterest, email me at ayokleyjessup(at)gmail(dot)com!
Andrea

Friday, March 2, 2012

Next Week...

I'll be back - full of posts...

But this week there's just too much to do, my camera isn't working right and my iPhone's camera doesn't do justice to all of the sweet decor I've been working on.

So please check in Monday - you won't be disappointed...  I promise!

Have a happy weekend!  I plan to!
Andrea