Photobucket Photobucket Photobucket Photobucket Photobucket Photobucket

Monday, December 16, 2013

{Partial} Holiday Home Tour

Hello!

Happy Monday!  And this Monday starts an entire week of posts!  Yay!  This is what me-organized, looks like!  It won't happen again until after Christmas... or New Years to be honest.

Last week I was busy decorating the house.  It took all week, and not because our house is grand or because I did both the outside and the inside, I just wasn't feeling it.  I had my husband get down the boxes from the rafters and they sat there and sat there and sat there.  I figured I should clean the house first - because you should always clean the house before you destroy it?  So that took a day (yes, a DAY).  Then I decided the only way to decorate was to take everything down that I had up - fall décor, plates, cups, junk mail, random school projects -  this makes sense, right?  But for some reason, I liked it that way.  It looked so clean and minimal that I didn't want to put anything else up.  I'm sure I sound bah-hum-bug-ish, I don't feel that way, I feel more like the Grinch when he realized that Christmas came without boxes and bows.  I decided that I didn't need to put out every piece of Christmas décor I owned for it to feel like Christmas.  I also gave up on my idea to make every gift for every child on our list - my goal was to enjoy Christmas, not be so stressed about making it look "perfect" that I was miserable and made everyone around me miserable.

So, here's what I did.  I left all of the boxes in the garage and went through them there.  If I wasn't feeling a certain Santa or Reindeer, I didn't bring it in the house.  I also changed my décor a little - I normally have a white, silver and red them with a little bit of turquoise mixed in but this year I wanted something a little... warmer?  So I decided to add in more greenery, gold and wood.  I LOVE it, my husband loves it and it just feels comfy.

 
My first inspiration was this wooden Marquee Ampersand I bought at my last Boutique.  It's from Junk Art Gypsyz and I knew it was versatile enough for me to use all year long in different rooms and different ways.  This piece was where the idea of using more nature inspired items, i.e. greenery, wood pieces, came into my head. 


I love the way the mantle came out. I used non-traditional Christmas décor mixed with Christmas goodies.  The wooden Metronome is an Antique that my parents found when I was young.  Once I moved out and took my piano with me, the Metronome came too!  I'd had the mercury candle pillars for years - they make an appearance with every holiday and just hang out and look pretty the rest of the year.  I added a fun snow globe that Adam picked out from Target (Threshold) and one of my vintage cameras with lots of greenery.  I stuck in some picks of bright red berries here and there to make the greenery pop a little more.  Easy, warm and personal.
Once I had it in my head that I wanted to use the ampersand above the mantle, I started thinking of Christmas phrases with "and" in them... Merry and Bright seemed like the obvious choice since the ampersand lights up the room.  I used the Silhouette Premium Vinyl in Gold for my phrase and mixed two different files for the wording, one for Merry and the other file for Bright - I did double check and measure the opening that I wanted my saying so that I'd have the dimensions correct for my words. Once everything was formatted with my Silhouette Studio Software, I cut it out with my Cameo, used the Silhouette Transfer Paper and stuck the wording down.  I hung the ampersand with a nail and stood back with a huge smile on my face!  I love it when a project exceeds my imagination!


The next area I wanted to share is the Dining Room Cocoa Station.  I saw an idea for this on Pinterest and loved it - again, something about a cocoa station seemed cozy to me - so I grabbed a an old tin picnic basket and started from there...


I used a KPS Burlap Runner with metallic gold dots and then started layering from there.  I put out the picnic basket, filled it with greenery and a Santa Plate and continued adding.  I like the mix of fancy-pants mercury and my rustic picnic basket.  I think they play nicely and give my vintage Santa's/Snowmen a good backdrop.  I also used my Reindeer Subway Sign from last year on the buffet - it's one of my favorites and when I couldn't figure out where to put it in the living room, I knew I had to create a spot for it in the dining room.


And last, but not least, is our dining room table.  Normally I strew Christmas items all down the center, but this results in me redecorating it almost nightly after dinner so I went with simple this year, put a glass apothecary in a wooden Coca Cola Crate (I've been "borrowing" it from my Parents for the last 3ish years) covered the bottom with greenery (seems to be the word on the street today), put some snow and a set of Santa & Mrs. Claus Salt and Pepper Shakers inside the glass and called it good... Sorry that Paddy Wagon the Elf is in the photo - he was naughty and was using the Christmas Bunting from the Playroom as a rope to scale the dining room table.  Mischievous Elf.

We have two trees, Adams in the playroom that he decorated all on his own (while I sat on my hands and told myself that it was HIS tree and that it didn't matter if every. single. ornament was on the same 3 branches or not) and our family tree that sits atop our Christmas Train and watching over all the gifts... pretty because they display our memories so nicely.  And, of course, there's a ton of Red Chevron and Turquoise Patterned Pillows covers our couches - courtesy of KPS.

It sure is nice having a store in your office!

I hope you enjoyed our partial Holiday Home Tour and that you decorate (or not decorate) exactly how you want and not by what you think you should do!

Have a good one!
Andrea
KPS

Wednesday, December 4, 2013

Lifestyle Crafts Studio Design Team Project Reveal

Hello!

It's December.
Did anyone else realize that?
Its. December.
And by extension, Christmas is in 22 days.

I'm still without a computer (do you think Santa frequents blogs?) which makes blogging challenging, to say the least... but I am so excited about the outcome of my 1st Studio Design Team Project that I couldn't wait to share it with you all!  After all, sharing is caring!

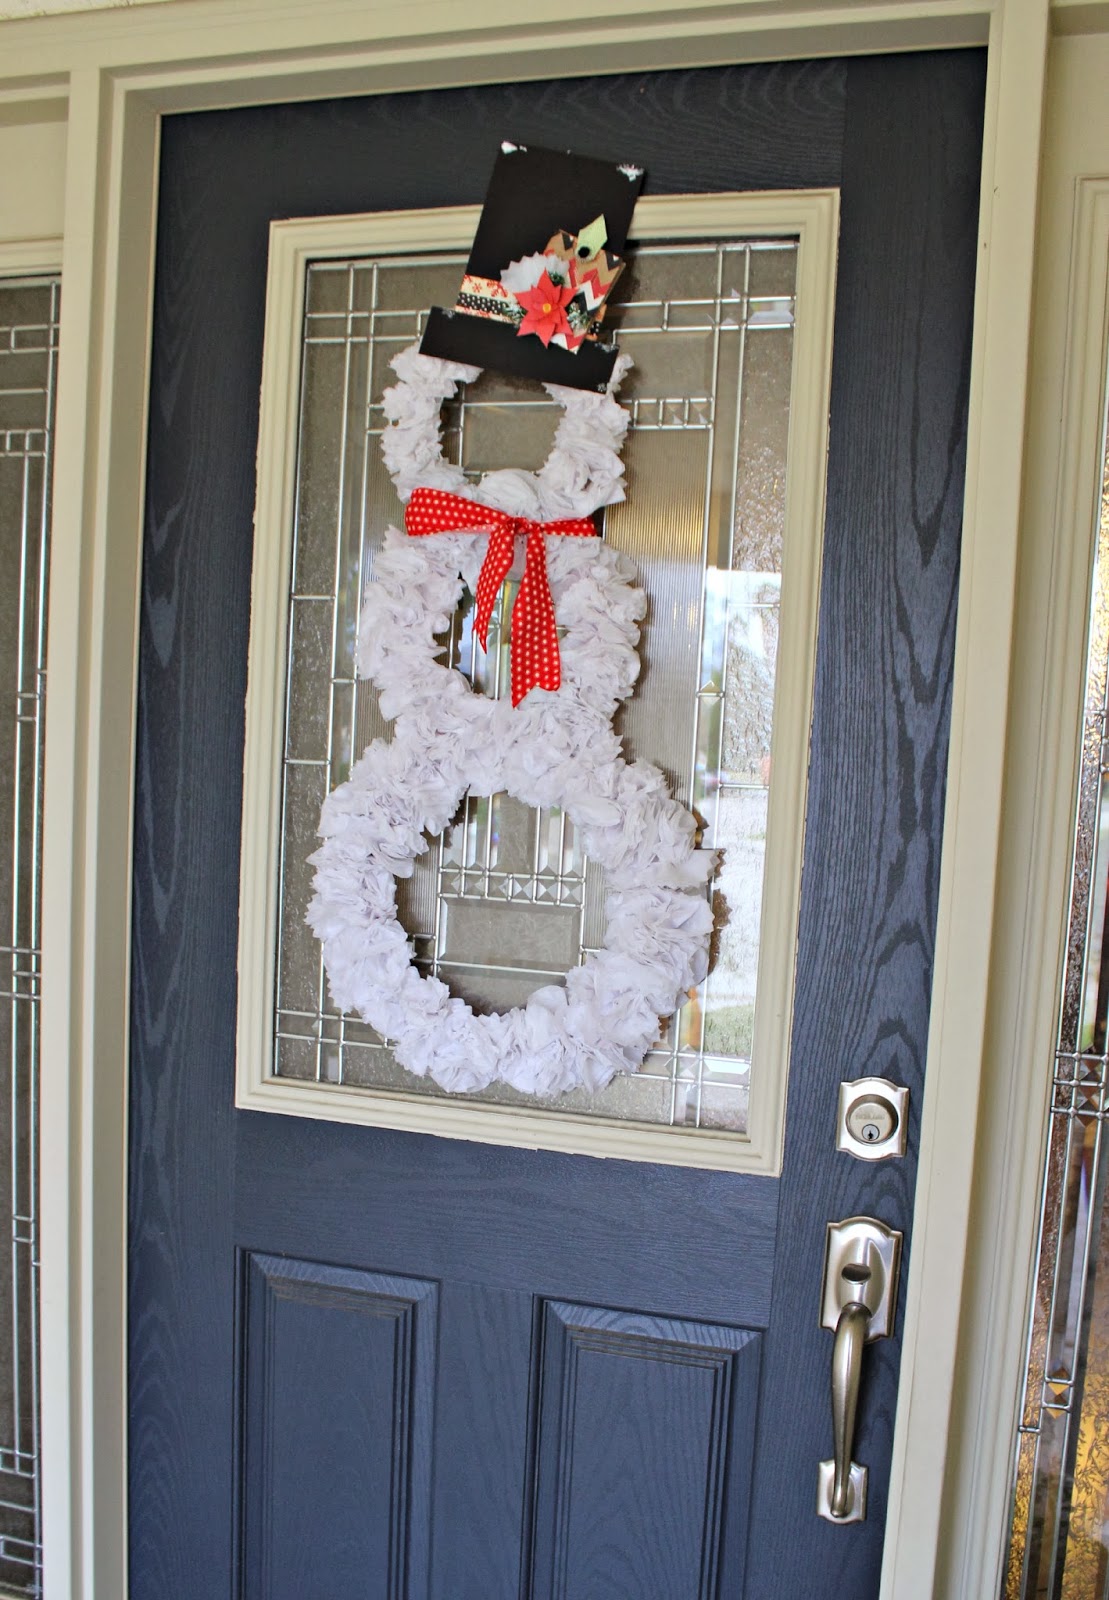
Here it is!


For some reason, I knew exactly what I wanted to do as soon as we got the go ahead to create a December project.  I gathered my supplies and started die cutting, and die cutting... and die cutting.

Here's what you'll need to get started:
 
1.  Evolution
2.  Nesting circle dies (I used the pinking edge circles, but any will do)
3.  Chipboard
4.  Tissue Paper
5.  Adhesive (I used a glue gun but it's up to you)
6.  Paper Trimmer
7.  Cardstock and Patterned Paper
8.  Plates to trace (for snowman outline)
9.  Winter Wonderland Pocket Kit
10.  Flower, Greenery
11.  Dimensional Tape
 
Let's get started!
 
After gathering my plates, I taped 3 pieces of 12" chipboard together on both sides.
 
 
I then grabbed my largest plate and traced it on the chipboard.
 
Continuing this until you have 3 sections of your snowman.
 
This is how mine ended up looking when I was done tracing all of my plates.  I used the two outer rings of the bottom circle for my snowman's body and the top ring for the head.  Don't worry if your rings aren't perfectly even, you'll be covering them up and you won't be able to tell when we're done.
 
Cut your rings out and lay them out, overlapping  each other, to get your snowman.  Tape your rings together on the front and back.
 
Now the fun part (not tedious at all) - grab your tissue paper and lay out your dies to see how wide you need to cut your strips.  Go ahead and cut your strips, trying to keep all your layers of tissue together.  I used probably 15 pieces of tissue.
 
Using your Evolution and platform, start die cutting your circles.  I love that the platform is magnetized so your nesting circles won't move around!  Here's how to use your Evolution - lay your dies face up on your platform.  Lay your material to be cut on top of the dies.  Place your cutting mat on top of both the dies and material you want cut and place into machine, gently pushing it into the opening until you meet a little resistance.  Now start cranking your handle and watch as your platform moves through the machine.  Easy!
 
Say hello to your die cut circles!  Now repeat until you've cut all your tissue!  This may take a while, but the snowman it totally worth it.
 
When you're done die cutting, grab your piles of tissue circles, your glue gun (or adhesive) and your snowman so we can start making him all fluffy!
 
Grab 3 pieces of your tissue circles.
 
Make a little stack of the and place your thumb in the center.
 
Gently push down on the center with your thumb so that the edges start curling up.  Once they're concave, grab the center from the bottom and pinch together.
 
Twist the bottom so that it creates a little flower looking guy.  Twist it nice and tight so that you have a little stem.  This is what we'll be gluing to the chipboard outline.
 
I liked to put a little bit of hot glue on the chipboard and then stick my tissue to that spot, but you do it how you're comfortable.  Once it's glued on, go ahead and gently pull the different layers apart, giving it more fullness.
 
Keep going, butting each new tissue flake next to the last one.  Depending on how fluffy you want your snowman, you can leave more or less space between each flake.  I also liked alternating the pinking circles with the regular circle - I thought it would make it interesting.
 
Just keep pinching and gluing...
 
pinching and gluing...
 
Until you have this guy!  Yay!  He's starting to take shape!  Notice how I left a section at the top bare?  This is where I'm going to put my stove pipe hat!
 
Which we need to make!
Grab your chipboard again and cut 2 rectangles, one measuring 6"x7" and the other measuring 2"x8".  The larger of the two will be the top of your hat while the smaller becomes your rim.  Tape them together with the top piece centered on the rim.  Tape the front and back.
 
 
Do the same with black cardstock, but don't bother taping them.
 
 
Grab your adhesive and glue your black cardstock pieces to your chipboard pieces.  I used my StickyThumb tape roller for this.
 
Here's what you'll end up with - don't worry about the seam, we'll cover it up with our hat band (sorry about the glare in the photo, the weather hasn't been supportive of picture taking!).
 
Now you can start playing!  I cut a 1.5"x6" strip of patterned paper for my hat band and added some washi tape for extra umph (super technical term).  Now, if you know me, you know I like to take out a ton of different elements and just play with them before I glue anything down - sometimes what works in my head doesn't work on paper.
 
I ended up making a little pocket with coordinating paper and my QuicKutz Pocket die from the Winter Wonderland set.  I grabbed an extra tissue die cut and gathered it behind a paper flower, adding some greenery that I'd dipped in "snow" and sprinkled glitter on.
 
I also glued some green ribbon to the top of my card that sits in my pocket and then punched a hole through it with my crop-a-dile to add a button
 
When it came time to glue my hat to my snowman's head, I realized how uneven my surface was.  I didn't want to smooch down the tissue flakes but I knew it needed more of a solid surface if I was going to hang anything from it, so I decided to build up my base before gluing down my hat.
 
To do this, I cut a long strip of cardboard off a box.  I then cut it into smaller strips that I could glue to my snowman.
 
Using hot glue, I stacked my pieces of cardboard on each other until I was almost flush with my tissue flakes.
 
I glued my hat to the cardboard base and viola!  A stove pipe top hat!  I added a little bit of snow to the corners and edges of his hat... he is, after all, a snowman.
 
I could've stopped there, but what snowman is complete without his scarf (I know, you may have been thinking of practical things like eyes... carrot nose... coal mouth but that's where you went wrong!)?  I cut a 2x36" piece of scrap fabric I had laying around and tied it around his neck, making sure the tails of the scarf were hanging down and facing the right way. 
 
 
Doesn't it just make you want to start humming Frosty the Snowman?  Hmm Hmm Hmhmhm...
 
If the entire snowman body seems a little too much for you, just do the head!  You could use the same basic idea, use a paper plate for his face and just do his face and hat.  You'd even have a solid enough surface to add eyes, nose and mouth! 
 
That's all for me today!  Thanks for visiting, I hope you enjoyed the tutorial as much as I enjoyed making this fun, flaky and cute guy!
Have a great day!
Andrea


Saturday, November 16, 2013

Operating System Completely Deleted

Good Morning...

I haven't been around in a while because my computer is busted.  Seriously busted.  I don't actually remember what's wrong with it, I think it's my operating systems been deleted or my main frame?  Or the central system?  Am I just making up stuff now - I have no clue?  And as bummed as I am that my computer is as broke as broke can be, I am so mad at myself that I didn't back up the last few years of pictures - I'll check my online photo accounts and hope for the best, but I am not great at uploading the photos from my comp to, well, anywhere.  You would've thought I learned my lesson 3 years ago when our desktop gave up and I almost lost all my Lil' A photos but nnoooo... I had to be lazy/impatient and have now lost Lil' A's first day of kinder photos, last day of preschool and more.  I'm getting mad at myself all over again...

I asked to borrow my parent's computer for a few days to get some work done, Christmas Cards ordered (BAM!  Done!), KPS Shop emails responded to and so much more...  I kinda felt like I did when I used to ask to borrow the car as a teenager.
I will be back.  I'm hoping to be back before Christmas because I have a ton of great DIY Holiday ideas/projects that I've been working on and really want to share.  You can always follow me on Instagram at KutzPaperScissors - I typically post photos of whatever I'm working on there because it's so easy!

Also, the last KPS Boutique is next Saturday - the Penelope Lane Holiday Boutique - you really don't want to miss it!  I've made a pledge to shop small business/handmade this holiday season - I don't think Target or Amazon will be affected too much with this, but I know that the business's I order from will be affected in a positive way!

 
Yes, did you notice I said LAST?  I've made some hard decisions about the future of KPS, but this isn't the post to talk about that...
 
Recap:
I'm still here and I'll be back super soon.
I'm a crazy person that never learns her lessons.  Back UP, BACK UP, BACK UP!!!
Visit me at the Penelope Lane Boutique - do some Christmas Shopping, say "Hey" to me and get a goodie if you mention the blog!
Have a wonderful Thanksgiving!
 
Hope your weekend is great!
Andrea

Wednesday, October 23, 2013

Lil' A as Sorcerer Mickey

Hello!  Good Morning!

Today I wanted to share a very easy, very quick Halloween costume that you can easily duplicate for your little Mouseketter!

Lil' As school doesn't allow Halloween costumes on Halloween - hey, that's cool - instead, they had Disney Day!

Which floats my boat...

Since we're HUGE Disney fans, I loved this idea as did Lil' A.  The only negative was that I got a phone call/message from the Principal on Sunday night saying Disney Day was going to be the following Wednesday!  What?!  Somehow, even though we love Disney, we don't have many Lil' A sized Disney dress-ups... we could've sent him to school in a Disney Hat and t-shirt, but seriously, would I ever do something that easy?  No way.

I called/texted friends and family that I thought might have a costume for us to borrow... we were in luck because Lil' A ended up with 2 full blown dress-up options... either Tigger or Buzz Lightyear.  We also had Mickey Hands and the Mickey Sorcerer Hat but no robe.  Can you guess which one he choose?  Do you think he choose one of the ready to go, didn't have to do anything besides put it on, costumes?  Nnnooooo.  That would be too easy.

He choose Sorcerer Mickey.  And since we don't do anything half-way around here (silly Big A actually said "Just send him in regular clothes and the hat/hands" - it's like he doesn't know me at all) - I bought red velvet and made him a robe so his look would be complete.

I used the Beach Robe Pattern from MADE...

and turned it into...


I had to make a few changes - the Beach Robe pattern is made to be short with short sleeves so I had to lengthen everything.  I measured Adam from his shoulders to his ankles (I originally went to the floor but then thought - Playground.  Boy.  5 Yr. Old.  School.  Bad Idea) and added some length to the pattern.  I also added length to the arms and made them wider at the opening so they'd hang a little more like Mickey's.


I was taking the easy way out, so I only hemmed the sleeves and the neckline.  I used an iron-on hem tape and then sewed the hems.  Nice, quick and easy.


And, just like magic, Sorcerer Mickey appeared!  Can you even tell which is the real Mickey?


The robe took  me under an hour to make, including cutting and hemming.  And he was so cute!  I bought 2 yards of the velvet from Joann's using a coupon so it was under $5!  I wish I would have put a hook and eye at the top and middle of the robe, it would've been easier for Lil' A to keep on - next time, next time!

Have a great day!  Hope it's full of magic!
Andrea

Tuesday, October 22, 2013

Will A Card Make it Better?

Or do you want roses?  Cookies?  I've been neglecting our relationship... I know.  You're not surprised, are you?  So lets start fresh... until I get overwhelmed around Christmas time and neglect you again!

Good Morning!

Thanks for visiting today!

Let's do a quick catch-up, shall we?

Penelope Lane Boutique was A-MAZ-ING!  So many excited, fun, sweet shoppers, getting to see my girl, Crystal, From The Lil' Cupcake, purchasing a tee pee for Lil' A from Bubba's Basics and stopping on the way home at Cheesecake Factory with a happy glow made brighter with the "Adam's Peanut Butter Cup Cheesecake".

I also had the California Utah Woman's Conference this past Saturday.  It was my first time and I loved walking around the HUGE boutique, seeing all of the amazing products from such a wide variety of vendors.  I was also fortunate to be next to 2 sweet and friendly vendors, which always makes the boutique more enjoyable.

There's been lots of life stuff in between each of these boutiques, lots of projects, a fun new garland, Disney Day and more, that I'll be sharing soon!

But today, I wanted to share a fun, Birthday card I made using a sketch from the Silhouette Blog and my Silhouette Cameo.


and here's the sketch...

 
You can find the entire post here.
 
But let's break down the card I made.  I completely formatted my card with my Silhouette Studio program, which makes it easy for me to know that all of my elements will fit exactly where and how I want them!
 
 
I wanted the card to have a lot of dimension, so I embossed my matted piece of blue card stock before adhering it to my bass.  Instead of using plain squares, I grabbed some of my birthday "Polaroid" files.  I didn't want my Polaroids to be blank, so I formatted hearts and clouds to fit in each.


I used a postage file for my banner and ticket.  I turned my files into print and cut files, printed the celebrate, happy birthday and candle before I cut them with my Cameo.  I couldn't leave well enough alone, so I added some dimension with crystal lacquer and sparkle with my glittery Stickles.  Every piece is popped up with foam double sided adhesive.


I saved this card for future projects - it would sure be easy to turn it into a holiday card, wedding card, anything really...

So I hope we've made up, I'm going to do my best to post regularly, but this is the crazy time of the year and I can't make any promises... because we all know I'll probably break them!

Have a great day!
Andrea

Tuesday, October 1, 2013

KPS FALL SALE!!!

KPS SALE!!!  Everything in the shop is ON SALE!  And not a little sale, at least 25% off... some more!  Help me make room for new products!  Visit the shop at www.kutzpaperscissors.etsy.com - let me know if you have any questions!
Have a great day!
Andrea
KPS