I hope you all had a wonderful weekend!
We were busy trying to finish up Lil' A's Big Boy Room (he's almost 6 - gasp)! We've been working on it for the past few weeks... it sure is taking longer than I originally anticipated but it's totally worth it - its better than I'd pictured it in my head! And, of course, Lil' A is pretty proud of it! I'm hoping to get it all done in the next day or two so I can share it and a few tutorials at the end of the week... cross your fingers!
Anyways - today I wanted to share a card that I made for the Lifestyle Crafts/WeR CHA booth using their new dies, new letterpress plates and a few other fun products!

This card is 4.25"x5.5", basically a letter sized paper cut in half. I LOVE layering with cards, so I started off by making 2 mats in the same white paper, but decreasing their size by about 1/8" each, I then used the WeR Sweet Heart Tool - the Heart Attack Destresser to give my edges a nice, worn look.
To give my plain, white cardstock a little extra pizazz, I used my letterpress to dry emboss. I used the Dots and Stripes* printing plate, which is NEW and super cool because they're actually double plates - which means you can turn the plate over and print again in a different color and you'll have double the pattern! Look for a tutorial on that soon! I love the extra effect with minimal effort this technique gives!
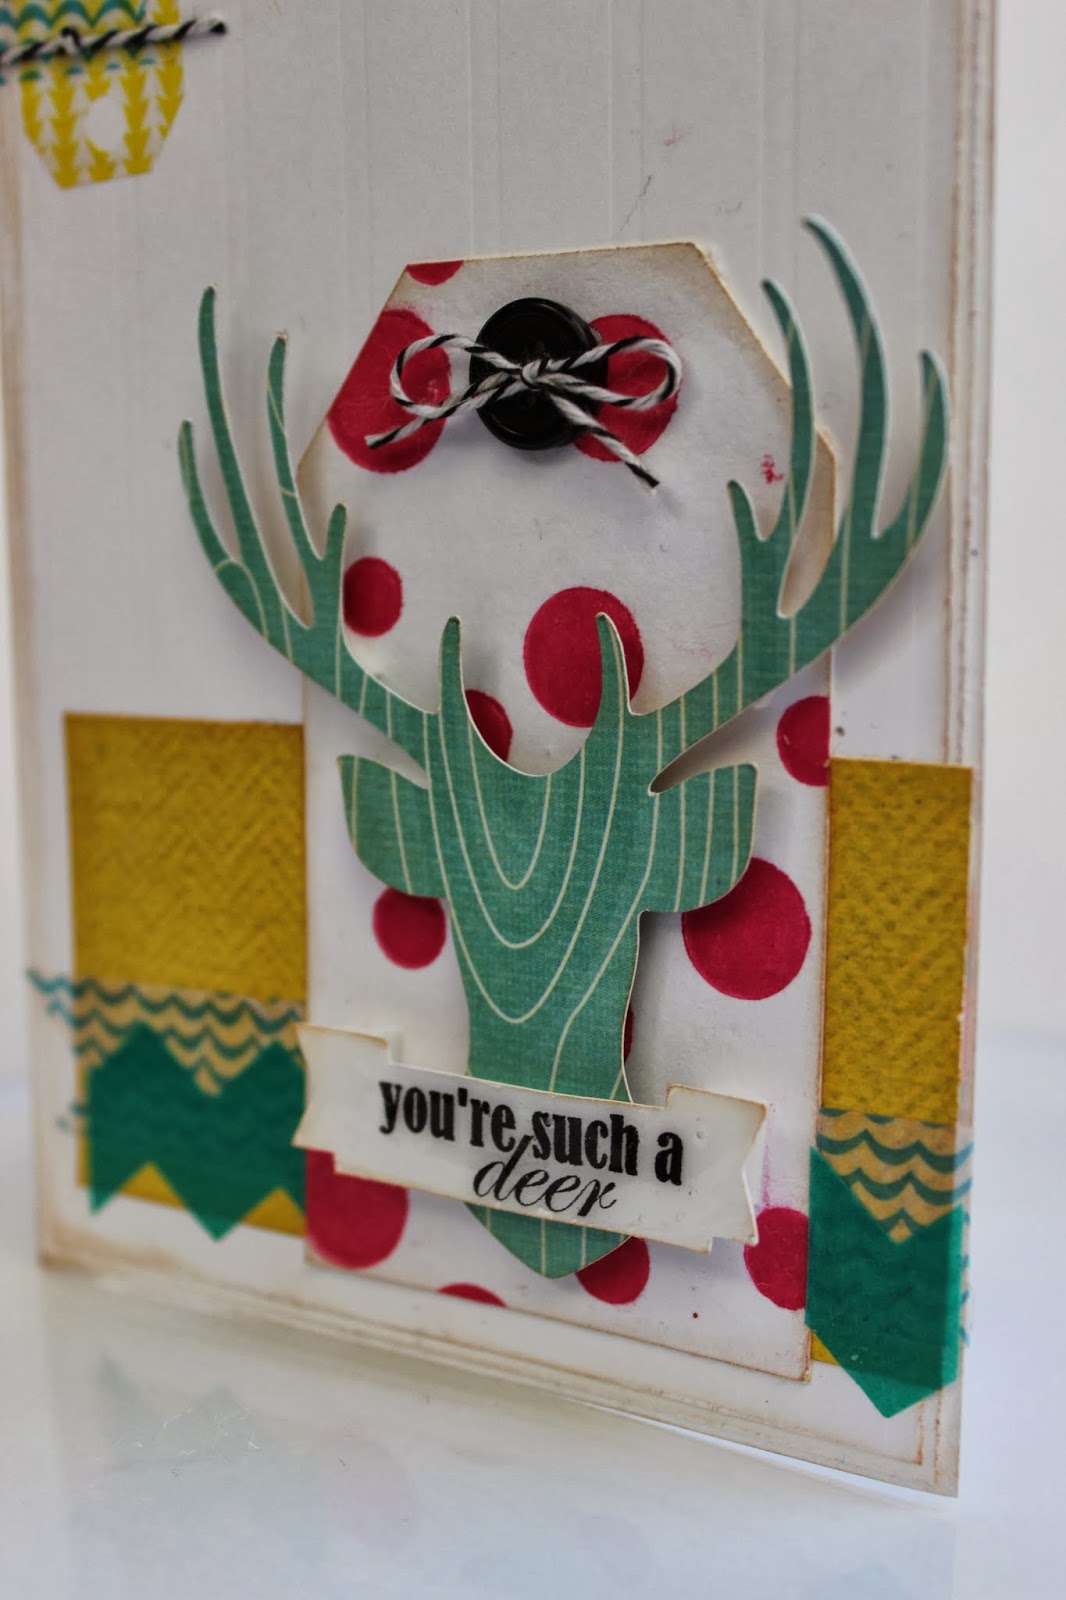
Next, I started layering my card - super easy. I used the WeR Country Livin paper in Flower Field for the mustard yellow rectangle that I glued down to the bottom of my card. I then added a piece of the ChevronWashi Tape in Emerald at the bottom of my mustard yellow rectangle and a die cut flag of the Shape N' Tape over both the Chevron Washi Tape and the yellow rectangle.
Next, I grabbed my Letterpress, my Dots Printing Plate* and the Hot Pink Ink and ran my plain, white cardstock through - BAM! Hot Pink Dots! LOVE it! I then used my Nesting Tag Die and cut a tag shape from my embossed, pink dot cardstock. I inked the edges of my tag with the Sweet Heart Inker in Brown.
I used my Deer Silhouette* Die Cut and the WeR Happy Campers paper in Flannel Shirt for my Deer- I love the teal wood grain pattern - and popped it up with dimensional tape on the tag. I die cut a banner from the Flags Dies* and then printed my saying on it, popping it up over my deer silhouette with dimensional tape.

Glue a bow made from the WeR Floss on a button and adhere them to the top of your tag. I also used some more Shape N' Tape that I die cut with both my Nesting Tags and Flags Dies at the top, left corner of the card with a little piece of floss... It doesn't take a lot of time, but it sure does add a lot!

And that's it! I really enjoy using the Shape N' Tape with my dies - it made it so quick and easy to put this card together. The Letterpress is another great tool to add a lot of dimension - I've started keeping mine out so I can just grab a plate, the ink and print away. Of course, I love the deer, but I'm pretty sure I've made that obvious!
* This product is NEW and not available on the WeR site now but will be in the Spring.
If you decide to purchase any of the supplies used, please click on the link and when you check out, use promo code kutzpaper to receive 20% off your order!
.jpg)
I hope you have a great day!
Andrea
Some products used were provided to me by WeR and Lifestyle Crafts as a member of the Studio Design Team but all opinions and creations are 100% mine.
No comments:
Post a Comment