Friday, May 31, 2013

Zuc'n It Up - Someone's Grandma's Zucchini Bread Recipe

Good Morning!

I'm back to share ANOTHER zucchini recipe!  Yay!  What, you don't have zucchini filling up every nook and cranny in your house?  You haven't put a face on a zucchini and given it your child as  "Zuci", his new friend?  You're now leaving before I divulge any more of my crazy?  Wait!... at least until you check out this Zucchini Bread Recipe!

(Photo and Original Recipe Courtesy of K&K Test Kitchen via Pinterest)
 
Grandma's Zucchini BreadFrom Grandma Betty

1 cup sugar
½ cup oil
2 eggs
1 tsp grated lemon peel
(1 tsp orange extract) or juice from ½ orange
1 ½ cup flour (I used bread flour and the bread was extra fluffy!)
½ tsp salt
½ tsp baking soda
¼ tsp nutmeg
2 tsp baking powder
¼ tsp ginger
¼ tsp cinnamon
½ cup pecans, chopped
1 ½ cup grated unpeeled zucchini
Preheat oven to 375°
Beat sugar, oil, egg, lemon peel, and orange extract until well blended. Add sifted dry ingredients and zucchini alternately and mix well. Stir in nuts. Pour into a greased loaf pan. Bake for 55 minutes.
 
--------------------------------------------------------------------------------------------------------------------------
 
So, I made a few changes based on the ingredients that I had on hand.
 
I used juice from our tangelos - they're delicious and super sweet!  I juiced 2 tangelos and figured that was pretty close to juice from 1/2 orange.
 
I also used the zest from the tangelos... I did have a lemon, but thought the orange coloring and flavor would be super yummy.
 
I chopped 1/2 C walnuts and instead of mixing them into the batter, I sprinkled them on top before baking.
 
I made muffins instead of a loaf, it's easier for a quick morning grab while running out the door to work/school.  I baked the muffins in greased muffin tins for 20 min.  I probably would've cut the time down to 18 min, the muffins weren't burnt, but I think they may have been a little over cooked...
 
I also sandwiched the shredded zucchini between a few paper towels and then squeezed the extra moisture out.  After I got as much liquid out as I could, I sprinkled salt on the zucchini and let it hang out until I needed it, the salt helps to get more liquid out.
 
That's it!  A super yummy zucchini bread/muffin recipe!  The recipe made 16 muffins, I gave a few to my Dad and my Mother-in-law, but we took the rest down in no time!
 
Have a great day!  See you Saturday with ANOTHER zucchini recipe... this time involving chocolate!
Andrea


Friday, May 17, 2013

Wecome Hank! But Don't Forget Stella!

Hello!

Thanks for stopping by!

Do you remember the Nautical quilt that I shared a while back?  I'd made it for our good friends who were expecting a fun little bundle of joy this spring...


This was for our new buddy, Hank who arrived in April and is so sweet, cute and l-o-n-g!  Hank is the lucky little brother to Stella, who is one of the cutest and kindest little girls... I'm sure that they'll take good care of each other from now on! 

We visited Hank a few days after he was born and back at home... we took some baby items for Hank , food/dessert to the Newly Newborn Again Parents and a gift for the new Big Sis'.  I know it's often hard for little ones to be left out when a new sibling arrived, I wanted Stella to feel like she was part of the process, so Lil' A and I went to Target, picked out a Boy Baby Doll and I decided to make a Mei Tai Style Baby Carrier for Stella's new little boy baby doll so she could be just like mommy.


I looked on Pinterest (shocker, I know) for a good tutorial and found this...

 (photo courtesy of The Shopping Mama via Pinterest)
 
This was a great tutorial, super easy to follow along with the head rest pattern that you could print out on your own. You can click on the link above to visit the tutorial and get your printable head piece and make your own...
 
The fabric I used is Summer Song by Riley Blake.  I choose a flannel because I thought it would feel best on Stella's skin - I know it's a little warmer, but I figured she's wear it more if it was comfortable and didn't irritate her.
 
 
Each side of the baby carrier has a different pattern so it's reversible - a girl's gotta have options!
 
 
I like the striped side the best, but the flowers and birds are perfect for sweet little girls.
 
Here's some close up photos of the details that add so much to this baby doll carrier...


This sewing project was super fast and easy and turned out so cute!  It looks exactly like the Mei Tai that I carried Adam around it when he was little... I loved baby carrying - having him so close that I could kiss the top of his head all the time. 
 
 
So that's it!  If you know a little girl that would like something like this, I cannot recommend this pattern/tutorial enough!  It's a beginner level sewing project with great photos and instructions!
 
Have a great day!
Andrea


Wednesday, May 15, 2013

Kutz. Paper. Scissors... Shop Update

Good Morning...

I hope all of the Mom's out there had a great Mother's Day!  Mine was filled with Adam snot and coughs - not exactly what we'd had planned for Mother's Day weekend, but my boy's still made it special and relaxing... Big A made steak, artichokes, cheddar dill mac salad and got a HUGE chocolate cake from Costco... all of my favorite stuff!  We also got up the dough boy pool... since it's been in the 90's-100's for the past few days, I think we got it up just in time!

I've been thinking a lot about the Kutz. Paper. Scissors Shop... I've been weighing the pros and con's, time situation, my families needs and my stress level.  I've been behind on orders since the beginning of the year, I've had mad customers and late orders - this is not the way I want to run my business, I don't feel proud of my business etiquette and every time that I receive a nasty email (warranted or not) it chips away at the joy that I used to feel with KPS.


I've been grumpy, tired, stressed, unorganized as stacks and stacks of laundry piled up, the house became dirtier and dirtier, we ate more cheap fast food dinners and I became a "Mean Mommy" every day, losing my patience with Lil' A and Big A, everyone that I care about.  I wasn't spending time with Adam, sure, we'd be in the same room but I'd distractedly listen/answer him and anytime that I had to stop working to make his lunch, wipe his bottom or unlock the door so he could go out would make me frustrated and I'd sigh with so much drama, it would be embarrassing for anyone else to hear.  I started to become resentful of my husband, that I was working late into the night while being responsible for running our home/life, which wasn't fair to him, he's never put any sort of expectations on me.  I'd be crying every day from stress/exhaustion and unhappiness... so one day, Big A said "Then stop."

Which was all I needed to hear.

I haven't stopped, my shop is still open for business, but I have decided to change a few things for now.  I am only putting in inventory that I have on hand, I am not taking any custom orders and I am only adding to the shop when I feel like I can.  I have also committed to shipping within 1-2 days and I am not taking my laptop on anymore vacations!  Last week my amazing Mom came over and helped me photograph all of my inventory, I then spent 3 days editing those said photos and I've been adding them into the shop daily.  I took stock of what I have and have been updating my inventory so I can avoid having to run around, find necessary fabric, cut and sew into the night.  It feels good to feel like I'm getting things under control again.  Really really good.  Big A and I will evaluate KPS again after Adam starts Kindergarten in the late summer - maybe I'll start taking custom orders again, maybe I'll stay the way I am or maybe I close down the shop... who knows.

I only get one chance to be a good Mommy and Wife - I have to chant this to myself daily when I get a request for a custom order.  I'm hoping to focus more on the blog, putting helpful info out there, tutorials, recipes, crafts, DIY - all of the things that I LOVE and want to share.

Here's some of the items that I just added to Kutz. Paper. Scissors...

NEW and ON SALE Burlap Table Runners...

Antique Typewriter Alphabet Burlap Runner
 
Zebra Animal Print Burlap Runner
 
Some NEW Chevron Pillow Covers...
 
Coral and White Chevron Pillow Cover
 
Khaki and Cream Chevron Pillow Cover
 
Denim and Cream Chevron Pillow Cover
 
 
And some NEW Pillow Covers in fun prints and colors...


Yellow Embrace Pillow Cover
 
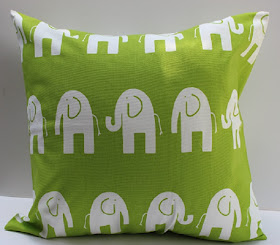
Elephants in Green Pillow Cover
 
Ikat in Java and Silver Pillow Cover
 
There's a ton more, most of these covers I have in a variety of colors.  If you're interested, please check out Kutz. Paper. Scissors.
 
A lot of gut spilling went on here today... sorry if it wasn't what was expected or desired, but I felt like an explanation was required for the KPS changes.
 
Hope you have a great day!
Andrea


Saturday, May 11, 2013

The Best Grandma... Mother's Day Gifts

Hello!

Tomorrow is Mother's Day, a day to thank the women in your life who have helped shape you, watched you grow, given you invaluable advice, hugged and kissed everything from a boo boo to a broken heart...  Let's just throw it out there, Mom's are pretty freak'n awesome! 

We're super lucky to have so many amazing women in our life, Adam's surrounded by 2 fantastic, giving, caring, dependable and fun Grandma's along with 2 Great Grandma's who tease him, play with him, give him hugs and kisses and make him feel loved.  We couldn't ask for better Grandma's, and while we love and appreciate them every day, we wanted to do something special for each of them from Adam!

Thank goodness for the Terrific Trio over at Eighteen25!  You may remember this fantastic Father's Day Book that Adam and I made using their printables...  and this year they made a similar book for Mom's and Grandma's! 

{Photo and Printable courtesy of Eighteen25}
 
So, Adam and I gathers our supplies, printed off enough pages for all 4 grandma's and went to work!
 
 
Since Adam is 5, we've been doing the writing over a few days... I'm sure it's no surprise that a 5 year olds attention span is pretty non-existent!  I grabbed the filled out pages, a paper trimmer, glue dots, a 4x6" photo album (found at Joann's for $1.99) and Washi Tape.
 
 
I trimmed all of the pages down to 4x6".  Adam then put glue dots in the 4 corners of the front page.
 
 
We then laid it on top of the cover, centered.  It was pretty good and stuck, so if you don't like where it's at... well... too bad.
 
 
I cut strips of the washi tape and Adam put them all around the edges.  I trimmed off the excess.
 
 
We then slid the pages into the protective sleeves.
 
 
We're going to add photos of Adam with each of the grandma's in each book, wrap them up and viola!  A fun, thoughtful gift from Adam to all of his amazing grandmas!  I think/hope they'll all like them, at least we know it won't be a duplicate of something we've given them before!
 
Visit Eighteen25 to make your own book!
 
Have a great day and to all the Mother's out there - thank you so much!
Andrea (and Adam)

Thursday, May 9, 2013

Teacher Appreciation Gift Idea's!

Good Morning!

Is anyone else out there scrambling?  Teacher appreciation week is this week while Mother's Day is Sunday... and if you're a DIY-er or Handmade-er, you've probably got a stack of supplies in your office/dining room/kitchen waiting to be manipulated into the perfect gift... just like me!

So, with only today and tomorrow to get the Teacher Appreciation Gifts together, here's what Adam and I did.  I pulled up Pinterest, searched for Teacher Appreciation Gifts and, after selecting a few that I liked for each of Adam's Teachers, I had Adam pick the final gifts.  I think he did a pretty good job!

Ms. Michelle is his Teacher Assistant and she's WONDERFUL!  She's super nice, caring, funny and friendly - she genuinely cares about all the kids in her classes.  She's also a young Mom who is super cute and stylish, so Adam picked out this gift idea...

(Photo and Printable courtesy of ShesKindaCrazy via Pinterest)
 
You can find the printable "File" tags here.  So, Adam and I went to Target and picked out the following:

Fun Nail Polish - 2 different colors

A fun nail file


 I used washi tape to tape 1 of the polishes to the file and added the "File" tag.  Then we put the other polish along with the make up bag and a Bow Clutch in a kraft gift bag and added 3 rows of the same washi tape to tie it all together.  It turned out pretty cute and totally fit Ms. Michelle's personality!

Adams Preschool Teacher, Mrs. Dierking is AMAZING.  I cannot express how good it feels to leave my child in her care.  She's patient, engaging, fun, kind, compassionate, creative and I truly believe that she loves my little boy.  She's a gardener so the gift that Adam picked out is perfect!

(Photo and Printables courtesy of SkpToMyLou via Pinterest)
 
You can find the printable here...  so, we made a stop in the Garden Dept. of Target and came out with the following...
 

A pretty outdoor gardening bag by Threshold
 
Some gardening tools (we actually got the Bulb Planter but I couldn't find a pic of it) and a box of flower bulbs.  We packaged everything in the outdoor bag and tied the "Bloom" tag to the bag.
 
We really love Adam's Preschool, Teachers, Staff and couldn't think of a better fit for him or us!  It's been a wonderful experience and it's going to be super hard next year not seeing everyone at that school, but we've excited for Kindergarten!
 
Have a great day!
Andrea
 

Thursday, May 2, 2013

Food Week!!! Fruit Salsa

Good Morning!

Thanks for stopping by today!

I shared my Mom's Bunuelo Recipe yesterday and mentioned that a little fruit salsa would be nice on the side... which was mean if I wasn't going to post the actual recipe to it! 

(Photo courtesy of Thread Addict via Pinterest)
 
Now, you can find a TON of recipes on the Internet, the one that I'm sharing is super simple without a lot of added sugar... which is important when you're having desert with a 5 year old who needs to go to bed at a decent time that night!
 
Fruit Salsa
 
2 lbs Fresh Strawberries (ripe or a little over ripe is perfect!)
2 Tbsp Strawberry Jam
1 Tbsp Struvia (I used a sugar substitute but you can use real sugar if you'd prefer)
 
Rinse and pat dry strawberries.
 
Remove stems of berries.
 
Dice berries and place in bowl.
 
Add your jam and sugar and mix well.
 
That's it!  So easy!  A lot of recipes use more fruit, but my family likes just the strawberries.
 
Here's the recipe for Baked Cinnamon Sugar Chips just in case you don't feel like making Buneulos.
 
Baked Cinnamon Sugar Chips
 
8-10 Flour Tortillas
2 Tbsp Butter (melted)
1/2 C Sugar
1/4 C  Cinnamon
 
Heat your oven to 350 Degrees
 
Line 2-3 baking sheets with aluminum foil.
 
Combine your sugar and cinnamon in a small bowl or shaker.
 
Lay your tortillas out and brush with melted butter (I use a pastry brush you can use a spoon, whatever you have).  Cut into triangles or strips.  Lay on baking sheet and sprinkle with the cinnamon sugar mixture.  Brush another layer of butter on top.
 
Cook for 8-10 minutes, until your tortillas are nice and crispy. 
 
So good!  And not too bad for you... well, as far as deserts go anyways! 
Have a great day!
Andrea


Wednesday, May 1, 2013

Food Week!!! Buneulos

Good Morning!

Thanks for stopping by!

Today I wanted to share a recipe that reminds me of a treat my Mom would make us when we were little...

I have some good food memories from my youth that are centered around my Mom; my mom letting me lick cake batter off the beaters, roasting pumpkin seeds, and tortillas covered with just about EVERYTHING.  A warm tortilla covered in butter is considered comfort food for me!  But, for a special treat, my Mom would warm up a tortilla, slather it with butter and then sprinkle a mixture of cinnamon and sugar all over it, roll it up and hand it over.  Yum.  Here's a twist...


Buneulos
Recipe courtesy of Loida Yokley (my Mom)

3 1/2 C flour
1 teaspoon baking powder
1 teaspoon salt
2 Tablespoons Ground cinnamon
1/4 C granulated sugar
1/4 butter or margarine
2 eggs
1/2 C milk

Oil for deep frying

Sift flour, baking powder, salt, cinnamon and sugar in a large bowl. Cut margarine into flour until mixture is crumbly.

In a separate bowl beat eggs and milk together then pour into flour mixture and stir until dough clings together when pressed.

Knead dough on floured board or counter about 2 minutes. Form into 1 1/2" balls and let set for 15 minutes.

With rolling pin, roll each ball over floured surface to a very thin patty and desired diameter. Like a tortilla.

Place each bunelo on wax paper, layering them until ready to use.

Deep fry about 30 seconds on each side in oil or until fluffy; blistered and golden brown. 


Drain on paper towels. Sprinkle with sugar cinnamon mixture

Sugar-cinnamon mixture: 1 C granulated sugar; 1 teaspoon cinnamon; mix and gently sprinkle over bunuelos just after you get them out of the oil

Makes about 5-6 dozen


Cinco de Mayo is just around the corner, which we pretty much use as an occasion to eat yummy Mexican food (I think we celebrate Cinco de Mayo at least 3 times a week)!  We're going over to my parents for delicious food, and I think my Mom and I are going to make up a batch of these sweet treats!

These would taste pretty yummy with some Fruit Salsa on top...

Have a great day!
Andrea