Photobucket Photobucket Photobucket Photobucket Photobucket Photobucket

Monday, June 10, 2013

Fashion Week... Lil' A Style

Good Morning!

Confession:  I'm not an amazing sewer.  There, I said it.  It's true.  I can figure some things out, I love a good tutorial with lots or photos to help me along my way, I cannot read a pattern to save my life, I always have to call my Mom for sewing questions.  But I LOVE it!  I LOVE being able to make something that I saw in a store or that I've coveted from a magazine... I've tried my hand at a tank dress and 2 skirts for me, and while they ended up okay (and I wear them because fabric=$$), they were far from perfect and each time I ended up frustrated that they didn't look how I had envisioned them once they were on.  But my favorite person to sew for is Lil' A!  I LOVE making him clothing that I KNOW he'll love for various reasons... so this week we're doing a Lil' A Fashion Show! 


I used BOTH the Muscle Tee and Basic Shorts pattern from MADE... Dana has done an amazing job of creating patterns that are functional and easy to use.  I believe the pattern is made for a size 2T/3T so I just increased the width of the pants on either side by about 1".  Since my guy is on the skinny side (so did not get that from my side of the family), this worked well and I have it labeled as a 4T/5T...


I love bright colors on little people... especially for summer.  I think my kid totally pulled off this look, I used a simple knit fabric for the blue tank and a green knit for the neck and arm holes.  I didn't even finish the bottom for this shirt since I knew it was going to be a play shirt.  Since I did not use a ribbed knit for the neck/arm holes, Lil' A's giant head (so big because he has a big brain and is therefore, a genius - true story) I had to increase the neck size to 15" instead of 12" (I believe that's what the pattern calls for).  This was my first time working with knits so I'm still learning the lingo... just so you know, not all knits are created equal.  I prefer to work with a jersey knit, just your basic t-shirt fabric...


I dressed this shirt up a little.  I used some left over gray knit for the neck and arm holes, then added a pocket with a little trim at the top to give it some "POP"!  I used a small piece of green/blue stripped knit and made a sort of bias tape to go at the top of the pocket.  So simple but it added a lot.  I did finish the bottom of this shirt because I wanted it to be a shirt he could wear wherever. 

Confession: I had to use bathroom words to get that smile.  It went something like this...

"Adam, smile and look at the camera."  To which I got this photo...


So, I took it to the next level and said "Adam, what's your favorite word?  Is it Tutu fart head?  Or cuckoo loco head?  Or maybe Tutu Fart Toilet Head?"  That's when I got the smiling photo... and the rest of our shoot was easy...

His natural Blue Steel look...

 Our Catwalk Pose...  Yes, he did that all on his own.


Jersey Shore Fist Pumping... it's a natural transition from Catwalk.

And now we're at the gun show...

Yes, these guns are illegal in most states... 

The shorts are a stretch cotton twill.  I liked the fabric because it's a bottom weight, which means it's a little more heavy duty but I didn't like it because it had stretch, which at first I thought would be great and comfy but ended up a pain to work with.  I don't like it when my fabric moves, it's makes it harder for me to get a nice clean seam and hem.  I used the flat front pattern from MADE for Lil' A's shorts so that they'd look a little bit fancier... you know, for the gun show.  Fancy pants for the gun show.

See you tomorrow with MORE tough and rugged fancy pants!
Andrea

Friday, June 7, 2013

Zuc'n It Up... Zucchini Pizza Bites

Good Morning!
 
 
More zucchini!  Yay!  This recipe is super quick, super yummy and I felt so good giving it to Adam as a pre-game snack!
 
(photo courtesy of dolcemente via Pinterest)
 
I saw the photo above (on Pinterest, of course!) and figured... "I can do that!"  I never even looked at the site until I went to get the address so I could reference it, and I realized it's all in Italian!  But here's what I did...
 
Zucchini Pizza Bites
 
1 lg zucchini, rinsed and dried, cut into thick slices (about .5" thick)
Marinara Sauce
Mozzarella Cheese (shredded)
Parmesan Cheese (shredded)
Salt
Italian Seasoning
 
Grab your sliced zucchinis and spring salt on them, set aside for 10 min to remove excess liquid.
 
Turn on your broiler.  Line a baking sheet or broiler pan with foil, grease with EVOO or butter.
 
Grab a slice of zucchini and spoon a good amount of marinara sauce on top.  Make sure to cover the entire top of your zucchini.
 
Sprinkle some of your shredded mozzarella and Parmesan cheese on top... we're BIG cheese fans so we had that bad boy covered!
 
Sprinkle a little Italian seasoning on top, you decide how heavy you want it!
 
Repeat on all zucchini slices.
 
Place the zucchini slices on your greased broiler pan and place under broiler.  I watched mine, they took about 5 minutes to cook in my oven, but you should really watch it so that they don't burn! 
 
Remove from oven as soon as the cheese is bubbly and light brown... yum!  Eat as soon as you can bare to, they're super good while warm and you don't even think about the fact that you're eating a zucchini pizza!  I made these for my little A as a snack before his tball game and I think it gave him the extra umph he needed to play hard and stay concentrated!
 
Happy zucchini eating!
Have a great weekend!
Andrea 


Thursday, June 6, 2013

Teacher Gift - Movie Night!

Hello!

The school year has officially ended for us... we are going to miss everyone at Barton House Playschool... Lil' A's Teachers were amazing and caring, the Director and Staff were so supportive and loving... We cannot find enough nice words to say about the whole experience!

Adam and talked about what he wanted to give his teachers... some of his ideas were Lego's, a trip (such a nice idea but so not going to happen), maybe some movies or something?  BINGO!  I remembered seeing a printable on Tatertots and Jello a few weeks ago and that was all it took!


Adam and I went to the store and I let him pick out the candy... I did have to remind that not everyone likes chocolate so that we should mix it up and get some fruity candy as well... this was met with an incredulous look.  I know son, I don't understand it either.


Adam choose a KitKat Bar, Reese's PB Cup, Skittles and Starburst so we just bought two of each (he had two teachers this year).  We grabbed a gift card for a movie theater at the grocery store too!  Who doesn't like a one-stop shop?!


I then went to my Closet of Shame Supplies and pulled out popcorn boxes that we used last year at our Backyard Movie Nights... PERFECT!  I threw in some red shred, the candy and gift card then printed out the "THANKS FOR MAKING ME FEEL LIKE A STAR!" printable that you can find HERE!  Instead of using boring clear tape, I grabbed my black and white polka dot washi tape and taped it to the popcorn box on the corners - easy cheesy! 


I hope that each of his teachers is able to take a night out and enjoy!  Trust me, after having unending patience with my Lil' Energy Ball, they deserve it and so much more!

Thank you Barton House Playschool, Mrs. Dierking and Ms. Michelle!

Have a great day!
Andrea

Wednesday, June 5, 2013

Crayon Roll Tutorial #2

Good Morning!

Today I'm sharing ANOTHER Crayon Roll Tutorial... yes, another one!  This one is for anyone who is looking to use 3 different fabrics OR who doesn't have a large enough remnant scrap for the body in yesterdays tutorial!


Supplies:
Outside Body Piece (6"x13")
Inside Body Piece (6"x13")
Coordinating Pocket Piece (8"x13")
Coordinating Ribbon or Twine
Coordinating Thread
Sewing Machine
Pencil
Ruler (I prefer one with a clear grid)

STEP ONE:
Cut your two body pieces to be 6"x13".  Cut your coordinating pocket piece to measure 8"x13".

STEP TWO:
Fold your coordinating pocket piece in half length wise, wrong sides together.  Think of it as a hot dog bun...

STEP THREE:

Top Stitch along the top of the pocket, about 1/8" down from the fold.

STEP FOUR:
 Place your pocket piece on your inside body piece, lining up the edges and the bottom of the two pieces of fabric.

Find your center, about 6.5" from the outside edge, and draw a line.  Continue making lines, spacing them 1" apart.  You'll end up with 10 lines (ignore my 12... opps).  These lines will become your crayon pockets.

STEP FIVE:
Sew on your lines with the coordinating thread.  I wanted my lines to stand out, so I choose a matching bright pink, but you could use a thread that would blend more... it's all a matter or preference.  Remember to back stitch at the top of the pocket for reinforcement, don't worry about the bottom.

STEP SIX:
Grab your ribbon or twine (1 yd) and fold it in half.  Sew the folded end into your body piece at the edge, going back and forth to reinforce.

STEP SEVEN:


Lay your outside body piece on top of your inside body piece and pocket, you'll have a nice little sandwhich now -
bottom: Inside body piece right side up
middle: Pocket piece right side up
middle: Ribbon
top: Outside body piece, right side down.

STEP EIGHT:
Top stitch around the edge of your fabric sandwich... remember to leave an opening so that you can pull this right side out!!

STEP NINE:
Trim the corners - this helps avoid bulk and gives your crayon roll a nice shape.  You can also take pinking scissors and cut around the edges to lessen the bulk...

STEP TEN:
Pull the crayon holder right side out through the opening.  Using a chopstick (or something pointy), stick your corners out so you have a nice shape.  Iron the creases and all over so that it lays nicely, iron the opening with the edges folded in so that you can sew it closed and keep it looking nice.
 
STEP ELEVEN:
 
Top stitch all around the crayon roll (I stitched about 1/8" from the edge).  Make sure that you catch both sides of the opening so that its closed nicely. 
 
Viola!  A fun, playful crayon roll using scraps! 
 
That's it for crayon rolls!  phew!  You could also take the same steps/tutorial and create a make up brush holder, paint brushes holder, scrapbook tool holder... so many options!
 
Have a great day!  See you Friday for Zuc'n It Up!  Zucchini Recipes!
Andrea
Tuesday, June 4, 2013

Crayon Roll Tutorial

Good Morning!

Yesterday I shared some Crayon Rolls that I made for the kiddo's in Adam's class as an End of the Year gift... and today I'm sharing 1 tutorial with another one coming tomorrow!


Supplies:

Main Fabric (12"x13")

Coordinating Fabric (8"x13")

Coordinating Ribbon (1 yd.)

Coordinating Thread

Scissors

Ruler (I like using one with a grid)

Pencil or Marker

Chopstick or something to push out corners

Sewing Machine (We're only using a simple straight stitch, nothing fancy)

Step ONE:

Cut your main fabric to be 12" x 13".
Cut your coordinating fabric to be 8" x 13". 

Step TWO:

Fold your main piece in half right sides together, you want to end up with a long rectangle measuring 6"x13" (think of it as a hot dog bun).  Iron the fold.

Fold your coordinating piece in half, wrong sides together.  You end piece will be 4" x 13" (think of it as a hot dog bun).  Iron the fold.

Step THREE:


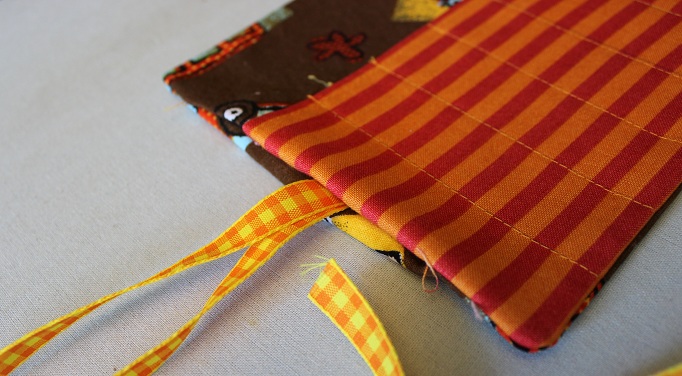
Sew a border with coordinating thread at the top of the pocket, where the fold (about a 1/8" border).  This will finish your crayon holding pocket nicely. (I forgot to take a photo of this, so we're substituting with a different pocket!  Just ignore the pattern and stick with the directions.)

Step FOUR:

Place your pocket piece at the BOTTOM of your main piece.  You'll want the bottom edge of your pocket to be even with the bottom edge of your main piece.

Step FIVE:

Find the center of your pocket by measuring in 6.5".  Make your first line from the top of your pocket to the bottom.  Continue making lines every 1" on either side of your center line.  You'll have 10 lines total (please ignore pattern, I forgot to photograph this step!).

Step SIX:

Sew on each of the lines, thus creating the pockets for your crayons!  Remember to back stitch on the top of the pocket, don't worry about the bottom (to save time, don't stop and cut at each line, once you reach the bottom, just pull your thread gently enough to give you enough room to start sewing on the next line.  This will save you time and tread!)  Trim your threads.

Step SEVEN:

Grab your ribbon and fold it in half.  Put the folded end on one side of your fabric.  Sew your ribbon onto your crayon pocket piece, going back and forth a few times.

Step EIGHT:

Fold your main fabric in half (remember ironing the fold earlier?).  Now you've created a sandwich with the main fabric on the bottom, the coordinating pocket piece in the middle, ribbon and the main fabric on top.  Your main fabric will be right sides together.

Step NINE:


Using a 1/4 Seam allowance, sew along both sides and the bottom of your fabric, leaving an opening on one of the sides so you can put this right-side out.  Remember to back stitch where you start and stop!  Trim corners.

Step TEN:


Pull your fabric back through the hole so that it is now right side out.  Using your chopstick (or whatever pointy but non-damaging tool you have), push your corners out.  IRON!  Iron the edges/seams and the opening.  You'll want to make sure and iron the folds at your opening so when you sew it shut, it'll look nice and clean.

Step ELEVEN:

Top stitch with coordinating thread all around the edge of your crayon roll.  This will help your crayon roll keep its shape as well as closing the opening.  I top stitched around 1/8" from the edge all around.

Fill with crayons and viola!  A great traveling case for your purse, diaper bag, car caddy, wherever!
--------------------------------------------------------------------------------------------------------------------------
TIP!!!

When you're sewing your pieces together, leave the opening for the pull thru on the opposite side of where you sewed your ribbons onto.  This way, when you're ready to pull it right-side out, you can grab the ribbons and pull it out easily.

 Keep pulling your ribbons until it's completely right side out!  Now you can poke our your corners and top stitch like normal. 
--------------------------------------------------------------------------------------------------------------------------

This is my easy-cheesy tutorial.  I'll be back tomorrow to share a slightly different tutorial with a few more steps, but it would give you the option of using 3 different fabrics or using more scraps (if you don't have a large scrap piece like the one needed for this tutorial).

See you tomorrow!
Andrea

Monday, June 3, 2013

End of School Year Gifts - Crayon Rolls

Hello!

Were you expecting more zucchini?  Well, I don't want to disappoint all you squash lovers out there so Zuc'n It Up will be back at the end of this week! 

It's almost the end of school here... summer is ringing the doorbell at our house and with only a few days left 'till we let it in,  I wanted to share a project that I made for all the kids in Adam's class.


I've had this idea for a while now... I've been wanting to make a crayon roll for Adam (not that I'm tired of having a billion crayons roaming freely in my purse...) and figured with all the traveling done in the summer, a crayon roll might be a great parting gift to all the kids (and parents) in Adam's class!


We've gotten to know most of the kids in the Yellow Class for the past 2 years, each child is so sweet, special and smart, we couldn't leave without giving them a little something to let them know that we'll be thinking of them all summer long!


A bonus to this project is that I was able to use fabric from my "Scrap" bin... so there's a few different patterns in the mix... the one above is a fun cars fabric that Adam picked for pajama pants (you'll see those soon!).


A slightly different take (a tutorial on this one tomorrow)...


I only had enough of the above fabric for 1 crayon roll but it's one of my favorites...


One of the crayon rolls for the girls... I LOVE the teal blue and bright pink...


And the Lobster print... this is scrap fabric from a custom order robe that turned out super cute!  Not sure if I like the gray chevron/pink dot side or the lobster side the best...

I made 8 girl crayon rolls and 5 boy crayon rolls... they took the majority of the day, but I think they turned out super cute!  I used my Silhouette Cameo to create the tag - I simply used the print option as well as the cut option. 


Adam signed his name on the back of each tag... see, I didn't do all the work!


That's it!  An easy, scrap using, beginner sewer, cute gift!  You could make these with a chalkboard fabric on the outside and put chalk in the pockets... these would be GREAT birthday gifts with a coloring book...

Check back tomorrow for a tutorial to sew your own!
Andrea