Friday, July 29, 2011

Please welcome Janee from Yellow Bird, Yellow Beard!

Hello Kutz, Paper, Scissors Readers!

Janee Lookerse from Yellow Bird, Yellow Beard here. Andrea invited me over today to share a special post with you, her wonderful readers :) So I put together a little collage of some of my favorite handmade and or vintage items with splashes of yellow. All of these items were created by very talented artisans who sell their goods on Etsy.

{{{.1.2.3.4.5.6.7.8.}}}


A few notes about some of these items::: The ABC pillow was made by a dear friend of mine Gioia, who was born and raised in Italy {!!!} and now lives in Southern California with her husband. The customizable vintage book journals are totally awesome, and very similar to a line of vintage book journals I made in college 4 years ago. You can see my last remaining book journal here. The cuff bracelet was made by a new friend of mine Amy of Ponder and Stitch; she is super talented and makes all kinds of beautiful accessories.

So there you have it! I hope you enjoyed our little shopping trip! Please follow the links to visit the rest of the items in their shops. And have a fabulous day!

xoxo
Janee

Thursday, July 28, 2011

Are you "twining" away for a tutorial!?

Well, we're back today with the baker's twine God's Eye tutorial! You don't need a whole lot, just a piece of cardstock, a scallop circle punch (or die), tape or glue and bakers twine! That's it!


I use a 2 inch, scallop circle punch from Fiskars. You can use a scallop (Flower) die as well.


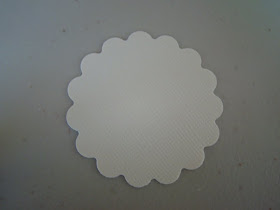
Punch out 1 scallop circle from your cardstock.


Ink the edges and cut about 2 yards of bakers twine for a 2 inch circle. You'll need more or less bakers twine depending on the size of your circle.


Tape 1 end of your baker's twine to the backside of your circle. I use Scotch Tape.


Start wrapping your twine in the "valleys" of each scallop. I typically skip 3-4 valleys before I wrap the twine into the next valley.


You'll continue this process, going from 1 valley to the next.


Make sure not to skip any, otherwise you'll get to the end and have to go back.


Do this on the whole circle. You'll know you're done when you start to overlap previous valleys.  The size of your twine circle will depend on how many valleys you skip - if you skip more, your twine circle will be larger; if you skip less, your twine circle will be smaller.


Here it is! Simple simple! You can add a smaller circle of patterned paper in the center or a button...


You can add some dimension by popping it up too.


See how easy this was? And you can do all different sizes - as long as you have a scalloped circle or scalloped square, you can get totally wrapped up in this project!

Hope you have fun giving this fun technique a try! See you all tomorrow!
Andrea

Tuesday, July 26, 2011

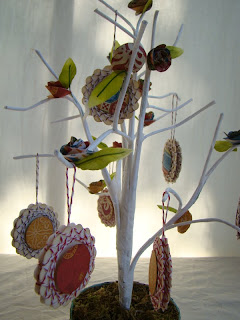
I'm growing a twine tree!

I wish it was a money tree, but I do like twine, so I'm cool with it.  The tree was from the $1 bin at Target.  I used WeR's Fiesta paper line for this Pages Design Team project - this centerpiece goes along with the table banner that I created - you can check it out here.

Yep.  That's baker's twine "God's Eye's" hanging from the tree. 

I also rolled flowers from WeR's Fiesta Line and glued them to the branches.
I then cut strips of paper and glued them around the base of tree - it was a green pot before and now it totally goes with my theme!  It was a little tedious, I slightly overlapped each strip, but I love the finished product!  I added the "ole" dimensional sticker with pop-up tape and a little more baker's twine.

And that's all wrapped up!

I'll be sharing a tutorial on how to create my God's Eye's later this week - if you want to see any of the posts on any of my Design Team projects, check out Page's blog:
http://www.pagesfromtheheart.blogspot.com/

Happy Monday!
Andrea

Monday, July 25, 2011

"New cup, new cup! Move down!"

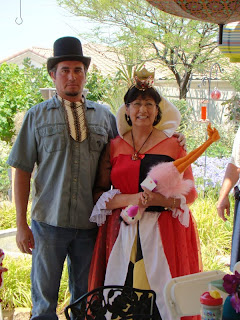
Our Mad Hatter's very merry un-birthday was a huge success!  I think the queen was very happy...

Queen Loida and Injun Robert

Of course, the queen's motto is "Let them eat cake!"  So we did!
Our Cheshire Cat lost his eyebrows, but he's still pretty darn cute!  We couldn't eat off normal plates, that would be ridiculous, so we used a little bit of Modge Podge and printed clocks onto vellum and adhered them to the bottom of clear plates.


We blew up 400 balloons for the occasion.  Yes.  4 . 0 . 0 .

We hung lanterns, all different sizes, colors and shapes.  We also hung a bunch of umbrella's, all different sizes and shapes.  We made tissue balls and hung those as well.  My mom had the great idea of hanging empty frames - we wanted the "sky" to look like the hole that Alice fell down into.  I love how this turned out, I'm not going to lie!  My Dad and brother helped with this part of the decor, they were troopers while listening to me tell them "Umm, can you move that umbrella over 3 inches?  It'll look perfect!" and "Think clusters, I want clusters!" 

And we cannot forgot that you must have your head covered when you are in the Queens presence, so here's some of our hats!

Mad Hatter Maya
Sis-in-law, Christine, and her pretty Pansy Hat
Me with my Mad Hatter Cheshire Cat hat

Uncle Stan as the White Rabbit, Meghann and Courtney as the Tweedles and cutie Emmerson

and we must not forget the characters! 


Aunt Dianna and Cousin Susan - aka - Tweedles

The King, Alice, the Queen and the White Rabbit - aka - my parents and pseudo parents

My parents - this is the way they typically look when they're talking to me

Mateo as the cutest White Rabbit ever

And I think that smile is the best possible way to end this post!  I'll be back later this week with even more pictures from the party! 

Hope you have a merry start to your week!
Andrea

Thursday, July 21, 2011

Over the Rainbow

Is where I've been this week!  I've been super busy trying to work on a sample for a class I'm teaching and working on project's for my Mom's birthday and so much more!  Oh, and I also got a BIG box from Lifestyle Crafts yesterday... chalk full of releases! 

I can't share the whole sample yet, but I'm just going to give you a little teaser...

Does she look familiar?

What about this guy?
"I am the Great and Powerful Oz!"

That's right, my sample is with Graphic45's "The Magic of Oz" paperline.  I love their papers - they're so versatile and if you're willing to spend some serious time with a pair of detail scissors, well, then they give you all the embellishments you need!

I don't think I'll be back till next week!  I'm sorry, but we're decorating for the Mad Hatter's Tea Party tomorrow and then the party is Sunday and then I (hope) will be organizing my NEW crafter's island that my fantastic Hub's made for me! 

Monday I'll have so much to share and all next week!
Thanks for the patience - I will return to my blogging world soon!
Andrea

Friday, July 15, 2011

Ole!

Today is my day over at the Page's Blog - so I'm going to share my project here but if you want more details, you'll have to look over there!

It's a table banner - I used an accordion mini-album style for the format of my banner.  It's easy, doesn't take any special tools or anything... I don't know why I hadn't thought about it before!

I was assigned to use WeRMemories "Fiesta" line - it's bright, it's colorful, it makes me crave tacos like no other!

I used a scallop circle punch and then wrapped bakers twine around the scallops, like a "God's Eye" - I made a ton of those when I was little.  I embellished with WeR's dimensional stickers.

Well, that's it!  Like I said, you'll get a more complete post over at Page's blog - check it out!

And, if you're interested in making on the wrapped scallop do-dads, stay tuned because a tutorial is coming your way next week!

I'll be at Collective Journey's teaching Shaped Cards on Saturday (there's still spaces...) and at Page's from the Heart on Sunday teaching 2 classes, one page layout class and one card class!  Call for more info!

Hope you have a wonderful weekend!
Andrea

Thursday, July 14, 2011

Yum

Seriously.

Yummy.  Yummo.  Yummy, there's a party in my tummy.

They taste just like a Reese's Peanut Butter Cup.  Yup.  And they only take about 15 minutes from start to clean up.

And did I mention, it's no-bake.  WHAT??? 

I know.  Get up, take your laptop into your kitchen and make these tasty goodness.

You can even have them for breakfast with coffee... not that I did today... but you could, you know, if you wanted to.  They have pb, and that's protein.  Pure protein.

I found the recipe on http://www.ourbestbites.com/ - you'll want to click on this link.  I'm not leading you in the wrong direction.  This is straight up, hard core Disneyland for your adult taste buds.  Here's the actual recipe.  If you've used this recipe before, well, now it's time for you to get reacquainted - it's so much better than you high school boyfriend when you see each other at your reunion.

You probably have most of the ingredients - I know i did.  Doesn't every kitchen have 1 lb of powdered sugar on hand?

Yup - graham crackers, powdered sugar, peanut butter, chocolate chips, butter.  Real butter.


Real, melted, these suckers won't stick to anything, B.U.T.T.E.R.

The recipe calls for 2 sticks of butter but I only had 1.5.  Don't worry, they still taste excellent, just a little more crumbly.  Crumbly is not bad.

That's melted chocolate chips with a spoonful of chunky pb in it spread on the powdered sugar crust.

This is your breakfast tomorrow morning.  Say good morning, sunshine!

Have a great day!
Andrea

Wednesday, July 13, 2011

Please excuse the mess!

I'm trying really hard to make my blog - well, mine!  Please forgive the "specialness" of the blog right now - it'll look semi-atractive again soon (I hope!)
Andrea

I'm bananas!

My Mom will applaud this admission.  I can hear her clapping 20 miles away.

Except I wasn't referring to my mental status.

I was referring to this...


Yummy. 

Click here to see more about this delicious-ness.  I found it on eighteen25's blog - you can see there blog here - I've mentioned them before - it's where you can find FREE down loadable subway art and so so so much more.

See you tomorrow!
Andi

(I hope you don't mind, but I've been into food lately and I think it's coming through on my blog!) 

Tuesday, July 12, 2011

Your patience is finally being rewarded!

Last week I said that I'd share more of the cards I created for my upcoming "Favorite's Cards - Shapes" class at Collective Journeys - and the day has finally come!  Let's take a look!

Hot Air Balloon Card

Hey Cupcake Card

A BIG Thanks Card


So that's the rest of them.  The class is this Saturday at 10:30 at Collective Journey's - give them a call to sign up 909.793.2200 - I think there's still spots left!

And remember to check over at the Page's blog - I just started showing the latest DT projects - I think you'll be very inspired.

I'll be back later this week with something delicious to share!
Andrea

Sunday, July 10, 2011

Sew Funky...sew much going on

The Sew Funky Vintage and Handmade Market has come and gone... here's a pic of my booth area.
Carrie and Michelle stopped by to say "Hi", which was so cool and supportive!  And Rosa and her girls... I'm lucky to have such cool people in my life!  The Market was hopping, seriously, most of the day the aisles were packed with people.  It was a great show and I met a lot of other really cool vendors/bloggers that I'm hoping will do a little guest blogging over here at Kutz...

My very good, awesome, goes way back (I have a picture of her in an Indian costume at my 5th grade Halloween party, that's how way back we go) created a Facebook page for my Etsy Shop - it's www.etsy.com/shop/ayokleyjessup, and I'm trying to figure out how to put a "like it" button here on the blog.  I added a lot of inventory to my shop this weekend, so if you get a chance, check it out. 

Tomorrow you should head on over the Page's blog to see the Challenge winner (it's a cool project) and this week we'll be starting to post the DT's July projects... if you like a good banner (and who doesn't), then you'll like these projects.

And speaking of banners... If you noticed in my booth pictures, I made more paint chip banners... I was pretty sure that I was going to get arrested at HomeDepot because I picked out almost every paint chip that Martha Stewart has to offer and put around 100 paint chips in my purse... and the alarm kept going off at the door and I was sweat'n because I started to worry that maybe once you pass 50 paint chips, each one was $1 or something and I was going to have to explain to the security that I'm not a deviant, just a crafter.  AND, the extra funny part is, that the first item I sold at Sew Funky was a banner that I'd made for decor for the booth with no intention to sell!

And, this is my last "and" - I googled my name today and saw this http://www.webfamilyny.com/stories/2011/7/fp_nandn_bodybib_2011_07.html, which is a blog that talks about my baby body bibs in my Etsy shop and I never even knew it!  Isn't that cool?  I think it's cool. 

Okay, I'm going to bed before I think of another "and"!  Remember to check Pages tomorrow!
Andrea