Photobucket Photobucket Photobucket Photobucket Photobucket Photobucket

Friday, July 27, 2012

Fun Friday!

Hello! 

Thanks for stopping by today! 

With a few weeks left before school starts back up,  I wanted to share a few super fun places in So Cal for you and your kiddo's to explore...  I realized this week that we only have 3 weeks before Adam goes back and we've barely crossed anything from our Summer Bucket List!

First, there is this awesome children's museum/workshop in Old Town Temecula called Pennypickles Workshop.  This place was amazing!  Both my husband and I went to this place and I think we were both as entertained as Adam!  And the other cool part is that Adam can go from now till he's a preteen and get something new from it every time!  It's a fun, science/math based museum that does everything from arts and crafts to music to optical illusions and so much more!


They had everything!  A hot air balloon that the kids could get in and pull the handle, turn tables, instruments, a garbage/recycle plant, duct tape wallets and soo soo sooo much more!  And the price was really reasonable, well worth it!

Another place that was very fun was KidSpace Museum in Pasadena!  This is also a museum, but it's very hands on and interactive with lots of cool stuff inside and outside!  The KidSpace Museum is right next to the Pasadena Rose Bowl... which we'll get to!


We loved this museum!  It had so much cool stuff to do, from this super tall climbing thing to an ant hill that the kids could climb in and out of and an earthquake stimulator, a fossil digging jeep, gold mining water area, HUGE garden area and so much more!  They also have fun special events, so check out their calendar! 

Then there's Pretend City in Irvine... This place is pretty neat for the little ones, I'd say once they're able to pretend and act out different things, they'll have fun.  It wasn't quite as fun for the grown ups though... we were mostly just trying to keep track of our own kids!  I think we'd been there for about 1.5 hours and I felt like it had been twice as long!  But it's really neat for the kids, nice and clean and big!  There's something for every kids desire, from an Art Studio, Library, Vet Clinic, Marina, Police Department, Fire Department, Beach, Construction Site, Farm, Grocery Store and more!


It was a little pricey, we went on a AAA special day so there was a little bit of a discount, but it was nicely air conditioned, and in 102 degree heat, you cannot beat that!

If you're not looking for kid friendly outings, try the Rose Bowl Flea Market, which is the 2nd Sunday of each month or the Saw Dust Festival in Laguna Beach where you can see cool handmade items from local artists!  Of course there's always the beach, if you go to Balboa, take a ride on the ferry! 

Have fun your last few weeks of summer!
Andrea


Wednesday, July 25, 2012

Yarn "Laser" Course...

Good Morning!

Thanks for stopping by! 

I was trying to clean my house the other day... one of my least favorite things to do!  I love love love having a clean house, and we try so hard to keep it picked up so cleaning won't be this huge obstacle, but I swear I spend 2 hours picking up misc and putting it all in the right room/closet/bin/cabinet/drawer - and then still have to clean clean! 

Anyways - my hard work'n man was working both Saturday and Sunday and I knew I had to clean with Adam, who is a wonderful helper, but who I try to keep away from the cleaning supplies... so I knew I'd have to find something for him to do... and then I remembered seeing this on Pinterest...

So, I grabbed these from my craft supplies...

and made this... (please please please forgive the horrible photos - remember, we live in a cave)


And he did this...


He stepped up and over...

crouched under...


Stepped over and bent and ducked all at the same time...


He played with this obstacle course off and on for the whole day.  Of course, this meant that I played with the obstacle course for the whole day - at least any time I wanted to use the restroom, grab something from one of the bedrooms, do laundry, go into the garage... well, you get the point.

We took it down that night after Adam went to bed, but it'll definitely be making more appearances in our house!

Have a great day!
Andrea


Monday, July 23, 2012

Pinned Up Mondays!

Hello!

Thanks for joining me today! 

I'm sorry for the lack of posts last week, but I'm back this week and with an almost complete project!  Yep, I said it!  A pinspired project that is practically finished!  Remember this?


The last time that I shared the progress, this is what you saw...


I had primed the former dresser turned bench but here's the steps since...


I sanded down the bench because even though I primed it, it was still not smooth.  I'm not sure if I used the wrong type of roller, next time (if there is a next time!), I'll try a foam roller, but it needed to be smoothed out.


After sanding, we used the shop vac and vacuumed all over the bench.  My big helper was happy to vacuum!  I then took a damp, microfiber rag and wiped down the bench.


After sanding the drawers, we used the air compressor and blew off the dust.  I then took the damp rag and wiped down each drawer.  Someday he'll hate the fact that I posted a photo of him with his eyes closed, but I'm just so proud and impressed by his willingness eagerness to help! 


We then set up the paint booth.  This was super pain to do in 102 degrees!  We used plastic sheeting that I had left over from the giant water pillow, and hung sheets of it to the top of the garage that extended to the floor.  We then taped the sheets together at the seams.  This was NOT fun at all!

After that, Alan (best husband ever) used our air compressor and an air paint gun to spray the grey/blue color onto the bench.  I'm sorry that there are no photos of this, but with my and Adam's asthma and allergies, we were hiding in the house!  But, here's the painted bench...


Yay!  It looks pretty good, if I do say so myself!  Next time you see this, it'll be sitting in the house, assembled and with a bench cushion on top! 

See you next Monday for the finished product!
Andrea

Wednesday, July 18, 2012

Fun with the Kiddo's! Fizzy Exploding Science!

Hello!

Happy Wednesday!  We've had a busy day... started off with a playground trip, then swim lessons and onto Storytime at the Smiley Library finished off with cousin Aidan coming back to our house to play!  Phew!  And that was all before noon! 

And while we are pretty good at filling our time with fun, kid centered activities, sometimes I like to do a kitchen science experiment - combining learning and play is one of our favorite things!

Fizzy Exploding Bags! 

I found this idea on Pinterest (shocker, I know) and checked out this site for the instructions.  Now, there is a scientific lesson here, but for the two 4 year olds in my life, we just kept it simple - the lesson was that mixing different ingredients from our kitchen creates reactions!  We did go over what a reaction is, starting off with if you hit someone, it hurts them the hurt is the reaction.  We then changed it into reactions in nature and cooking reactions.  My main goal was to get them to understand the idea of a reaction.  They did pretty good.

Here's what we did...

I prepped everything before involving the boys.

I tore a paper towel into a rough 5" square.  You didn't have to be super precise.

I put 1 1/2 Tablespoon of baking soda on the center of the square.  I folded the towel so that it was like an envelope.  This was the Time Release Capsule.

I had 2 Ziploc sandwich bags (we only had freezer ones, I think regular would've worked better) and labeled each one - one said Adam and the other said Aidan - we're very particular with ownership around here!  I measured out 1/2 Cup Vinegar and let each boy pour 1/2 C into their plastic bag.  I then measured out 1/4 C warm water for each boy and let them pour it into their bag.

I then helped each boy put their Time Release Capsule into the bags.  You have to be quick with this, you don't want to let the air/fizz escape from the bag after you drop the capsule in!  So, I sealed the plastic bag but then opened it up just enough so that each boy could drop their capsule in and we resealed immediately... My brother came to pick up my nephew during this part, but it was hard to do this with 2 excited boys on my own... Hence the horrible photos...


Here were a few of our experiment mistakes...

1. While we were adding Adam's capsule, Aidan's bag tipped over and spilled, letting out some of the vinegar/water mix that was inside.

2.  I used a whole paper towel for each capsule - I guess I need to read instructions better next time!

3.  Adam didn't seal his bag all the way, so he lost a lot of air and fizz.

4.  Trying to document the experiment and help the boys was a mistake on my part - I should've just focused on them!


So, the bags are supposed to fill with air and either explode or shoot off... since we used the freezer sandwich bags, our bags were too strong and wouldn't explode or shoot off.  I let the boys shake the bags to keep the reaction going, but once they were done, I let the boys squeeze and explode them and I think it was more fun for them this way!  They've wanted to do it again and again.  We've talked about what caused the reaction... Was there a reaction when we mixed the vinegar and water?  Was there a reaction when we added the Time Release Capsules?  What happened to the bags?  What do you think they filled up with?  Etc. 

So, that's it!  Kitchen science is fun!  And baking soda is a fantastic ingredient - I have another baking soda experiment planned for tomorrow!

Have fun!
Andrea

Monday, July 16, 2012

Pinned Up Mondays!

Hello!

Thanks for visiting with me today!  I appreciate you stopping by!

Hope you all had a great weekend!  I know I did!  I got to do 2 of my favorite things... a little papercrafting at Collective Journey's on Saturday at a Charity Crop with friends and family and a fun lake/boat trip with my family!  It was kind of a spur of the moment trip, which was super fun and a beautiful day!

Okay, so let's get to why you're here today!  Pinned Up Monday!  Today I'm sharing a banner that I made for our Backyard Movie Night.  Here's the Pinspiration...

{Photo courtesy of thetomkatstudio.com via Pinterest}

I love this whole look!  Love how they kept the color scheme in all of their decor...  But, since this was a casual family/friends movie night, I kept myself in check!  I did, however, create a banner based on the banner above.


 I purchased a few sheets of red and white patterned paper from Michael's and used other supplies that I had on hand.  I cut red solid cardstock to be 4" x 6" and matted 3.75" x 5.75" patterned pieces on top.  I punched large 3" scallop circle from solid white paper and glued those to my banner pieces.  I then die cut all of the letters from black solid using my Spotlight font by QuicKutz.  I glued the yellow ribbon to the top so I could hang the banner from our outside wall.  And that was it.  A quick, simple project!

Our Movie Screen...

I used glow in the dark paint in mason jars for the kids... more on that in another post


We had the food table set up on the patio with Nachos, a Popcorn Machine, candy, cupcakes, fresh fruit, pastries, pizza, drinks... there was soo much food left over, it was crazy!  Everyone brought blankets and chairs to be comfy in and we all settled down to watch Tin Tin.


We also had the kids play area over to one side, just in case anyone got bored and needed to play during the movie...

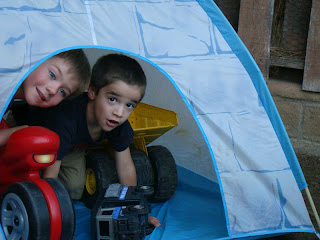
Nothing like an igloo with a motorcycle, dump truck and police paddy wagon in it... oh, and 2 little boys too!

Movie Night = Success!

Have a great day!
Andrea

Saturday, July 14, 2012

New Items in the Shop!

Hello!

Thanks for stopping by today!

Did any of you try the Cheesecake Strawberries?  Did you like them?  I like them so much that I kinda want to go to make some today... but I can't because I'll be working on an upcoming project to share at Collective Journey's all day today!  Yes, you heard right!  No phones interrupting, or that pile of laundry moaning from our bedroom... dirty floors to clean or a 4 year old who thinks my only job is to play emergency vehicles all day long!  My favorite part of the day is when my son is shooting "bad guys" and I'm yelling over the machine gun noise that he instinctively knows how to make, "Hug It Out with the bad guy!  Use your words!  You don't have to shoot him!  Hug it OUT!"
Okay, so here's some new products that I've stocked in my shop...


I still have more pillow covers to add... I'll be doing adding through the weekend.  And don't forget, all of these patterns are available on GroopDealz through the 17th!  And after that, they'll be in my shop but not at the discounted price!


And, just in case you think I'm going "soft" (haha, get it, cause of all the pillows?  Soft!"), here's a one of a kind sign that I made last week that I LOVE and keep thinking about taking it out of my shop to keep for myself!


It started off as just the lid to a wooden crate that I used in Adam's bathroom and ended up like this...


I want to keep sell it to someone who thinks it as cool as I do!  The phrase is inspired by Sesame Street... there's a commercial with a "kindness" counter, and they always say "Kindness Counts"... well, I took it one step further and gave the ultimatum... Be kind of leave!  You can still see the imperfections of the lid through the paint, which I think gives it cool character.  I think it would be neat hung above my someones front door.

Thanks for stopping by and taking a look at what I've been working on lately!

Have a great weekend!
Andrea