Photobucket Photobucket Photobucket Photobucket Photobucket Photobucket

Tuesday, May 24, 2011

Another Sketch Support inspired layout!

Hello!

Happy Tuesday - we had a very fun day!  Adam, Aidan and I played trash trucks... a lot... took naps (my favorite part, but was told naps are not fun!), made up numerous trash truck songs before nap and wiped a lot of runny noses.  Poor little guys!  Spring colds are no fun!  I took their temperatures after lunch, before nap, and what do you know but they both had matching fevers!  Not high, but it was just kind of funny that they were exactly the same! 

Anyways, onto my point!  I saw a sketch on the Sketch Support blog that I used for a layout that I created of our trip on the MetroLink back in February - here's the sketch

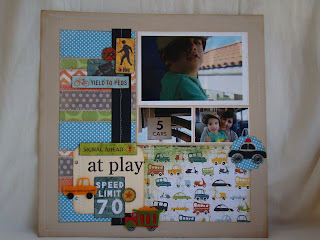
And here's my Layout:
I used some MM Lime Twist, some Basic Grey Wanderer, some Sassafras Felties...  I plan to journal on the computer and cut them into strips to go across the bottom right hand vehicle paper... the "at play" is an OA flashcard that I cut down.


It's a little hard to see, but I sewed along all of my edges and the space between the strips of paper because I wanted to keep the train track feel and I sewed down the center of the black solid piece like a street line.  I also used Glossy Accents on my "signs" that I hand cut from the Basic Grey paper.

I'm all about the sketches lately!  I love how I can use them and change them to fit my theme, I don't get stuck on the way a picture of a layout looks, or the paper that the person used or the embellishments... it's very freeing once you get the hang of sketches!

Here's a few sketch websites that you can check out!
www.sketchsupport.com
www.pagemaps.com
http://www.sketchabilities.blogspot.com/

I hope to post again tomorrow but it depends on my sickie!
Andrea

Monday, May 23, 2011

Step to the right... and clap clap clap clap clap clap clap clap

Has anyone else ever done that line dance?  Whenever I think of a "step card", the dance tune and lyrics spring to my head!  Anyways - I saw this sketch for a card on Sketch Support and immediately saw a little different design in my head!

Here's my take on the card... umm, can you tell that I have a little boy??

I used my Silhouette for the buildings.  I really loved this shape from Silhouette, you could cut the outline of the buildings from a solid, then it gave you the option to cut the actual buildings from different paper!  I used Basic Grey's Wander paper, which worked out great because of the double sides!  The trucks are from Sassafras Felties.


I debated about putting the sentiment on a cloud, popping up from the top of the sun, next to the sun but then decided to stamp Happy Birthday on the inside.  This also lays flat, it would fit into an A2 envelope IF I hadn't over hung the sun off the top of the card.

I just have to say, that when my little 3 year old saw this card sitting on the table after I'd completed it, he stood and looked at it for a good 5 minutes and then told me that it was a beautiful "thingy" and he then said "Ohh, thank you so much for making it!  I love it, Mama!".  I'll probably just leave it up in the playroom since he likes looking at it so much!  You could use this same side step for any number of themes, the skies the limit!

I found the tutorial for the side step card here.  Please check it out!  Also, Michelle did an awesome tutorial on the Pages Blog today, or you can always admire all of her creativity on her blog.  Hope you're feeling inspired today!

Andrea

Friday, May 20, 2011

My Pages DT Layout

It was my turn again today to post a project from our May kits... so I posted a layout!  I was inspired by a sketch that I saw on the OA website that Roree Rump created -
But, since I did the layout last, I had used most of my Nikki Sivils patterned paper all up!  I had to be creative, I sort of felt like Pooh Bear, sitting down, thumping his temples and saying "If I could only think a thought..." and then my eyes fell on my sewing machine.  A light went off.  Thread makes lines... so, here you have it, my interpretation of the above sketch with limited paper but a super cute little boy that would make any layout a.dor.a.ble.  Seriously.

My favorite part... the sun-clouds combos in place of butterflies.  I seriously had very little paper to work with, but was determined to use what I had and not cheat, so this is what I came up with.  But, it has all the elements that I love: simple, clean lines, white space, embellishments...

Check out the Pages blog for more details!

I'm out at Page's tomorrow for our PageMaps layout class - I think I have room for 1 more... call MaryJo (Kathy's still in Alaska!) to sign up!

See you all Monday!
A

Thursday, May 19, 2011

Finally! Flower Rolling!

This technique is so simple!  Seriously simple!  They take no time, a few minutes, and you get so much from a simple piece of paper.

Here's the supplies that I used:

I use ScrappyGlue, but I know that other people prefer GlueDots - it's totally up to you.  I typically use a double sided paper or a solid paper since you see both sides of the paper when your done with your flower.  I used a Marvy 3.5" scallop circle punch for the tutorial, but you can use any circle punch as long as it's large enough to cut and roll.  I also use a 2" circle punch and a 2.5" circle punch for different flowers.

Punch your paper.

Ink your edges if you want, you can do it later as well or not at all.

I typically don't draw my "snails shell" onto the circle, but did for the sake of the tutorial.  I normally just cut it in this circular pattern.

Cut your "snails shell" pattern.

This is what it will look like when you're done cutting.

Now you'll start rolling from the OUTSIDE OF YOUR CIRCLE!  You can roll this super tight because you'll be able to release it so it'll take it's form at the end. 

This is how I hold my paper while I roll, it's easiest to use two hands, one holding the rolled piece and the other rolling the strip of paper.

I have my flower all the way rolled, except for the end piece.

Put some glue or your glue dot on this tail piece.  Then rest it against the rolled part of the flower so your edges touch the glue.
You can release your flower a little so that you have more space between your rolled petals before the glue is dried.  You can make it as tight or as loose as you want it.  Hold it till the glue is dried.
Here you go!  I sometimes add Stickles or some bling, or even distress the edges for a little more definition.

These seriously take NO time!  And once you get the hang of it, you'll love making them!

Email me with any questions!  Hope my terminology is easy to understand!
See you all later!
Andrea

I guess everyone's "for the birds"!

My Pages from the Heart Design Team project is on the Nikki Sivils blog today - you'll get to see some adorable baby photos of her nephew, an announcement from Cricut and then you'll see my little hatbox/birdhouse project!


Click on the link below!
http://nikkisdoghouse.blogspot.com/2011/05/hes-here-hes-here-baby-noah-is-here.html

And don't worry, I haven't forgotten about my flower rolling tutorial today!  I'll be back this afternoon (around nap time!) to post it!
Andrea

Wednesday, May 18, 2011

My heads up in the sky...

At least that's what it feels like today!  I totally forgot that I was going to do a rolled flower tutorial and worked on assignments instead... so I will do the tutorial tomorrow (I would do it tonight but I'm losing my light) and I'll share a shape card that I started the other day and finished today.  And, that I TOTALLY love!  I'm really feel'n the shaped cards lately!


I made this using my Silhouette, the Hip Horray paper from MyMindsEye and some embellishments.  The banner is attached to floral wire and says "Reach for the sky", I thought this would be a good graduation card...


It's a little hard to tell, but there's nothing between the basket and the balloon, which made it difficult to get it to stand on it's own so I glued toothpicks to the inside of the card (front and back), from the bottom of the basket along the strings and into the balloon area.  I also sewed along the balloon where the different papers meet.  The clouds are also cut from the Silhouette and I popped them up and also put one on the back part of the card to give it extra dimension.

Phew!

Gotta run - dinners burning!
Andrea

Tuesday, May 17, 2011

For the birds...

That's what my Pages From the Heart DT project is for!  Actually, I think it's more for the shelf to hold fun supplies in, treasures or to wrap a gift in!  But, I wouldn't blame a little birdie for wanting to take up residence in it...

I used Nikki Sivil's "Summer" patterned paper from my kit, did a little bit of sewing (which added soo much!) and decorated to my hearts content!


Check out the Page's Blog for a little more detailed explanation!  And tomorrow I'll be posting a rolled flower tutorial - I've been wanting to do one for.ev.er!  Yay! 

See you tomorrow!
A

Monday, May 16, 2011

Let's share..

Hello!  Happy Monday!

I hope that everyone had a great weekend!  I know I did, it was kind of a "dream" weekend for me, meaning I loved every single day of it!

Friday I had a "Girls Night" with one of my BFF's... we had pedi's (my feet are still sighing with relief), did a little craft shopping, went to dinner and ended our night with a little chocolate covered cheesecake from Rocky Mountain Chocolate Factory and totally unsuitable "girl talk"!

Saturday we hung out around the house, I worked on projects for the Kissui Craft Fair and we picked paint for our house.  I hate to iron, but for some reason, ironing fabric that you're going to make fun stuff with doesn't bother me like ironing shirts does! 

Yesterday was a great day at Page's National Scrapbook Day crop!  I was, hmmm, working(?) it, but basically got to sit, chat with some great ladies and work on my own projects!  Don't worry, I'll share very soon!  And don't forget to check out Page's blog, where you'll see what Michelle created for our Design Team - she's awesome and totally inspiring!

But, I was looking at my past posts and it's been soo long since I've posted a paper craft that I was more than a little shocked!  I've had these cards waiting to be displayed for over a month!  What was I thinking? 


Butterfly Shape Card

 I love this card!  I used my Silhouette SD to create the Butterfly shape of the card and cue the patterned paper for the butterfly.  All the patterned paper is October Afternoon's 5&Dime paper - which I LOVE!  The flower is a yo-yo flower that I made just by scoring, folding and flattening.  It's a very simple, quick card but has a ton of cuteness because of the shape and the paper!

And here's another card - I do love a good mustache...


This card is made with Crate paper's Toy Shoppe line - I can't get enough of it!  I love the vintage feel that it has while being super cool.  I die cut the mustaches from my LifeStyle Crafts Mustache Cookie Cutter dies.  The "Macho" are October Afternoon stickers.  I can't decide if this card is for Papa or Alan for Father's Day, they both have pretty amazing mustaches...

I'll see you tomorrow where I'll be sharing a project that I did for the Page's DT!
Andrea

Saturday, May 14, 2011

I'm still here...

busy busy, working on my 1st Page's Design Team projects, thinking about applying for a new Design Team that Michelle from the Pages Design Team told me about... making samples for next months Favorite Cards Class, cutting and sewing projects for the Kissui Craft Fair... So, I'm  definitely still here, just can't share anything that I've been working on till next week!

I'll be at Page's National Scrapbook Crop tomorrow, ALL DAY!  Working on more projects!  And visiting, possibly helping some customers with questions, having a great day!

Hope to see you there!  And please stay tuned next week, I'll be posting my DT projects and the other members of the Pages DT projects on the Pages blog! 

See you all SUPER soon!
A

Tuesday, May 10, 2011

We'll be here!

Kissui Children's Store is hosting their first Craft Fair and I'm going to participate!  I'm a little nervous, I keep wondering "What if my item's don't sell?", but then my husband says, "But what if they do?".  I'll be making some applique shirts, crayon rolls, hopefully subway art, a bandelero or 2?  And, I think that my good friend, Meghann, is going to join me and make some carseat covers and burpclothes and maybe some other fun goodies! 

Hope to see you there!
Andrea

Monday, May 9, 2011

Ban-de-ler-ooooo!

I saw this really fun Snack Bandelero on "Celebrate the Boy" month on Made by Rae's blog at the beginning of the year and have wanted to make one for Adam since then - I've had the supplies for the past month or so and wanted to make one for both Adam and Aidan before Easter but wasn't able to find the time... so, I've been on a sewing kick since the Singer Sewing Party on Saturday and decided to just do it!  And I loved it!  And Adam loves it!  Yay!  So, you can check out the actual tutorial here, but I'll show you my own experience with it, but IF you decide to do this, you should really check out Deborah's tutorial because it was so well written and easy to follow!  Mine is probably a little more, umm, not easy to follow.  Yeah, I'll put it like that.  So, here's my toy bandelero!


Okay!  Let's get started!  Here's what you'll need:
  • 1/2 yd medium weight twill
  • 1/2 yd fusible interfacing
  • 1 yd elastic, 1 inch wide
  • Coordinating thread (I decided to use thread that would stand out on my bandelero)
  • Snaps or buttons (optional - I didn't use them on mine)
Let's begin!

  • Body - Cut 2 pieces from your twill measuring 3x30 inches (this is for an average 2 year old.  My son weighs about 28 lbs and is a 2t and I wish that I would've gone a little longer - maybe closer to 3x35 inches.  It's your call.
  • Elastic piece - Cut 1 piece from your twill measuring 2 1/2 x 24 inches.
  • Pocket - Cut 3x4 inch rectangle.
  • Interfacing - cut 1 piece 3x30 inches.


Let's make the body of the bandelero!
  • Take your piece of interfacing and iron it onto the wrong-side of 1 piece of your bandelero body.


  • Put your two pieces, right sides together and sew a straight stitch along both long sides.  You don't need to worry about the short ends, you'll finish these are the very end.

  • Now, turn your body piece right side out and iron it so the seams are flat.  Using a zig-zag stitch, stitch as close to the edge as possible on both sides.  Set aside.


Loop Piece:

  •  Take your 2.5" x 24" piece of fabric and fold both sides in 1/4" and iron the folds.


  • Fold this piece in half, like a hot dog and iron.


  • Topstitch along both edges with a straight stitch - do it as close to the edges as possible.


Take your elastic and attach a safety pin to one end.  Insert into one end and feed all the way through.  You're piece will bunch as you go.  Cut off excess elastic.
Attaching Loops to Body:

  • Fold your body piece in half.  I placed a straight pen to mark where I wanted to start my loops, which is about halfway on your body.


  • Pin your loop piece to the body of the bandelero.  Attach the loop strip by securing one end, then folding it back on itself to trap that first raw edge under the strip as a whole. It sounds odd and backwards, but it totally works and gives a nice, clean finish. Place the loop strip so that the raw edge is pointing toward the body of the bandelero and the length of the loop strip is heading AWAY from where you want the row of loops to go. Stitch across the loop strip close to the raw edge to secure it in place.

  • Now you'll want make your loops to hold the goodies!  I picked a few toys and a sippy cup and used those to see how tight to make the loops.  Once your figure out your placement, pin the loop down and sew along it.  I went over the seam a few times to make sure it would withstand a 3 year old little boy!

  • Repeat this step for each loop that you want to create.  Once you get down to the end of your strip, turn it under and sew a seam along the top to finish it off nicely.
Pocket:

  • Please check out Deborah's tutorial for the pocket!  I didn't take any pictures BECAUSE I seriously didn't know what I was doing and was just hoping it would work out!  It did, but if you want to make one, please please, PLEASE check out the instructions here.
  • Sew on your pocket, right side to right side along the bottom of your pocket.  


After you sew it on, fold it up to create your pocket and press it with an iron.  Pin your sides to your body piece and sew them on. 


  • You're almost done!  Now, fold your bandelero in half, right sides together and sew a diagonal seam along the bottom to finish it off!


  • Cut the excess off close to the seam and turn your bandelero out - add toys and you're done!  yay!  You could put the button or a snap here instead of sewing it shut if you wanted.


Phew!  A big project crossed off my to-do list!  I might go make a few more right now!  A HUGE thank you to Rae from Made by Rae for hosting Celebrate the Boy month and giving mom's of boys fun things to make!  And a HUMONGOUS thank you to Deborah from Whipstitch for coming up with the Snack Bandelero and for doing such an amazing job with the tutorial so that I could totally copy it!

See you all soon!
Andrea