Photobucket Photobucket Photobucket Photobucket Photobucket Photobucket
Showing posts with label Holidays. Show all posts

Thursday, May 8, 2014

Holy Momofuku Cornflake-Chocolate-Chip-Marshmallow Cookies & Teacher Appreciation Gift

Good Morning!

Momofuku.

Could be my new favorite word.  I know it's Lil A's new fav.

Its definitely my new, favorite cookie!


Today, for Teacher Appreciation week at Lil A's school, it's bring your Teacher something to Eat!  So stay with me, we've done SUP and now E=Eat!  Some kids brought the teacher fruit (nice, healthy) and other kids brought Starbucks cards (yum!) but NOT us!  We went with a cookie that has everything sweet and sticky in it under the sun... that also happens to be the MOST DELICIOUS COOKIE EVER!


Lil A and I were watching something (I have no idea what!) and they were talking about a restaurant in NY, Momofuku Milk Bar and there were talking about the Momofuku Cornflake-Chocolate-Chip-Marshmallow Cookie and Lil A just thought the name was the. BEST. name. ever.  So, when I asked him what kind of cookie he wanted to make for his teacher, he cried out "Moooo-Moooo-Fu-Coooooo!!!!"  Seriously, it was the hilarious hearing him say the same.  So, I googled the cookie and found the recipe here.

It was time consuming, you have make the cornflake crunch first and let it cool, so I think we started making the cookies around 12:45 and ended up cooking the first batch at 3 pm (there's also fridge time, we weren't working on the cookies the whole time!).

We also baked the first batch a little too long... the recipe called for 18 minutes, and that's what we did, but I think we should've taken them out at the 16 minute mark.


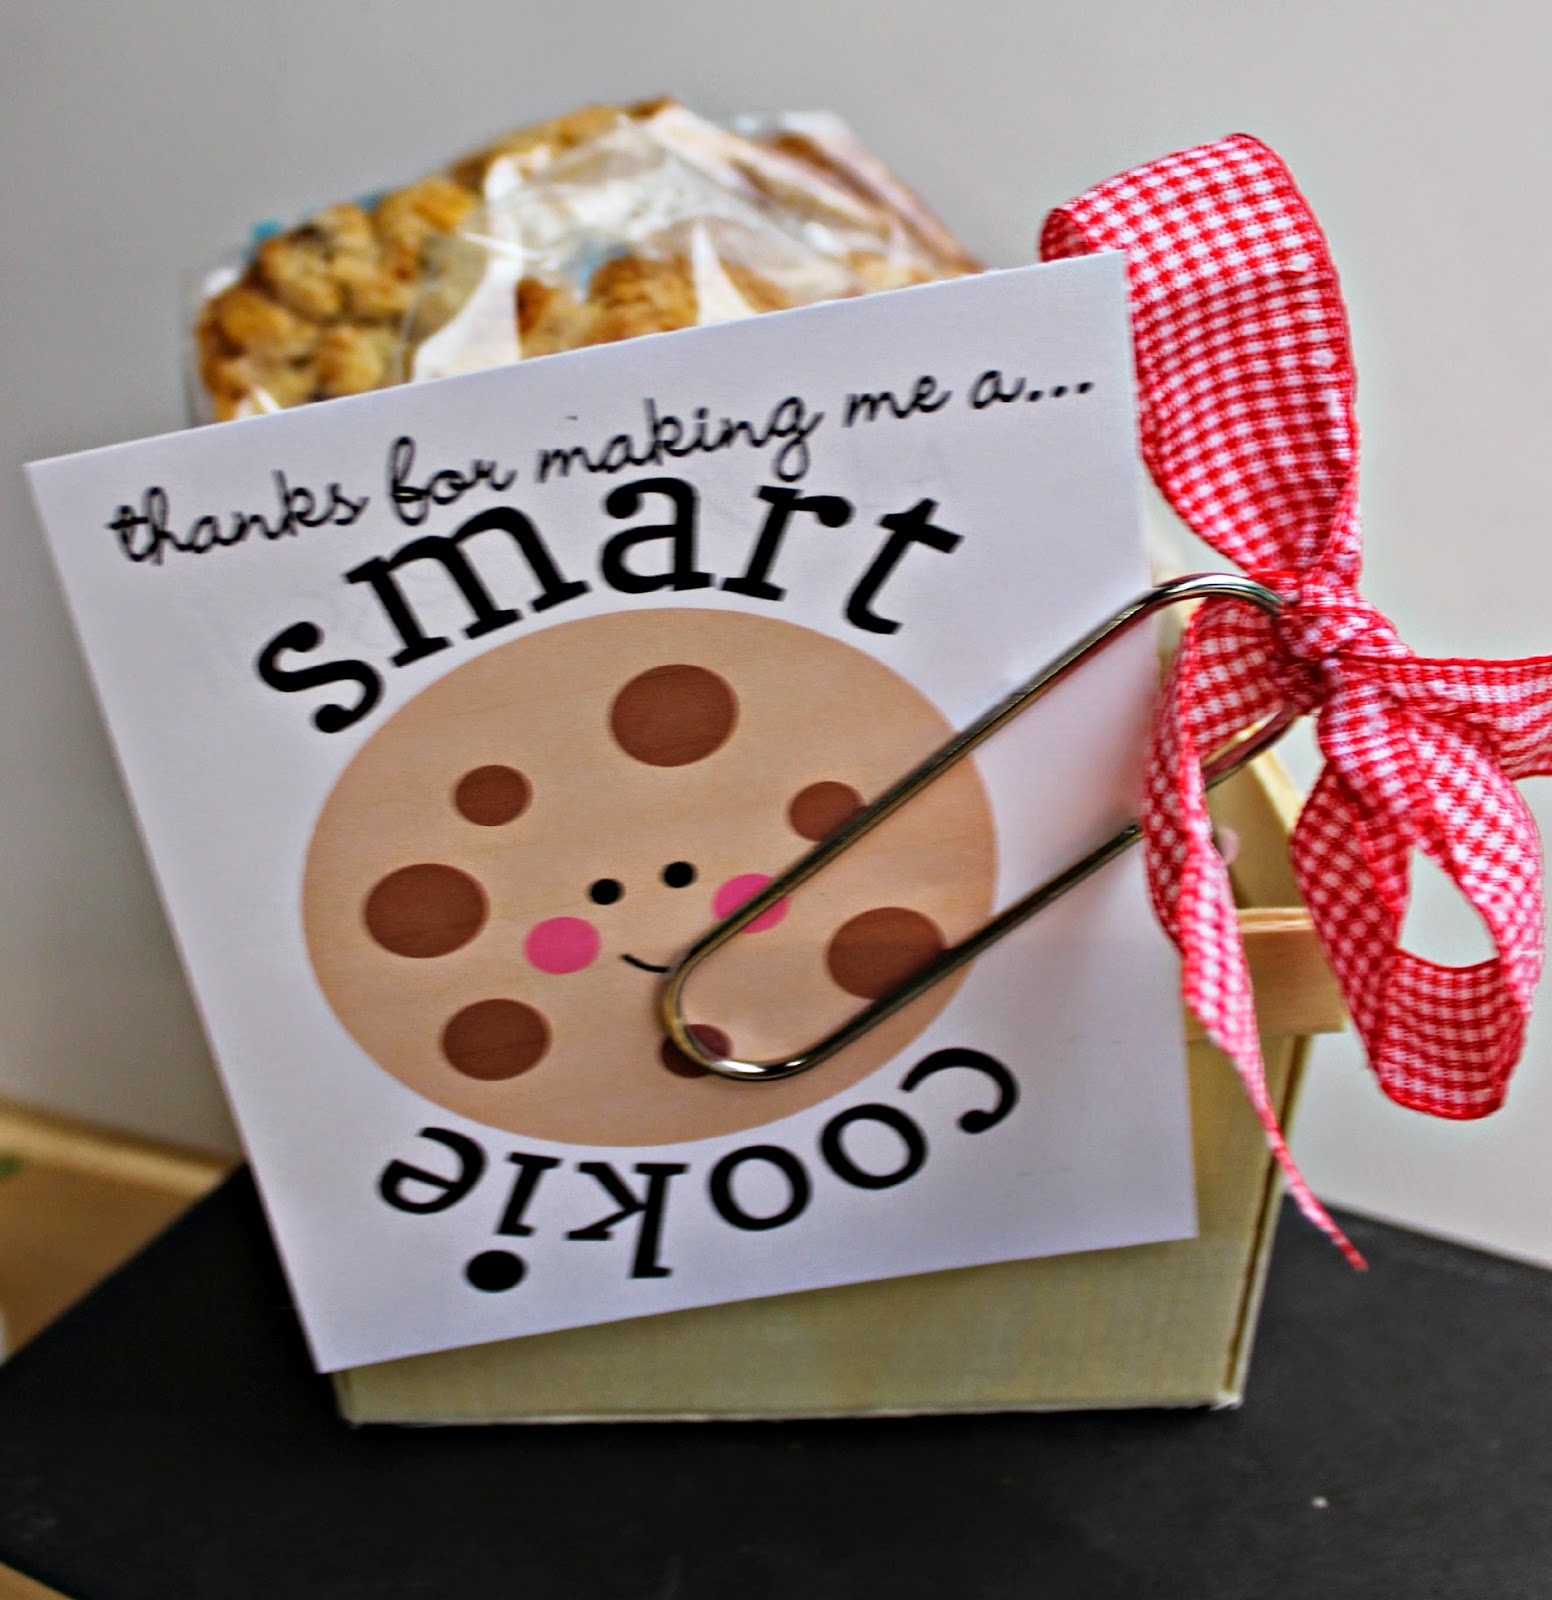
We ended up putting the cookies into cello bags (1 cookie per bag) and I used WeR Washi Tape to close them up.  We put them in these super cute, wooden berry containers that I purchased from Michael's with a little shred.


I made the cookie tag with my Silhouette's Print and Cut feature. It's so cute! I tied ribbon into a bow onto a super big paperclip and used that to attach the tag to the berry container.

So, go on, make a Momofuku recipe!  And say Momofuku in as many fun, crazy voices as you can come up with - I'm telling you, it makes the cookies taste better.  I'm eager to try the Crack Pie and Strawberry Lemon Cake from Momofuku as well...

Have a great day- hopefully it's involves a cookie!
Andrea

Wednesday, May 7, 2014

Choose Happy Wooden Sign - Teacher Appreciation Week!

Good Morning!

Happy Wednesday!  If you have a little person that's of school age, then you probably know that this week is Teacher Appreciation Week!  Our Schools theme for the week is Super Hero's and they also sent home a very helpful note suggesting what we can bring our teacher every. day. of. the. week. So far, we've taken supplies (the "S" in "super"), something unique or useful (the "U" in "super") and today, we took something pretty (the "P" in "super").  Here's what Lil A and I made...


I asked Lil A what he wanted to get for his teacher for something pretty... I suggested going to Collective Journey (our local paper crafting and gift store) and picking something out but he said "I want to make her something!", so I said, "Like a picture or something?" and he replied, "No, like a sign like you make for your business".  Now, I'm going to admit that I was not thrilled at this prospect... since it was Tuesday afternoon at 2 pm, all I could think of were the other million things on my To-Do list that weren't going to get done, but then I reminded myself that he's not always going to think what I do is cool, or that crafting is fun and at some point, he may even think that picking something from a store is more meaningful that making something (gasp!).  So, I went with it.

I had 2 slices of wood that I'd gotten from Joann's around Christmas time, so I unwrapped the packaging from one, measured and grabbed my computer.  I knew I wanted to use WeR's Farmer's Market paper line, I loved the soft hues and thought it looked like colors and patterns his teacher would like.  I let Lil A pick everything else out - we looked at my shape library on the Silhouette and he picked out the Cute Flower Wreath and the "Choose Happy" saying (I made the shape with my text and weld buttons), which I then sized with my Silhouette Software and cut with my Cameo.


I had Lil A glue all the different elements to the wood with Scrappy Glue.  Talk about a lesson in patience, I kept telling myself to let him do it, even if it was crocked or off center... my OCD was screaming the whole time,  but it's perfect! He did such a good job and he was so excited to give it to Mrs. L this morning!  You could see his pride!


I guess he choose happy in this picture, huh?  You should've seen the other ones we took, one of them was super cute, the others he was making a mad face and moving the sign up and down over his face and changing his expressions...  he's a character!

You could really make this sign for anyone - just change the saying, design, colors, paper to reflect the holiday or the recipient.

We hope you enjoyed today's project, have a great day!
Andrea (and Lil A!)

*As always, if you like the paper you see here, visit ShopWeR to purchase and use code KUTZPAPER at checkout to receive 20% your total!

Monday, May 5, 2014

Fiesta En Una Caja! (Party in a Box) AND Happy Cinco de Mayo!

Happy Cinco de Mayo!

One of my favorite things about the Mexican culture is how bright and fun everything is.  I'm half Latina, so maybe it's in the blood, but the colors, flowers, happy, good time loving muertes, FOOD, music... it just makes me want to fiesta!  So, what better way to celebrate Cinco de Mayo than with a Fiesta in a Box?


Bright, fun colors are a trademark of the Mexican culture, so when I was deciding what would go into my box, I knew that I had to make a cheerful banner. I used yellow, green, blue, purple, red, pink and orange cardstock for my banner along with my Lifestyle Crafts Doily Banner die. Aren't those great!?


I was able to get 6 flags from each 12" piece of cardstock - I used red and white bakers twine to string them with.  Also, when I was popping out all the little shapes that create the design, I kept them all to create confetti.  Hello!  Two-fer!


I made a bunch of tissue flowers using the Lifestyle Crafts Nesting Flowers die.  This went by super fast, I was able to cut 15 pieces of tissue at once! I used a brad for my center - this held all the different layers together while giving me something to bunch all the different layers of petals around. You can tape the flowers to your wall for a pop of fun or stick them to skewers and have them coming out of a salsa jar on your table...


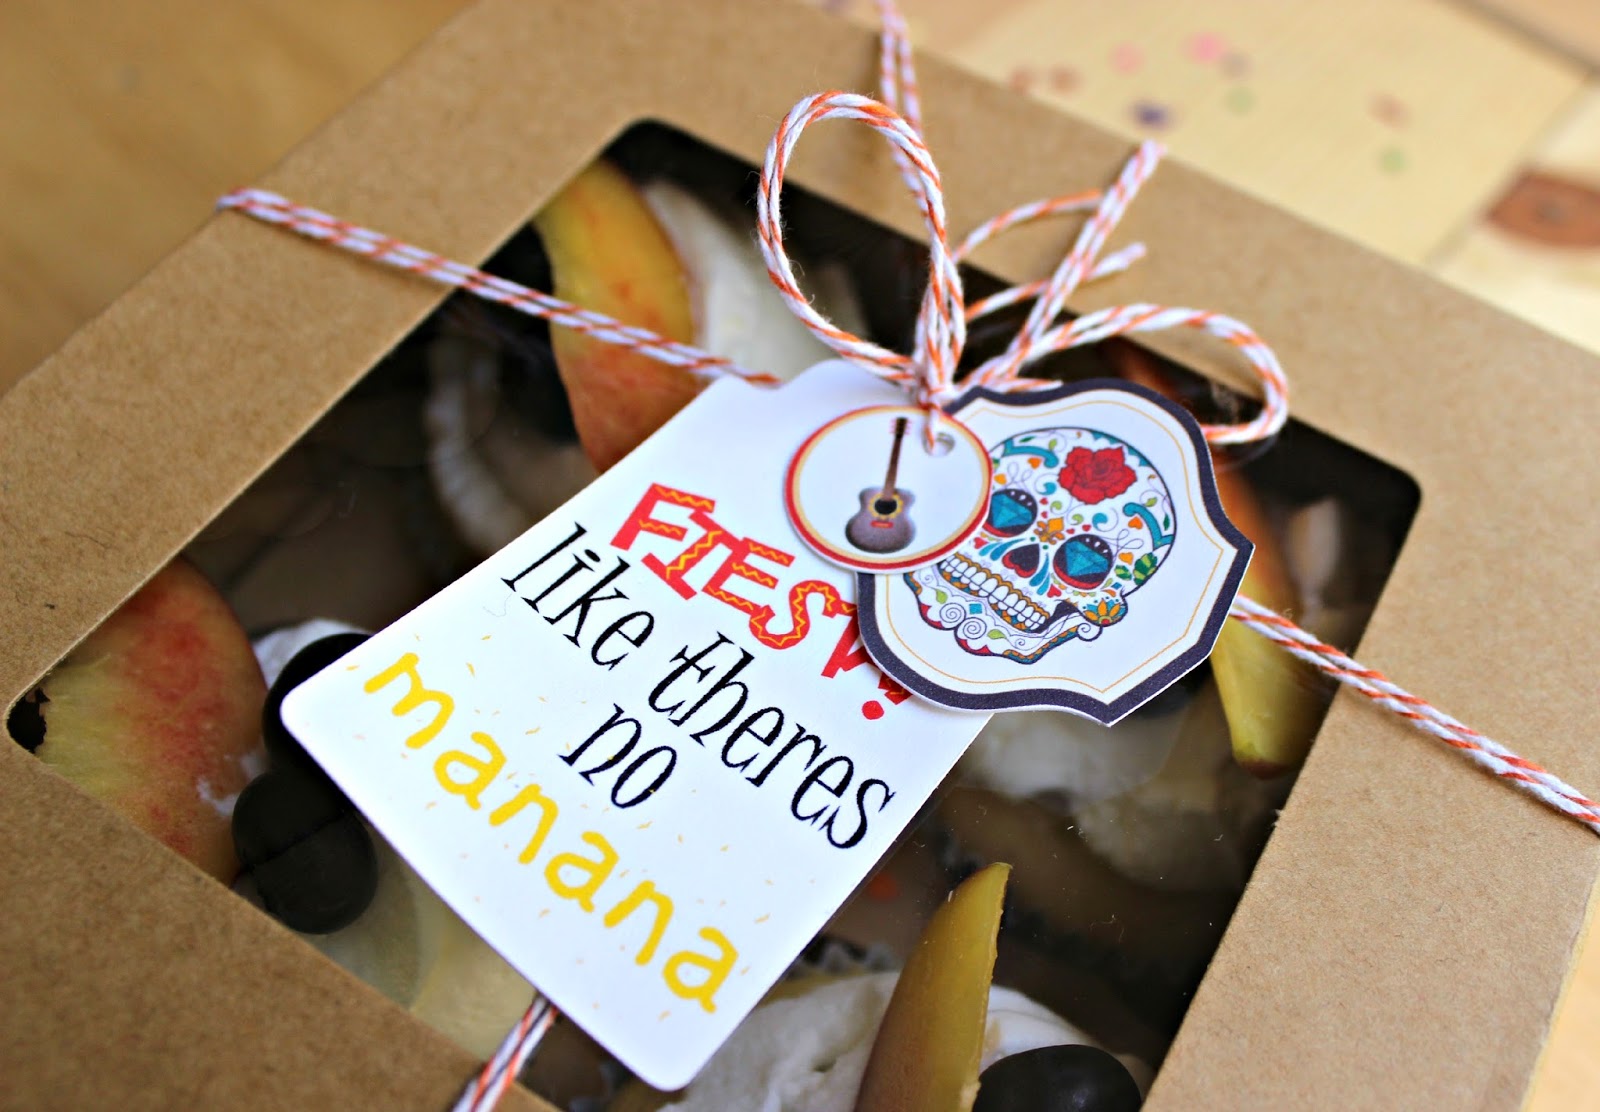
I used my Silhouette Cameo to create the tags to close my cupcake filled bakery box.  Silhouette had these great print and cut "Fiesta" labels and tags (the sugar skull and the guitar tag) and I created the "Fiesta like there's no manana" tag using their software.


And last, the highlight of the box (in my opinion), are the Tres Leche Cupcakes.  Tres Leche is a traditional, Mexican dessert that is super yummy, light and easy to make; the Tres Leche name comes from a delicious mixture of Condensed Milk, Sweetened Evaporated Milk and Whole Milk!  I used this recipe from Martha Stewart, which I highly recommend.  The cupcake is a little dense, but after you poke holes and pour your tres leche sauce over it, the dense cake is necessary so that your cupcake doesn't end up mushy.  The "frosting" is a handmade, whipped cream mixture that I topped with fresh peaches and blueberries, but you could do cinnamon with a caramel drizzle if you wanted a little more richness.  But these are perfect just the way they are in my book!

Side Note - I used foil wrappers for my cupcakes to help keep the moisture in!  This is a great tip if you decide to duplicate these cupcakes.  I cooked them at 325 degrees for 20 minutes and they were perfect.  If you're making the cake per the recipe, just follow the directions.

And last, once you have all of your goodies packed up and ready to go, drop them on your friends doorstep, ring the doorbell and run!  Who wouldn't want to open their door to find a Fiesta En Una Caja?  I also added some wooden castanets for the kiddos (yes, your friends may or may not love these) that I found in the Target party aisle and a few tissue fans that they could put together and hang around their house.  

Ole!
I hope you have a great day, celebrating Cinco de Mayo in, or out of, a box!
Andrea
KPS

As always, if you want to purchase any of the dies that I used in today's post, visit the ShopWeR page and use code KUTZPAPER at checkout to receive 20% off your purchase!


Tuesday, April 1, 2014

April Fools!! Today's NOT National Scrapbook Day...

Did I get you?

Did you think today was the BIG Blog Hop with the WeR Lifestyle Crafts Studio Design Team?  The one celebrating National Scrapbook Day?  With a link to the WeR Blog with their super awesome give-away?Well, April Fools!  It's not until May 2nd... the real National Scrapbook Day!  Fooled ya!

Did I convince you that I didn't just totally get the dates wrong and that I meant this to all be one funny, joke?  I'm quite the jokster.  I'm such a jokster that I even fooled myself into thinking everything had to be done today to be live by 6 am tomorrow! Hahaha.  Funny stuff!

So, since I'm so good at this whole April Fools thing, I'm going to keep it going!  Look at what Lil A is going to get for dinner...


A delicious slice of Berry Pie!  April Fools! It's Meatloaf and Mashed Potatoes!  And I think I'm going to follow it up with a yummy dinner of...


grilled cheese sandwiches!  April Fools!  It's sliced angel food cake with colored icing in the middle!

And since ya'll are being such great sports about my little mix-up, visit me tomorrow to see my April Studio Team Project and a give-away (said in my best Oprah Car voice)!

Have a fun, goofy day!
Andrea


Wednesday, March 26, 2014

Copper & Wood Caddy

Hello!!

Today is a little different than normal because I'm not sharing a project that I made... but a project that my husband made!!


Big A made this caddy for his BF's birthday - it turned out so well, I LOVE it!  It'll fit cans, bottles, whatever you'd need to travel with... and look awesome doing it!


I'm feeling the mix of metal and wood - I'm not bragging, but it was my idea to use a copper pipe for the handle instead of a wooden dowel... I'm just saying...


You can see the plans that he used here.  You can also check out Etsy if you love this idea and want to grab one for your Man/BF/Dad/Bro!

Have a great day!
Andrea

Monday, March 17, 2014

Wee Lil' Leprechaun Trap...

Top O' The Morning To Ya!

Happy St. Patrick's Day to you!  I'm so happy to be back - blogging full time again!  Yay!  My laptop to replace the replacement laptop arrived Friday and I'm so excited because... it means I can share a super fun, easy St. Patty's Day project with you!  Lil' A and my nephew, Lil' AY put these fun guys together and are super excited to see if they work - I kinda am too!


Would you or your Little like to make one?  Here's what you'll need!
-  Noteable Paper by WeR 
- Sheer Metallic Vellum Pad by WeR
- Evolution Die Cutting Tool
- Lifestyle Crafts Dies by WeR:
Village
Hearts Punch Die
Banners
Grass Border
Lemon Drop Font
Berry Container
Arrow (2x2)
- Wet Glue (I used Scrappy Glue but it's your choice)
Sticky Thumb Adhesive Runner
- Glue Dots
- Sticks
- Cardstock
- Scissors, Paper Trimmer, Bone Folder, Buttons, Pen

Go ahead and die cut all of the piece for your trap.  Trust me, if you're doing this for Little people, make sure they're all cut because while you say, "Just one more second! I just have to cut (blank)!" they'll sigh and start turning dies into pretend guns/weapons and pretty soon you're in the middle of a war zone between your flowers die dand the hearts punch die!


They sure do look sweet while they're assembling their traps!


Bam!  Those are some talented Little's, I tell ya!

Now, let me walk you through the part that actually turns just two super cute die cut shapes into a true Leprechaun Trap!

Cut a 4"x4" square from cardstock and score the sides.  Cut of the corners using the score lines as your guide.

Turn over your cardstock and place your house in the middle.  Mark your corners.

Cut a rectangle out of the cardstock, this is going to be the hole that the leprechaun falls into!

Put a line of glue all around the edge of the rectangle. 


Place your house on the glue and press gently.

To finish off your lid, we need to seal the lip.


Glue your grass border to the edge of the lip.  Don't cut off excess!  Instead, fold at corner and continue onto the next edge.

Continue all the way around - you'll need to piece it a little bit so you'll actually need 1.25 sections of grass.


Now it's done!  But, you can always add more... my Little's were done by this point but I sure wasn't!  I felt like maybe the Leprechaun needed a little more pizazz to entice him to our trap!


So I made a Shamrock with my punched out hearts and a button.  So easy!  I could have sworn I had a 2"x2" shamrock die but I couldn't find it and I'm kind of glad I didn't because this turned out so cute and it was so easy!


I also thought that I'd rather over-do-it than have the Leprechaun pass the trap by so I made a sign to go over the trap (GOLD was die cut from the WeR gold cardstock)...


And just to be clear, I cut an arrow from the WeR gold cardstock (Sheer Metallic Paper Pack) and pointed it towards the house so there was NO confusion!


I was pretty proud of the trap!  Cute.  Too the point.  Effective.  Until Little AY said, "Auntie?  How's the Little Leprechaun going to get up to the door so he can fall in?"

UGGHHHH.  Why did I make such a big deal about how small Leprechauns are?  Because it was pointed out by my observant Little's that the door was tiny.  Itsy bitsy.  So I really drove home the point that Leprechauns are teeny tiny.  Yep.  I am my own worst enemy.  And yep.  My Littles are very quick on the uptake.

But, it's okay.  I sent the Little's out to collect sticks (a boys dream) and with a little Scrappy Glue and some strong cutters, we were able to make a wooden ladder.


Which turned out super cute!  And totally made the trap.

So, to sum it up-

Put fake gold in your basket.  We used Rolos.  They're like gold to me...


Put your lid/house on the basket.


Don't forget your ladder!  Imagine the wee leprechaun climbing in and stepping through the door into the wee house, looking for his gold when..


He falls through our hole (which is more a lack of floor!) into our basket and can't get out!  Bam!  The Little's release the wee man and in return for his freedom, they get his crock of gold.  And they get to by every. single. Lego. that. ever. existed.  EVER.


I'd you'd like to grab the supplies to make a Leprechaun trap, visit the WeR Online Shop, and don't forget to use the code: KUTZPAPER to receive 20% off!  Look at that, it IS your lucky day!


Thank you so much for visiting!  We hope you have a super lucky, happy St. Patty's Day!  
Andrea (and the Little's)

Thursday, February 6, 2014

A Little More Love

Hello,

I wanted to share a few of my past Valentine favorites today!  Since Lil A's birthday is right before Valentines Day I don't normally decorate too much for the Day of Love... I've found that little boys aren't big into red and pink all over the house when celebrating their birthdays, but I was able to find a few things I've made for the lovey dovey holiday!


I made this chair backpack for Lil A last year.  I wanted it to look like an envelope and be full of love.  I put love notes, little goodies, candy in it every night before I went to bed so Lil A would wake up in the morning and run to look and see what was in it.


Another Valentine treat I made was a Mailbox and Love Coupon Book Combo...


I still LOVE this sweet mailbox!  Both the Mailbox and Coupon Book are made from the Lifestyle Crafts dies, along with all the fun and frilly details!  After seeing the honeycomb embossing on the coupon book, I'm feeling inspired to go make something related to "bee mine!"...  You can still get some of these dies at the WeR Shop - if you make a purchase from there, use code KUTZPAPER at checkout for 20% off!


Have a great day!
Andrea