Photobucket Photobucket Photobucket Photobucket Photobucket Photobucket
Showing posts with label LifeStyle Crafts. Show all posts

Friday, February 24, 2012

I *heart* St. Patty's Day!

Hello!

Happy Friday!  Yay! 

As some of you know, I am lucky enough to design the QuicKutz Club projects for Pages From the Heart - which is an awesome deal!  Lifestyle Crafts/QuicKutz sends me their new release and I figure out a fun project for Kathy's club members - it's pretty fun! 

For Valentine's Day, QuicKutz released their Sweetheart Line - which was super cute!  My favorite part was the nesting hearts - but take a look at these super cute dies!


Aren't those cute?  I love them!  I think I'll use the donut's for my sister-in-laws bridal shower card - they're doing donuts in place of a wedding cake!

Kathy was giving her club this die as their Club Die...
It's a Heart Doily die - so pretty!  You might be thinking that a heart in February is a pretty easy product to work with... except that the club was AFTER Valentine's Day.  Ugghhhh.  I didn't want to make a Valentine's project that no one would be able to use for a year!  So, I grabbed my hearts and thought, "Hmmm, what else can I made with hearts?".  And then I made this!

A Shamrock!  Perfect for our next Holiday, St. Patrick's Day!  I used this die...
Which is a Nesting Heart Die - you get 5 nesting hearts in this package!  And I used the largest and 2nd largest dies to create my shamrock petals along with the doily heart.
I also used the QK Nesting Circles to cut out 3 rolled roses for the shamrock center, used a manila tag and some fake cream flowers.  I gathers shimmery tulle and placed that behind the flowers/tag/ribbon.

So cute, huh?! 

For the stem I used a kabob skewer and covered it with paper.  I glued the stick onto the back of the shamrock and covered it with a circle glued on top of the stick for support.

That's it!  I'm feeling pretty lucky, how about you?

Have a great day!
Andrea

Tuesday, December 27, 2011

PB Inspired Paper Crafting

Good Morning!

I hope that your Christmas weekend was full of family, friends, laughter and fun!  I know ours was... we had so much fun and excitement that my body couldn't take it and today I ended up with a sinus infection!  But, watching this...

happy little face is well worth any yucky after Christmas germs!

And here's a little gift idea that I made last week that was inspired by a Pottery Barn item that I've been conventing for, umm, like 7-10 years...


Maybe it's a little hard to tell what it is...  but it was inspired by these...


They used to have some that had vases for flowers or candles were attached to the wall with wire or something like that...
So I made a little hostess gift with that same idea - a "vase" attached to the "wall" that holds goodies!  This picture might be easier to see what it is.  It's a little cone (similar to a tussy mussy) that is attached to an easel base with floral wire...


 The cone is actually the Life Style Crafts Party Hat turned upside down so it can hold goodies.  The rosette on the front of the cone is from Life Style crafts as well...


The easel that holds the cone is from LifeStyle Crafts as well, it's the Card and Card Easel kit...  And, if you noticed, the scallop circle that is behind the cone is embossed with the Life Style Crafts Damask Embossing folder and then cut from the Cupcake Stands Scallop Circle...


 Sorry, I can't seem to get a picture of the embossing folder, but you get a damask folder and a floral folder in one pack - they're very cool!


 And here's the view from the top - I put some Muddy Buddy's in the cone as the treat.  The tag is an OLD EK punch and I wrote "Thanks" on it.  I love this!  I love that it's a free standing "treat", and you can take the cone out of the wire holder... it's not glued in, it just rests in the wire!  I did use a foam pop-dot to attach the rosette to the cone which does help to catch the cone, but it really doesn't need it.

I used October Afternoon's Farmhouse and Boarding Pass paper lines for this project.  I love the rulers from Farmhouse - I have a thing for vintage rulers and am always on the lookout for them in thrift stores or yard sales!

IF you're part of the Die Cut Club at Page's, you'll be doing this project for club this month!  I know sometimes it's hard to think of different ways to use your dies, but if you just look at their form instead of what their called, sometimes that can help...  A little inspiration never hurt either!

Have a great day! 
Andrea

Wednesday, September 21, 2011

Patience is a virtue...

Or at least that's the rumor...

I wouldn't know, I'm plumb out today!

We were finally all better, just a little lagging cough and tiredness, but the hubs and I were planning on starting an eat right and exercise plan...   You know, boosting our immune systems to fight germs and all that preventative medicine mumbo-jumbo.

And then this happened...

I have crutches, and a large, straight brace that is not the most fun contraption.  They think I tore my meniscus, along with cartilage and have fluid on my knee... so I'll have an MRI Friday and meet with the Ortho Surgeon and hope that surgery isn't my answer.

Now, this isn't that big of a deal.  Yay, it's not comfortable or convenient, but it's so much better than it could be!  And, I did get to have a little bit of fun before all of this with my bro-in-law and future sis-in-law!  Nothing makes me happier than a wedding!  Except, maybe taking the engagement pictures!


They're an attractive couple, but I guess you can see that!

And even though I doubt this one is on the "Save the Date", I LOVE it!  They were having a staring contest to loosen up.  I'm pretty sure Kerry won.  Dan doesn't look very hard core.  We took these pictures downtown Redlands, where theres a ton of cool, old historic brick buildings with a ton of character.  The first picture that I shared was on an old fire escape on the brick building  and this one was in front of a cool, old green door.  Now, I am not a photographer but it was a lot of fun.  It made me remember when Alan and I did ours, it was so hard to be ourselves in front of the camera and not feel forced, but we have one of ours framed on the wall and we look really really really in llllooovvvveeeeee.

And now is time to share an actual paper project!  What?  I know, the whole point you come to this blog!


I used the LifeStyle Crafts Be Spooked 3-D tree, which is Ba-nan-as.  I LOVE it!  To make my tree spooky, I cut it out of black cardstock and added a ton of fun little spooky shapes from both LifeStyle Crafts and Cottage Cutz.


I am also teaching the "Magic of Oz" Altered Book class at Collective Journey's this Saturday and there's still time to sign up - 909.793.2200. 


Hope you're all having a less of a "fall" than I've had!  Get it, because of my knee, less of a fall... because it's fall... I guess the pun loses some of the cleverness if I have to explain it!

Andrea

Friday, August 5, 2011

200 Posts, My First Contest and a Simple Little Something...

Today is my 200th post. 

What?  I know!  The last 100 have flown by!  I think I've had this blog for 3 years now and it took me 2 years to do the first 100...

So, to celebrate my 200 post's, I'm having a contest!  My first contest.  I'm a big blogger now. 

Are you totally like me and skimming ahead to see what you'll get if you participate? 

One winner will receive a $25 gift card to the  Kutz, Paper, Scissors shop.  You can grab a cute child's body bib or a fun Subway Art like this one here...

Another winner will get a fun assortment of Lifestyle Craft's Sweet Simplicity dies...


And the last winner will get a "splashy" assortment of Lifestyle Crafts Tropical Splash dies...


Are you ready for the catch?  All you have to do is leave me a comment letting me know which post(s) was your favorite(s) and which prize you'd prefer.  The contest closes Sunday, August 7th at midnight.  Please remember to leave your email so that I can contact to let you know that you're a winner!  

And, finally... here's my Simple little something!


A mini-album made from manila envelopes and Simple Stories "100 Day's of Summer" paper.  I LOVE this paper!  It was so easy to use, it had great 4"x6" paper journaling doo-hickies, fun strips, the paper is just plain fun-tastic!

Here's a close-up of the cover.
The banner is punched from Stamp'in Up's new exclusive pennant punch.  I love it, it has 2 pennants, 1 scalloped and the other plain.

Here's some pics of the inside pages.


I used tags, coin envelopes and the 6"x9" Manila envelopes along with 1" binder rings.  Love this album.  Love the paper.  Love the subjects - Adam and Aidan!

Have a great end to the week!
Andrea
 

Monday, April 18, 2011

It's been a "taxing" day!

Get it?  Since it's the deadline for taxes?  Can you tell that I used to work at a Tax and Bookkeeping office?  But really, I meant my day as a Mommy has been taxing on me... it's one of those days when hitting your head against the wall for an hour is more appealing than dealing with a tantrum throwing, hitting, no-napping toddler.  Am I the only Mommy out there to ever feel this way?  And as I'm writing this, I can hear ladies all over the world saying "This too shall pass".  I know, I know, but it really doesn't help much in the heat of the moment... err... moments... like 500 moments...

Anyways!

Onto projects!

I've been feeling very Easter-ish lately.  In fact, the afore mentioned toddler asked me if we could have an egg hunt with his friends (every child under 10 that he comes in contact with is his friend, he'll even make up names for them) and I agreed (this was during a sweet time with him)!  I was playing with the latest LifeStyle Crafts release, it's a Graduation/School one, and I loved the paper bag soo... here's what I came up with!

{Chick and Bunny Treat Bags}


Now, I'm not going to lie, the bunny is totally my favorite!  I like the chick, but he kinda looks like a Herman Munster chick to me... my Mom assured me that he's cute, but since she's my Mom, she's a little biased with my work. 

Let me tell you about the bunny!

All the shapes on him are LifeStyle Craft dies!  The ears are nesting ovals, his little mouth piece is a nesting label die, his feet are nesting ovals, the body is the paper bag cookie cutter die... the whiskers are just strips of paper that I tore and the eyes are googly eyes, and a little pink button for his nose. 

And of course...
Every bunny needs a cute little tail!


The chick is all LifeStyle Craft shapes as well!  And this one I was a little more creative with!
Again, the body is the paper bag cookie cutter die.  His beak and his feet are triangles that I cut off the diamond 12' border die.  His head is nesting oval, folded in half.  Again, the eyes are googly eyes from my local craft store!  I debated about giving him little wings, but figured these treat bags are for little people ranging in the age of 3 weeks old (so sweet!) to 4 years old!  I don't think they're caring about anything except what's in the treat bags!

Check out my post on Page's blog to start meeting the new Design Team!

See you all soon!
Andrea

Monday, February 21, 2011

So much to share!

Hello!  What a busy week!  Phew!  We had a great class at Collective Journey's Saturday morning, we made the boys cards that I shared last week!  M's baby shower was yesterday, and we were just cruis'n with it!  It was actually a crazy, mad dash for the last hour before the party, trying to get everything together, but I think we were done with 2 minutes to spare!  Talk about good timing!  I wanted to share some of the party decor that we did - please let me know if you have any question!

(Centerpieces)


The centerpieces were "Tire" diaper cakes.  I took a round hat box, painted the inside silver, then put diapers all around it and held them in place with rubber bands.  I then covered the diapers with black plastic (a disposable tablecloth), die cut the word "Babyear" instead of Goodyear and put it on the tire, along with a piece of black/white bakers twine.  I also made "w"'s for tire tread.  They came out pretty cute!  We got the cars from an old fashioned dinner called Ruby's, and put decorated candy bars in the seat.
{Tire Diaper Cake and Car Close-up}

I used English Rose from QuicKutz/LifeStyle Crafts for the font.  As you can see, it was difficult to get a smooth finish on our tires... Can you see my chrome rims?

{Food table with paper garland and pom poms}
{Hall tree with pom pom garland, paper garland and ribbon}

{Hutch with paper garland and folded paper cars}

I tried very hard to stick with a blue, brown, cream and chrome color scheme.  I didn't want anything to look to prissy or girl-ish and I think the silver candlestick holders really added the chrome feeling that I was going for!  The pom-pom garland was fun to make, I bought a pom-pom maker from Joann's Craft Store and made pom poms while watching television - we strung the pom pom garlands across the ceiling (sorry, pic didn't turn out) and put single pom poms on the food tables.  The paper garlands I punched and die cut from coordinating papers and then sewed them together.  All of the paper that I used was by October Afternoon.  The cars and trucks (hard to see, their cream and blend with tablecloth) were die cut from my Silhouette.

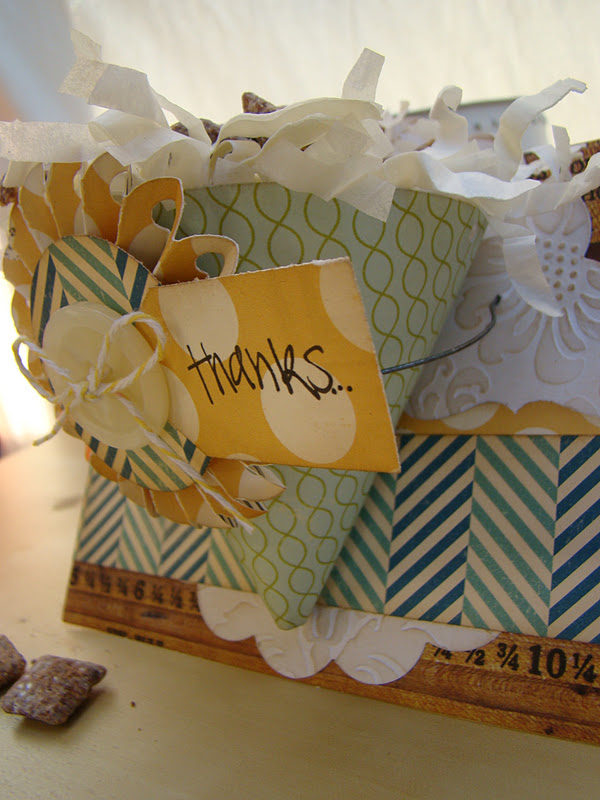
{Trail mix party favor table - see the sign?  It's a license plate!}

{LifeStyle crafts party flag insert - awesome!}

{Party Favor Jar with trail mix}


So, I think that IF I had to pick my favorite thing from the party, it would have to be the favors!  V found these jars at Micheal's for $1 each!  Can you believe that?  We cut vinyl cars (same style as on invite, '57 Chevy) from light blue vinyl and stuck them onto the jars, then wrapped each jar with brown and cream ribbon and tied a little die cut tag onto the hinge.  We placed one jar at each place setting and then put a ton of "trail mix" mixing on a table in different jars so that people could make their own trail mix.  I die cut a license plate from my QuicKutz die and printed on the inside of the plate: Thanks for cruis'in by!  Please fill your jar with your favorite mixing's for the road!".  We used the LifeStyle Crafts Party Insert Flags to label the mixings.  I also sprinkled more cut out circles in the same papers on the top of the trail mix tables.  I love the way the different layers of mixings look in the jars and how the car then pops!

{Car Centerpieces with candy bars}
{Happy Family Candy Bar}


And last, but definitely NOT least, here's my next favorite, the candy bars!  We had to think of something to fill the cars with for the centerpieces, so V had the idea of making a license plate candy bar wrapper.  She did 8 different varieties, each with a different saying.  Where the state name would normally be, she put M's last name.  Where your tags would be, she put the due date.  She also did a different saying for each license plate frame, super cute!

We had so much fun!  Hope you get some good ideas!
See you later, I promise you won't have to wait another week for a post!