Photobucket Photobucket Photobucket Photobucket Photobucket Photobucket

Friday, February 8, 2013

QuicKutz Valentines!

Good Morning!

Thanks for coming by today! 

I don't know about you, but I love Valentine's Day!  I love having an excuse to decorate our home in red and pink, to eat candy and to think of the sweetest ways to let my guys know they're loved!  I also cannot get enough hearts - I'm sort of a girly girl that is surrounded by trash trucks, construction vehicles, police and fire stations and all that is boy, so Valentines is a perfect excuse to let the girly girl out!

I had a lot of fun making Page's From the Heart's die cutting club project this month!  I used old and new dies, some that were obviously Valentine's or Love themed while incorporating some of their core products!  Take a look...


Here's a list of the dies that I used:
Mailbox
Nesting Doily Hearts
Nesting Banners
Arrows
Sketch Book
Honeycomb Embossing Die
Cupcake Stand
Hearts Die
O' Happy Day Font

The mailbox turned out super cute and was very easy to assemble.  I embellished it all over!


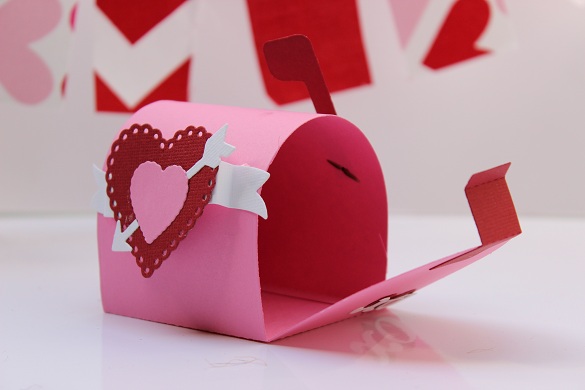
I wanted my mailbox to have a little dimension, so I bent my banner on both ends and glued the ends to the mailbox but let the rest of it popped up from the mailbox.  I used 2 sizes of the nesting doily heart for my heart and an arrow from the arrow set. 

And easy and inexpensive idea for a Valentine's gift for your special someone is a coupon!  You can make a few of these from your scrap paper!  Make one for your Significant Other, child, friend, parents and fill it with whatever coupons you want!


I really really really enjoy using the embossing folders to add a little extra texture - it's cheap, easy and quick!  I used the honeycomb embossing die and cut it a little smaller than the book so it's a mat.  I cut a few hearts from different colors and glued them to the bottom of the coupon book and added the word coupon from Happy Day font, my meaning is "love" coupons.


You've got mail!  I made a few coupons for my little boy that said "Stay up 1/2 Hour late!" and "Let's Play!  30 Min whatever  you want to do with Mommy!"  and "What's for Dinner?  You pick!".  There's nothing that costs money, but Adam will love these!

And last, here's a cupcake stand that I made and dangled hearts from using the Cupcake Stand die and the Hearts Die.


This was super easy, I just used bakers twine and brads or tape to secure the hearts to the stand.  I taped the bakers twine to the underside of the cupcake stand so no one would see it.  I'd feel special getting a little treat on this stand!

That's it!  All of these projects are very simple and I honestly used scraps on every single one!  You could easily put together a little Valentine's Party or Date night using the QK dies!

Have a great Friday and weekend!
Andrea

Tuesday, February 5, 2013

Full of Love Valentine Chair Backpack Tutorial!

Good Morning!  Thanks for visiting today!

Let's go ahead and jump right into the tutorial for the...

Full Of Love Valentine's Chair Backpack

Here's what you'll need...
Felt:
Orange
Red
Yellow (optional)
White
Black
Blue
pink (optional)

Sewing Machine
Red and Orange Thread
Scissors
Scratch Paper and Pencil


First, you'll want to cut your envelope piece of felt.  Here are the measurements that I used - I was being a little lazy and only using 1 piece of felt for my envelope, so it's kind of like a pouch...

First cut a rectangle that is 14" wide x 30" long

For the triangle end,  measure 7" in from the side and put a little mark, so you have a center mark on 1 end.  Then measure about 8" down from the same end on BOTH side and make a little mark.  Now, cut a straight line from the center mark to each of the 2 marks on the size, you'll now have a point. 


Fold your bottom end up to where your triangle starts and you can see you have the start of your backpack!


I then cut slots into the back of my backpack for my straps.  I cut the slots about 1" in from each side and they're roughly 2" wide.  The top and bottom slots around about 8" apart.  You can also sew the straps straight to the envelope if you'd rather, but I wanted the option of changing the length if I ever had to!


Now you'll start the fun part!  I drew a roughly outline of a dump truck - it's pretty much just a few squares, 2 circles and 1 rectangle with an angle. 

I then cut the dumper from orange, the tires from black, the cab from yellow (I ended up changing to red because I wanted a more Valentine feel), a small square from light blue for the window and that's it!

I also cut a few hearts from the red and pink felt.  I did them different sizes and I just eyeballed them.


You can lay it out until you're happy with the look.  I ended up rounding my point - I just like the look better.

If you're doing straps, you can cut your straps to be 2"x 20" from the red felt. You can also use ribbon if you'd rather.

Now it's time to assemble!  Here's what you should have:


First I top stitched all around the envelope with red thread.  I also stitched on my dump truck, I wanted to give it a little dimension, so I stitched the wheels, did a decorative siding on the dump part of my truck and stitched my window onto my cab.


Next, I folded the envelope and pinned all of my hearts and dump truck pieces to the envelope.  REMEMBER!!  Do not pin to BOTH pieces of your envelope, only to the outside piece that you're going to sew them onto!  Your envelope is still NOT sewn together, you'll need it completely open and flat to sew your dump truck onto it.


Once it's pinned on and you like the placement, open your envelope back up and sew your pieces on.


Now you can sew your envelope together.  I just did a straight stitch along bot sides - I also added a zig zag here and here just to give it a little more interest.


Now you can run your felt straps through the slots in the back.  I then sewed the strap ends  together so they each strap loops through the envelope.  Then just slide the sewn piece into the envelope so you can't see it.

That's it!  You're done!  You can now put your Valentine Backpack on a chair!


Now find a super cute boy and ask him to be your Valentine!

I've been collecting items for the past month or so to put in Adam's backpack, we use it similar to an Advent Calendar - I put something in it every day for him to see.  Remember, it doesn't have to be a "thing", it can be a note telling them why/how they're special and lovable or an activity... it's just a way to constantly remind them that they're loved.

After the Fact Ideas:

Here's a few things that I wish I would've done...

1.  Topstitch more - I wish I would've top stitched to make it look more like an envelope - I think the extra detailing would've added a lot.

2.  Pinked the edges - I wish I would've used decorative scissors or pinking scissors to cut the edges - this extra step would've made the envelope look a little more expensive.

3.  I wish I would've put Velcro or a snap or button on the pouch so that my flap would stay closed.  It pretty much does, thank goodness felt sticks to felt!

I think that's it!  I hope this was helpful!  If you decide to make one, let me know, I'd love to see it!

Have a great day!
Andrea

Monday, February 4, 2013

Pottery Barn Inspired Valentine Holder

Good Morning!

I hope you all had a lovely weekend!  Thanks for visiting today!

Today I'm sharing a fun, easy and inexpensive Valentine's that I created for my little Valentines after seeing this one in Pottery Barn Kids...


I love the idea of this Valentine holder, but it's a little too girly for my little Valentine.  I've been scouring the $1 bins at Target, ordered a few fun boy-ish Valentine Books and added a few fun items that I've been wanting to get for Little A but needed an excuse... Daily Valentines was a perfect excuse!

I have a HUGE tub of felt with lots of fun colors so I decided to make a Little A appropriate Valentine holder...

FULL of LOVE Chair Backpack
 
I made this in about an hour and I probably could've done it a little faster if I'd sketched it out first, but it kind of a trial and error project...
 
 
The dump truck was super easy, I just drew a rough pattern on paper and laid it down on my felt and then cut it out.  There's no tough cuts, it's basically just a square with an almost rectangle and 2 circles.  Pretty easy for anyone.  You could also use a die to cut a dump truck if you had one, QuicKutz has one that I own, but I wanted one a little larger than theirs.  Trust me, I've seen about 1 billion dump trucks, I think I can draw a rough one in my sleep!


Here's the straps that go around our chairs to keep the backpack on all the time.  So simple.  All felt, so no frayed edges, wonder under, anything.  I LOVE felt for this reason!


Hmmm... I wonder what's in it today? 

I'll share a tutorial on how to make your own Full of Love Chair Backpack tomorrow!
Have a great day!
Andrea

Thursday, January 31, 2013

February... A Month of Giving Back

Hello!

How are you!?  Thanks for visiting again! 

I know, it's been too long...  I'm sorry for the long delay in posts, it's been a busy, overwhelming past 2 months full of Christmas, sickness, fun, birthdays, sickness, work and more!  I've also been playing with the the idea of getting rid of the blog...

I didn't realize how much blogging would take - It takes so much time, planning, organization and creativity, I feel like I'm letting my readers down when I miss a post and, between my shop and family life, blogging seemed like the easy item to let go of.  Then my sister told me that she checked my blog to stalk see what we'd been up to and was bummed that I hadn't blogged in so long.  So, you have my sister to thank for reviving my determination to make this blog work!  Thank you, Karen!

You might be expecting something A-MAY-ZING for the first post back, like a brilliant DIY or papercraft, and while it's an amazing subject to me, you might be a little surprised.  It's about the need to give back and how you can help.

If you've been following me for long, you know that my little boy was born 2 months premature.  I had a condition called HELLP Syndrome, which is basically where your body identifies the baby as a threat and, instead of getting rid of the baby, your body shuts down.  By the time the doctors figured out what was going on, my kidneys, liver and heart were shutting down or had shut down and my brain was next.  So, I delivered Adam via cesarean while under general anesthesia due to the fear of bleeding out.  Adam was born 3 lbs, 9 oz and 20" long - he was beautiful, with a head (and back!) full of hair and the tiniest feet and hands I'd ever seen.


Our NICU experience was as positive of one that you can have; we had an amazing doctor and wonderful, empathetic and giving nurses.  I felt the compassion and was comfortable that my little guy was in the best human hands possible.  And while I felt good about where he was at, I was overwhelmed.  I received a morning and evening update from Adam's doctor every day, and often, those days were filled with positives, but there were also a lot of set-backs such as a tumor on his brain (benign), a malformation of his brain, lung/breathing issues, stomach issues, insulin issues, and more - there were a lot of unknowns and a lot of the calls/visits ended with me confused, scared and emotionally unhinged.  I wasn't always strong, but I did my best.  And I had a lot of strength around me, from the little guy to our family and friends.


The first time I was able to hold him was the greatest moment of my life.  I cannot express the completeness that I felt at that moment, a wholeness that I hadn't felt since he was in my body.  He was so tough, went through so much with different procedures, exams, and more and he inspired me to reevaluate what was important in life.  I loved this little cub with an exponential amount of love that continues to grow every day.


Adam's challenges didn't end with the NICU, he came home on an Apnea/Bradycardio monitor that would alarm whenever he stopped breathing or his HR went below a certain number.  He couldn't keep his O2 level up when he was in a carseat, so he came home in a car bed... I attribute to his general distaste of car trips to the carbed!  He would stop breathing when he slept, anywhere from 2 to 22 times a nap or night.  He would brady approx 1/2 the time he stopped breathing.  He was in and out of the PICU for the first 18 months of his life, his first smile was while in the PICU...  But his smile lights our life daily and has only gotten brighter and brighter.


He is now a healthy (there are some issues that we're still monitoring) little boy who is turning 5.  5!  I cannot believe it.  He continues to amaze me daily, his sharp wit, humor, manipulation skills, intelligence, sweetness and his compassion.  He is the greatest miracle in the world to me.


You might be asking yourself how this l-o-n-g back story is relevant to Kutz.Paper.Scissors... and here it is.  Since it is February, Adam's birthday month, and because I want to use my business in a positive way that can help someone else, I've decided to give 20% of KPS February profit to the March of Dimes. a non-profit charity that helps families who are dealing with prematurity and gives funds to research to find the cure for prematurity. 

If you have seen a product of mine that you love and want your money to go a little further, please make a purchase in February at Kutz. Paper. Scissors .  You don't have to do anything extra, I'll keep everyone updated on the progress of the monies raised throughout the month and then do a final reveal!  Easy cheesey - you get something awesome from KPS and are giving back in the process - it's a win-win!

So that's it!  Phew!  A super long story and some very cute photos of my little cub... I hope the photos were worth the length!  Thanks for continuing through to the end, and even if you don't see anything in the shoppe that you need, please share this story - the proceeds go to such a worthwhile cause!

Have a great first day of February!
Andrea

Monday, December 10, 2012

Just when I think I'm back...

On the 3rd Day of Christmas my true love gave to me...

a burst pipe under our kitchen sink!  Along with mold mold mold.  And destroyed pergo flooring. And destroyed cabinets...

Yes, I've been missing in action - I started the 25 Days of Pinterest only to get to day 3 and have my posts come to wet and soggy stop.  We are now completely sealed off from our kitchen and the mold Remediation company has started drying out our kitchen.  We're without cabinets, sink, oven, stove, flooring... if you need it to cook, we don't have it!  So, this has been monopolizing my time along with finishing up orders, shipping orders and, of course, Adam!

I'm hoping to finish up all of my orders and have them ALL shipped by Wednesday of this week so we can concentrate on having lots of Christmas fun!  I don't plan on posting again until after the New Year... When I started this blog, it was a showcase for my QuicKutz Ambassador projects and has evolved over the years.  I enjoy sharing different projects, recipes and ideas but have been struggling with time allotment - blogging takes up a significant amount of time! 

I'm hoping with the New Year I'll be newly organized and can get back to sharing with all of you!

I hope the holidays are very Merry for you and yours.
Andrea

Sunday, December 2, 2012

25 Days of Pinterest! Day 2!

Good Morning!

Welcome back to Day 2 of the 25 Days of Pinterest posts!  I hope that you enjoyed Day 1 and felt inspired to do something, even if it was just to look at Pinterest!

Today I'm sharing a seasonal favorite, the Advent Calendar!

{Photo courtesy of twigandthistle.com}
 
Advent Calendars seem to be the big thing this year... and I can see why!  They're a fun tradition that builds the excitement for old and young alike!  I've loved them since I was a little girl and had fun making a few different ones over the years!
 
{Photo courtesy of www.marthastewart.com}
 
One of my favorite things about Advent calendars is that you can really use just about anything, as long as you have 25 of them!  Different sized envelopes taped to the wall in the shape of a tree?  Genius!
 
{photo courtesy of www.designspirationsk.com}
 
I love the simplicity and colors of this one!  And it doesn't look expensive to make, which is a huge plus in this house! Just a few clothespins, a board, number stamps or stencils, paint, decorative tape and some wrapped goodies!
 
{Photo courtesy of www.marthastewart.com}
 
I think this one is my favorite!  It's made from baby socks!  Isn't that cute!  Love it!
 
Last year we did a Book Advent calendar... you can see the posts here and here...  We're going to be doing a mixture of the Book Advent Calendar and Acts of Kindness Advent this year... unfortunately we're 2 days behind, but luckily Adam's still too little to realize that so I think we're safe this year!
 
Here's a fun, simple print and cut Advent Calendar that I made using my Silhouette Cameo!  Take a look!
 
 
All of the little banners are included in one $.99 image download from the Silhouette online store! 


I used red Bakers Twine and cute, red mini clothespins to hang my small number banners.  You can either hang this advent from your mantle or in a frame!  I found the pretty frame at Michael's, it's plain when you buy it, but you can paint it any color you'd like!  I liked the burnt edges and I didn't want to lose that contrast by spray painting it, so I rolled paint on!
 
Hope you have a wonderful Sunday!
Andrea


Saturday, December 1, 2012

25 Day's of Pinterest! Day 1

Good Morning!

I'm over at the Penelope Lane Boutique today, talking with the fabulous vendors and ogling all the amazing creations!  If you're looking for a fun and fabulous boutique to do a little Christmas shopping at, come down and join us!

I'm so excited, because today is Day 1 of my 25 Day's of Pinterest!  I'll be sharing different Pinterest projects that I've either been inspired by or straight up copied!  I'm going to include Holiday Decor, Gifts you can purchase or make, Elf of the Shelf ideas, Recipes, Outings/Traditions and more! 

So, without further ado, here's Day 1!

{Photo courtesy of  vosgesparis.blogspot.ca via Pinterest} 

I fell in love with this idea!  I love the simplicity of the star and the rustic feel of the wood.  I believe that they used yard stakes for this star, but I could be mistaken (I looked at two pins that were similar to this).

Here's my interpretation...

I decided that I didn't want to purchase anything for this project, so I walked very nonchalantly, with my hands in my pockets and whistling, past the paint desk in Home Depot and grabbed a few paint stirring sticks maybe a few times... and then I ran!  Okay, that 's a little dramatic, but that's what I felt like I was doing!  The paint stirring sticks are free, but I'm pretty sure they'd frown on anyone taking 10 sticks at a time!  It was like I was revisiting my paint chip days!

So, I took 5 paint stirring sticks and I sanded them down to try to get the orange Home Depot a little less noticeable.  I then glued the sticks together in a star shape.  I used Gorilla Wood Glue and just did a little dab where they connected - wipe off the excess glue with a damp cloth.  I then clamped them together at each glued point and let them dry over night.

The next day I used Killz Primer - Odorless - and did a few coats on each side making sure the Orange Home Depot was completely gone.  I let this dry over night.  I then grabbed my can of cream spray paint (again, odorless) and did 2 coats of paint on each side. I let this dry again overnight.

I had a package of battery operated white lights that I typically use on my mantle so I wrapped them around the star, popped in a few batteries and BAM!  A fun, FREE (if you already have a strand of battery operated lights) Christmas decor!  You could really paint the star any color or use colored lights on the star, it's up to you!

Afterthought - I wanted my star to look a little more rustic, so I ended up sanding the edges a little to show the wood underneath.  I like it a lot more now.  I also added some greenery, ribbon and a few jingle bells and plan to put this on our front door.

Have a great Saturday!  See you tomorrow!
Andrea