Photobucket Photobucket Photobucket Photobucket Photobucket Photobucket

Thursday, April 3, 2014

Little Warrior Appliqued Pillow Cover Tutorial

Hello!

It's Tutorial Thursday!  So let's jump right in and get to being a warrior applique-er.  Sure, that's a word. And a thing - warrior applique-er.

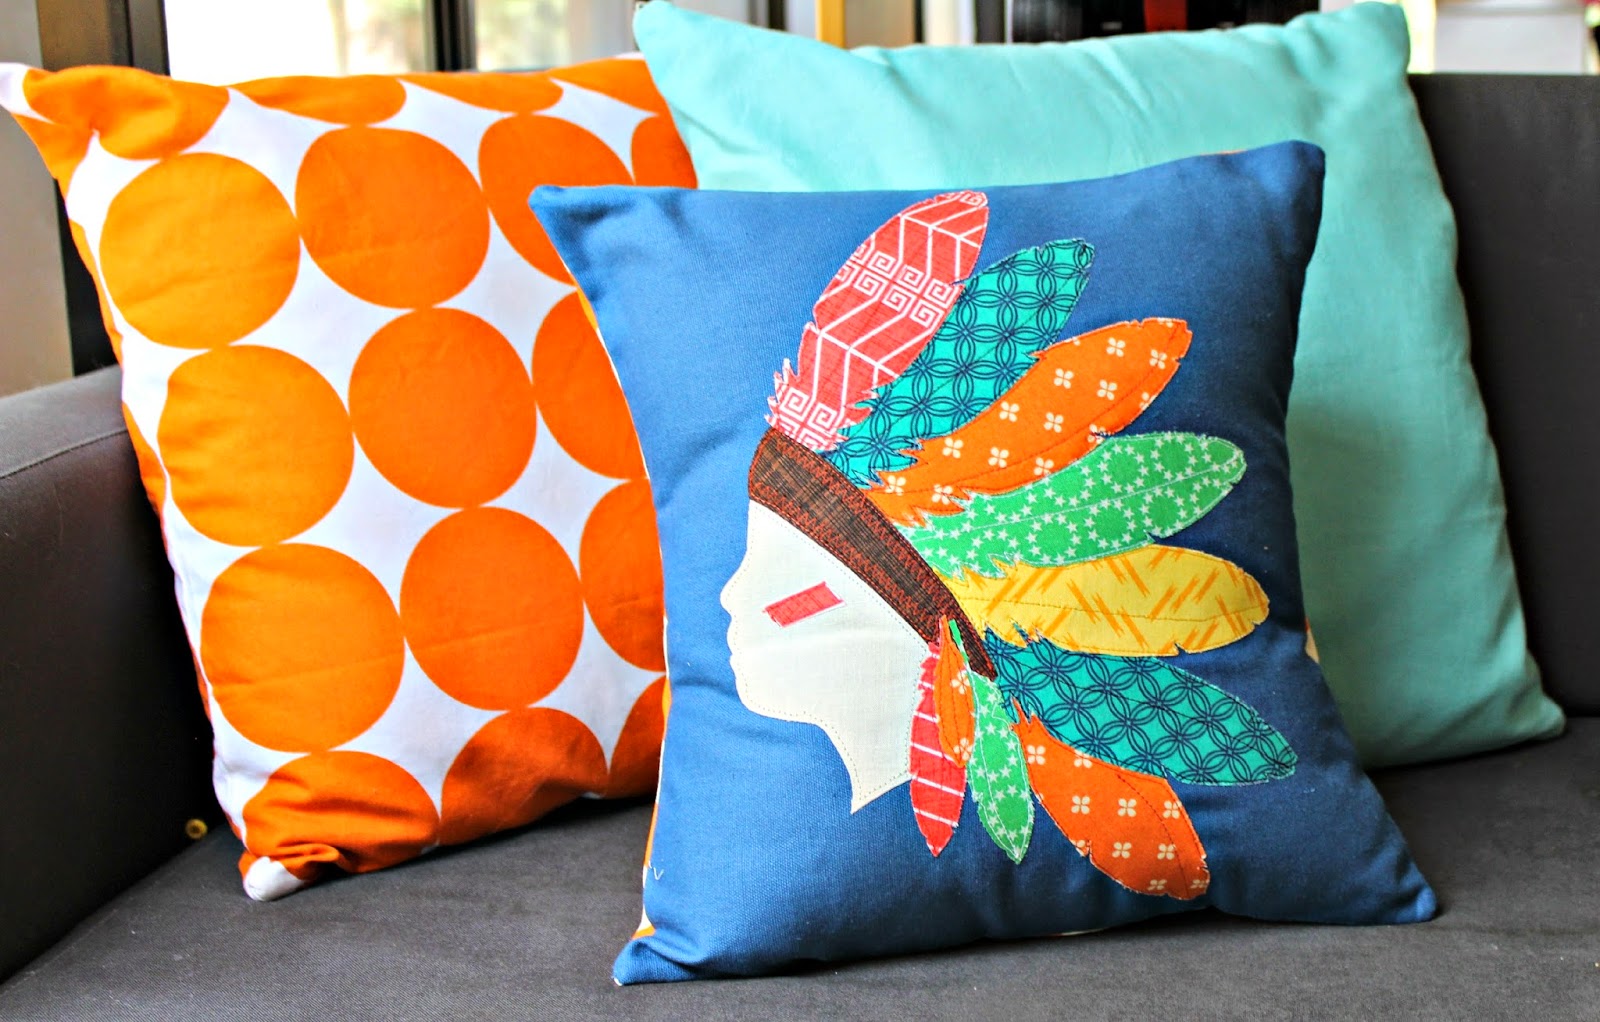
Little Warrior Appliqued Pillow Cover

Here's what you'll need:

1/8 yd (6) different colored cotton fabric
1/2 yd flesh colored cotton fabric
1/2 yd solid upholstery fabric
1 yd Pellon 725 double-sided, heavy duty Wonder-Under, iron-on adhesive
Coordinating Thread
Scissors and Rotary Cutter (if you have one)
Sewing Machine
Lifestyle Crafts Feather Headband Dies
Lifestyle Crafts Feather 4x4 Shaped Die
Evolution Die Cutting Machine
Camera
Printer
Your Little Warrior

Let's get started!

1.
Take a close up photo of your little warrior with a plain background behind him.  Print 2 copies.  Cut out your warriors silhouette from one copy - set aside.  Draw a "band" on your warriors head and cut it out - set aside.

2. 
Cut your Pellon adhesive into the following:
(5) 1/8 yd stripes
(1) square that will fit your warriors silhouette 
(1) rectangle that will fit your band

Lay your adhesive sheet with the textured side face down on the back of your fabric (solid fabrics don't really have a back).

Place your iron on the adhesive and press for 5 seconds.  Move to the next area and repeat until your fabric is completely bonded to the adhesive.  Repeat for all your fabrics. 

Leave your paper backing on your fabric, it will help with tracing and die cutting.

3.

Let's cut our your warriors silhouette now.  Lay your silhouette face down on the paper backed adhesive and trace with a pencil or pen.  Carefully cut the silhouette from the fabric backed adhesive and set aside.

4.

Repeat the same steps for the headband that you did for the silhouette.  Set aside.

5.

Cut the adhesive backed fabric that you're using for your feathers into (2) 4"x4" squares and leave the rest the way it is.  

Place you large feather from the headband set and the 4x4 feather die on your magnetic platform, cover with your fabric, place the cutting mat on top and run it through your Evolution.  Repeat for all of your fabrics.

Viola.

6.  

Grab your upholstery fabric that will end up being the front of your pillow, your silhouette, band and feathers.

7.

Lay out your design, trying to center it on your square.  I used a clear ruler to do this, which helped tremendously.  I also cut off the stems of my feathers - they weren't going to be seen on my design and I didn't want them to stick out from under the band.

8.

Peel off the paper backing of your head, band and feathers as you lay them down!  I did this after I had everything placed and I was kicking myself!

9.

Once you get it exactly the way you want it - take a quick photo with your phone - trust me, it'll help in case anything gets moved on accident.

10.

Secure your design to the fabric with a straight pin.  

12.

You can iron on your entire design at the same time or section by section, whichever is easiest for you.  I ironed on my face, went back and pinned my feathers to my fabric and ironed, went back and pinned my band on and ironed but if you prefer, you can do it all at once.

13.

Once everything was on, I felt like my silhouette was a little too stark and I knew exactly what every good Warrior had - war paint!
 

So I cut a small rectangle from the red fabric scrap and ironed that on as well.  I could jave stopped there, made my pillow and called it good but then I wouldn't be me.

14.

You can totally skip this step, it's up to you!  I grabbed my appliqued pillow front and sent into my sewing room.  I threaded coordinating threat into my sewing machine and started edging all the different pieces.  This was the most time consuming part of the process and only because I had to re-thread my machine for every color fabric I used!

15.

Here's the final result.  I'm still thinking about adding a button to cover the hanging feather stems but I'm just not sure.  Luckily I have plenty of time to figure it out!

16.
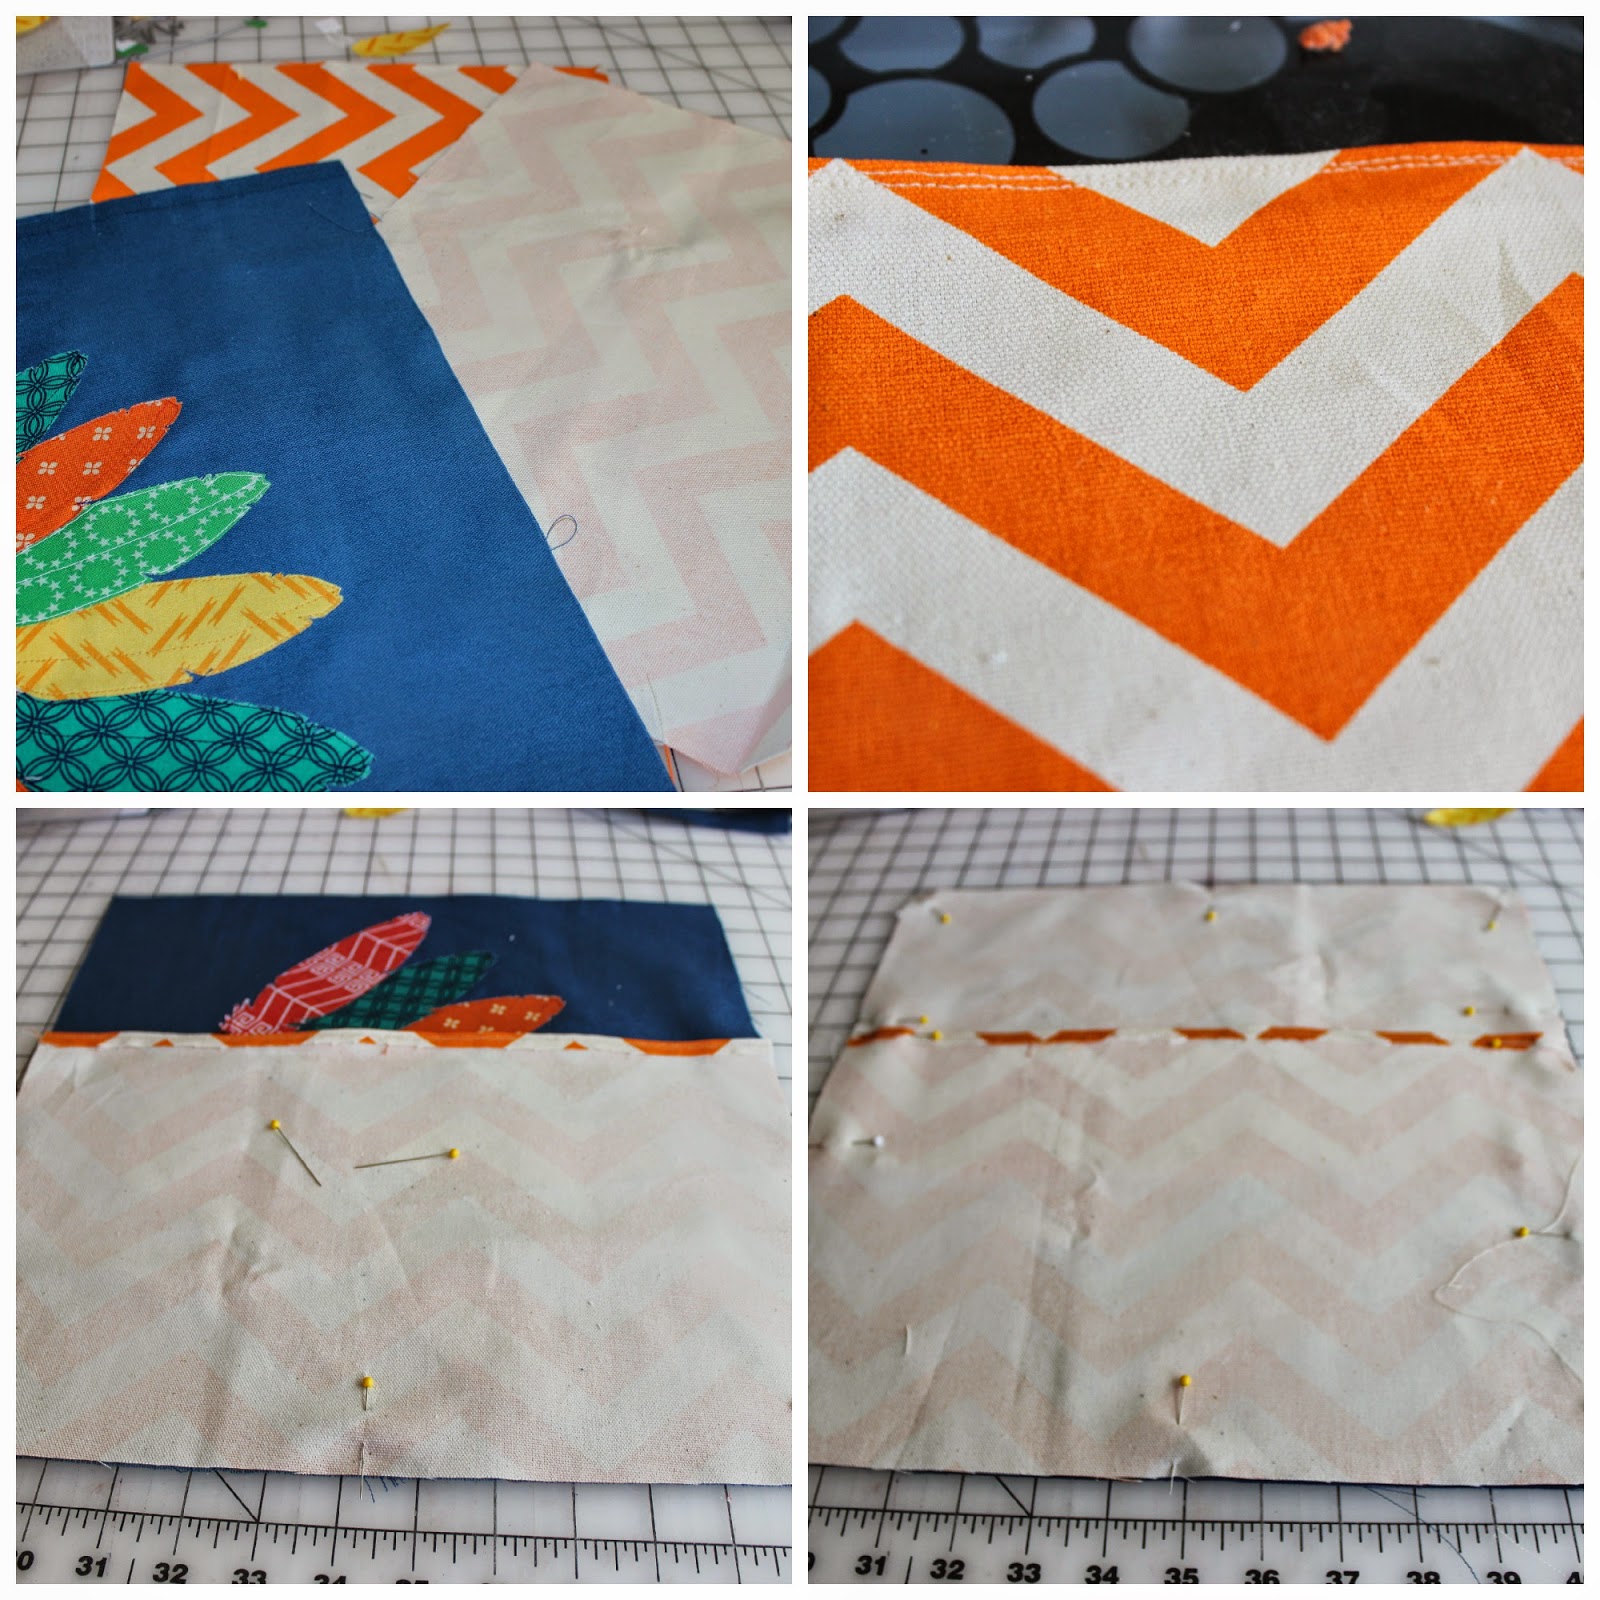
Let's assemble the actual pillow cover now.  This is a super simple, envelope style pillow cover.  

Cut down your appliqued front to 14"x14" - try to keep the appliqued warrior centered.

Cut your (2) back panels to be 9.5"x14".

Fold over the seams that will be where your envelope opening is.  The fold will become your hem.  You can do a double or single fold - depending on what you like.  I prefer to double fold one and single fold the other.  

Sew your hems on your panels.

Pin your double folded hemmed piece onto your front.  Line up the bottom and side as best you can.

Pin your single folded hemmed piece to your front.  Line up the bottom and sides as best you can.

Sew all the way around your cover.  I prefer to do a straight stitch first, going over the corners and where the openings are twice.  I then run my cover through my serger - all the way around!

Turn right side out, poke out corners with a chop stick or something sharp but not too sharp and iron.

Stuff with a pillow form and admire your Little Warrior.  I prefer my pillows to be extra stuffed, so I typically stuff my covers with a size larger form.  I used a 16" pillow form for my 14" cover.


I hope this was helpful!  I really enjoy appliqueing - it intimidated me when I was first learning about it, but after trying it a few times, I realized that it's just normal sewing but with a design!

Please let me know if you have any questions on this!  Or if you give it a shot and how it turns out for you!
Have a great day!
Andrea

ps - don't forget to enter the give-away for some fun WeR Washi Tape on yesterday's blog!  Good Luck!

Wednesday, April 2, 2014

Little Warrior Appliqued Pillow - Lifestyle Crafts Studio Team Project

Hello!

Today's a very fun day for me - I finished my April Studio Team Project last week and was so excited with the way it turned out, (you know, sometimes my ideas are awesome in my head but pale in reality) I couldn't wait to share it with everyone!  And today's the day!


I'm in lurve with this pillow!  Yep, seriously, in lurve!  Why?  Well, because my Little Warrior Appliqued pillow is all about my favorite little guy... Lil A, who is a true warrior.

You may know a little of our story - but if you don't, here's a quick run down...

Lil A was born 2 months premature with a barrage of health issues... so many, to be honest, that I don't remember or understand all of them.  A lot of them cleared up on their own, or with medical intervention, and some we're still dealing with or are aware of today... but he was so strong, he was such a good little guy, a happy little guy, who was constantly being poked, pricked, rolled, scanned, suctioned, alarmed, probed and prodded, tested... he fought for the first 2 years to just breath, he is my fighter, my WARRIOR!

It makes me smile and cry when I look at the above photo and compare it to this one...

We are blessed.

I knew I wanted to make an appliqued pillow cover for his month's project and I was playing with the idea of making a spring motif appliqued pillow cover - possibly with flowers or a bunny... maybe flowers and a bunny(!) but I was listening to Lil A one day, he was telling me a story - a very animated story - and I was awed by how fortunate we are, how strong he is today, how I couldn't see an end to the health issues when he was first born and how grateful I am that he is such a fighter.  A warrior.  And I looked over at him, imagined him with a Native American Headdress and that was that.  The Little Warrior Pillow Cover.


I'll share a detailed tutorial tomorrow, but here's a quick run down.  I took a photo of Lil A's silhouette, which I then printed, cut out and used it as my pattern for my little warrior's face. I wanted this to be totally personal, something that we could cherish and remember him exactly the way he is now.  Using his silhouette was the best way to accomplish this.


I then die cut all of my feathers from adhesive backed fabric.  I used 2 different feather dies for this project: the Feather Headband and the 4x4 Shaped Die - Feathers.


Once I had all of my pieces cut, I ironed them onto a piece of solid blue, upholstry weight fabric that would become the front of my envelope style pillow.


Once the silhouette, feathers and headband were all ironed on, I edge stitched everything.  You don't have to do this, but I liked the extra umph the stitching gave it.


There are so many variations that you can make of this same pillow!  You can use one color fabric for the feathers instead of a variety, you can use solid cotton fabric instead of printed, you can research a certain tribe and duplicate their traditional headdress... it's completely customizable!  Since Lil A's Warrior Pillow was going into the playroom, I wanted it to have a playful vibe hence- a rainbow of colors.


I hope you enjoyed this months project!  This was an easy project, but a little time consuming.  I wasn't able to completely cut through my fabric with the feather dies so I had to hand cut certain areas - I did it while watching a Wild Kratts show with Lil A which made it good busy work while learning about a big nosed monkey.

If you want to make a Little Warrior Pillow Cover for your own Warrior, check back tomorrow - I'll have a detailed tutorial ready and waiting!

And remember, if you want to purchase your own dies, visit the ShopWeR store and enter code KUTZPAPER at checkout to recieve 20% off your entire order!


Now please take a moment and enter the WeR Washi Tape Giveaway!  Good luck!
Andrea

a Rafflecopter giveaway

Tuesday, April 1, 2014

April Fools!! Today's NOT National Scrapbook Day...

Did I get you?

Did you think today was the BIG Blog Hop with the WeR Lifestyle Crafts Studio Design Team?  The one celebrating National Scrapbook Day?  With a link to the WeR Blog with their super awesome give-away?Well, April Fools!  It's not until May 2nd... the real National Scrapbook Day!  Fooled ya!

Did I convince you that I didn't just totally get the dates wrong and that I meant this to all be one funny, joke?  I'm quite the jokster.  I'm such a jokster that I even fooled myself into thinking everything had to be done today to be live by 6 am tomorrow! Hahaha.  Funny stuff!

So, since I'm so good at this whole April Fools thing, I'm going to keep it going!  Look at what Lil A is going to get for dinner...


A delicious slice of Berry Pie!  April Fools! It's Meatloaf and Mashed Potatoes!  And I think I'm going to follow it up with a yummy dinner of...


grilled cheese sandwiches!  April Fools!  It's sliced angel food cake with colored icing in the middle!

And since ya'll are being such great sports about my little mix-up, visit me tomorrow to see my April Studio Team Project and a give-away (said in my best Oprah Car voice)!

Have a fun, goofy day!
Andrea


Monday, March 31, 2014

Boys Bike Card using the Silhouette Offset Feature

Hello!

Did the weekend fly by for you like it did for me!?  Yesterday we had an open day, so we each wrote down 3 things we wanted to do on scrap pieces of paper, folded them up, put them in a hat and let Lil A pick out 3 activities.  Here's what they were...
- Watch the Lego Star Wars Movie
- Practice the loop for the Redlands Bicycle Classic
- Work on the garden

And I'm happy to report that we were able to cross each of these off our list!  My favorite part was the garden.  Big A and I were able to put together 1 garden box (we're replacing the pallets from last year since our dinosaur keeps growing and stealing our harvest!)...

(last years pallet garden)

We still have 1 more box to make and Lil A and I are going to plant our seedlings this week so that hopefully next weekend we'll be able to finish off the garden!  The weather's been so nice where we are that it makes all of the earthquakes we've been feeling seem like a mote point!  Well, kind of...


Anyways - our little cousin turned 6 a few days after Adam but they didn't have his birthday party until last weekend so I created a card with my Silhouette that I thought reflected one of his interests - bicycling!


I made this bicycle card by using the offset feature on the Silhouette.  The offset basically makes an outline of the image that you can make as small or as large as you want!  I made my offset image large so that my card base would be the same shape as my bike.  I also mirrored my offset shape, welded the two shapes together to create my actual card.

I wanted the card to have a little dimension so I sized a grass border to the bicycle and cut it out of different papers.  I then glued my bike to the card but left the tires free of glue so I could add the grass behind the wheels.  One I glued the grass down I glued the tires down.


I added the "6" as if it was riding the bike.  Looking at the card now, I wish I would've added some googly eyes to the 6!  Next time, next time!

That's it - a simple, fun, personalized card for a fun little boy!  

Remember to check back tomorrow - I'll be sharing my Studio Team April project and taking part in the Studio Team Blog Hop with a link to the WeR blog where you can enter to win a HUGE giveaway!

Have a great Monday!
Andrea

Friday, March 28, 2014

Gold Rush Miner Birthday - Part Two

Hello!

Today let's talk about the fun part of the Gold Rush Miner Birthday Party!  The part that's all about the kids!  Because lets be honest, the banner, invite and cupcake pics aren't "fun" to them!


Since we were having a "Gold Rush" party, I figured there had to be some sort of gold finding activity... so we decided to let the kids pan for gold!

Such an easy and fun activity!  I purchased some aluminum pie pans from the Dollar Tree, spray painted some lava rocks gold and filled 2 plastic tubs with sand, hiding the golden nuggets in the sand.  Big A punched holes in the pans so the sand could shift through and I made some cute Gold Loot bags for the Miners to carry their gold in!


Now, I know I said I was going to focus on the kid activity part of the party, but I have to take a quick turn and just say that I made my Gold Loot Bags with my Silhouette Cameo, the Silhouette Stamping Supplies and a Staz-On Ink Pad!  I formatted my image, cut it with the Silhouette Stamping Material and then stamped it onto some muslin bags I purchased at my local craft store!  So easy!  I LOVE the stamping material!  Maybe I'll do a tutorial on it soon... 

Okay - back to the fun!

Of course, half of the fun of finding gold is getting rich and spending the gold!


We set up our store with different containers from the Dollar Tree filled with fun kids toys and candy.  We had kits, batons, necklaces, Matchbox cars, puzzles, bouncy balls, Army Men and so much more!


I made the store sign using contact paper from the Dollar Tree, some patterned paper I had on hand became the border and the letters were formatted with my Silhouette software and cut from solid cardstock which I then glued to the covered foam board.  We hung the sign from our patio cover with bakers twine (my Crop-a-Dile had no problem punching through that foam board!!) and the Miners were able to come in and trade their gold for goods!  I loved this - so much more fun than just a goody bag!

We also set up some fun booths with activities for the kiddos.  My friends and I all see to go over-board when planning our kids parties - all of the booths I used for Lil A's party were actually made from my friends Halloween party!  We just covered them with butcher block paper and decorated them to represent our theme!


The Sharp Shooters booth was my favorite.  The kids used a rubber band gun to shoot down cans and bottles - and since I'm crazy, I covered the bottles in cute paper because I just couldn't leave it alone.


Another booth was a bean bag toss.  We used some small tin buckets I already had on hand (I think I got them from the Dollar Tree or Targets Dollar Aisle for a past party) and some corduroy bean bags on a wooden stool and let the kids aim and through!


We did end up taping the tins to the stool with duct tape - otherwise they were getting knocked down more than they were getting bags in them!


And last, we had a Gold Ore Toss!  It's similar to the Bean Bag Toss, except the kids were tossing gold coins into ore carts!


My nerd flags going to fly for a minute - my favorite part of the whole thing??  The Gold Rush educational posters/pictures that we found online (hello, Google!), printed off on regular printer paper in various sizes and glued to the covered booths!


The kids loved the fun activities, Lil A was thrilled with everything and he keeps finding gold in the backyard that he wants to trade in!  Oops - guess I should have disposed of the extra gold nuggets from our panning center better!

I hope this party inspires you with a difficult theme!  Have a great weekend!  And make sure to check back in next week - the WeR Studio Team Blog Hop is Tuesday for National Scrapbook Day... and you'll have a chance to win something HUGE on the WeR blog!

Andrea