


Supplies:
Pencil
Garden Gloves
Saw
Nails
Hammer
Crow Bar (Optional)
Pallets
Sandpaper
Manure or potting soil
Seeds
Landscape Fabric
Staple Gun
Scissors
1 2x4 wood beam for each pallet you'll use
1.
Clean/weed the space you'll use for your garden. Our side yard is the perfect spot, we needed lots of sun for our veggies so this is the ideal spot for us. You can see what your plants sunlight needs are by checking the seed packet or potting pick (if you're using a mature plant). Our side yard was overgrown with wides, so Big A and my Dad used a rototiller to rip up the weeds and then Little A and I went through and threw all the weeds away. This took the majority of a day for us, but if you're area isn't a weed jungle, you'll be fine.

2. Once your area is free of weeds, go ahead and rake it so that it's pretty flat. Its helpful for the whole process if your ground is soft but not wet.
3. Grab your pallet, hammer, nails, saw and 2x4.

3. First you'll remove the excess boards from your pallet top. I wanted wider rows for our veggies, so I removed every other board with the crowbar. You'll want gloves for this, you'll need to pull, tug and pry on the boards and more pallets are basically a large splinter.
4. Next you'll cut your 2x4 into pieces so that each piece is the same width as the pallet, these will be the legs of your pallet raised beds. To do this, I simply leaned my 2x4 against the pallet, got the ends even, drew a line where I wanted to cut so that my legs were the same width as my pallet and used the circular saw to cut my pieces. You could use a regular saw, but it would take a lot longer. I then hammered my legs onto the bottom wooden slats of my pallet.


6. Now comes the fun part! You'll want to make a nice, flat spot in the dirt where you'll lay your beds.


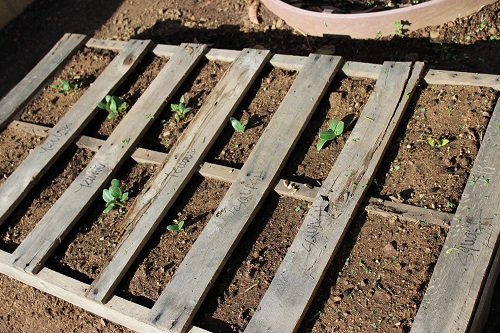
7. Lay your bed in your raked spot and fill with a mixture of soil and manure. Try to get your soil/manure mixture to the top of your beds. We wanted to make sure that the soil wasn't going to move around too much on us, so we would step/stomp on it to pack it in. We also wet it down after we packed it in, let it settle then added more dirt/manure and packed it in again. You'll have some seepage around your pallet, but you pack a little bit of dirt around the base to avoid too much.

NOTE: Adding dirt with a dump truck is the fun way to do this.


Oh! And another great part of garden beds with pallets - you can write directly onto your pallets what you planted so there's never any confusion!

That's it! Go on, get dirty! Please leave me a comment with any questions and I'll do my best to give helpful responses!
Have a great day!
Andrea
No comments:
Post a Comment