Photobucket Photobucket Photobucket Photobucket Photobucket Photobucket
Showing posts with label Pinned Down Mondays. Show all posts

Monday, April 16, 2012

Pinned Up Monday!

Good Morning!

I'm back from my unplanned but very necessary week blogging break.  I was able to upload all of my photo's, plan out posts, work on pillows, create new signs for my shop... I even taught a Make-n-Take at Collective Journey's for a charity event on Saturday!  I was able to see old friends... holla Mary, Naomi, Karen, Janice - there and teach a fun and simple project that I created with my Silhouette! 

And speaking of my Silhouette Cameo, it's been getting a good workout lately!  I've been using it a lot!  And today's Pinned Up project is just 1 example of what I've been using it for!  Here's my Pinterest inspiration...

{photo courtesy of  cakeslikesaparty.com via Pinterest}

No, I did not make a cake using my Cameo... but I could probably use it to decorate one!  I love that banners are popping up everywhere!  Banner's are just for hanging from walls and ceilings, they're even great for decorating unexpected places... like this birthday cake!  And since I had a little girls birthday present to wrap, I decided to take the birthday banner idea in a new direction!

 
I wrapped the gift with kraft paper that I use to ship my signs.  I then took scraps of different October Afternoon lines that I had and cut pennants using my Silhouette Cameo.  My favorite part of the whole project was that I could cut 3-4 scrap pieces of paper in one shot!  I just mapped out my cutting mat, put the different paper on different parts of the mat and cut!


I still had some scraps of scraps, so I grabbed my heart punch and punched a few hearts to add to the banner.


I then sewed all of the banners together with my sewing machine - this took maybe 5 minutes. 


Of course, the gift needed a tag so I used my Cameo to create one.  I used a number tag, (it's was her first birthday so I choose the "1" tag) , typed the birthday girls name in and had my cameo cut it out.  I liked the negative effect and debated about backing it with a solid but liked the way it looked without.  I used my software to create the rectangle and the wording that would fit perfectly on the tag - I just printed and then cut it out and the tag was done!  Super cute, personalized tag all with my Silhouette Cameo!


Here's the final gift wrapping!  I love the simple but sweet look of the different patterns on the kraft paper!  Looks old fashioned but still current!

That's it for me!  Have a great start to your week and I'll see you back here on Wednesday!
Andrea

Monday, March 26, 2012

Pinned Up Mondays

Good Morning,

Well, today is my Pinterest inspired project day!  Yay!  And my project is , quite literally, about pins!

Here was my inspiration...

{Photo courtesy of From makeit-loveit.com via Pinterest.com}

Aren't those SO pretty?  I love the idea of using a mason jar that you can store your sewing supplies in with a pin cushion on top...

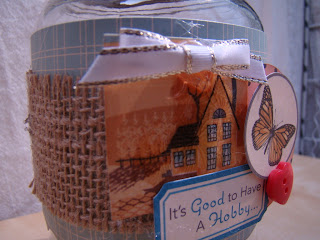
So I made this for part of my Page's DT projects...


It was pretty simple, but I would do it a little, errr... a lot different.  I was trying to see which method would work best for the pincushion top, so I ended up cutting a circle from canvas fabric and then stuffing it with pillow fiber.  I then hot glued it to the inside of the rim of the lid.  I then glued on the top so that the stuffing didn't come out into the mason jar.  Next time I'll make it smaller and I'll sew the circle... so it doesn't look like such a huge bulbous mass on top!


From there I just started decorating the jar with scrap paper from OA's Farmhouse collection.  I also used a strip of burlap, since canvas and burlap seem to fit perfectly with the Farmhouse line!

I used the Word Stickers and punched paper to decorate the jar.  I added a little bit of ribbon and a button to give the jar a little umph.  And that was it!  I'm hoping to fill it with some sewing supplies and give it to a friend as a little "Thank You".

I'll be back Wednesday with more projects to share!
Andrea

Monday, March 19, 2012

Pinned Down Mondays - St. Patty's Day Fun

Hello!
I know, I know, you might be groaning from all the corned beef and cabbage that you had over the weekend... and you might be over the whole Green thing, but, well, here - we're always into green.

Green is my little boys favorite color - always has been.  So, when we started talking about St. Patrick's Day at the beginning of the week, once I mentioned that EVERYONE had to wear green or get pinched, he was all in.  I got pinched since I stayed in my pj's for most of the day, Papa got pinched because he wasn't wearing green... we take our pinching duties seriously around here!

Anyway, the Husband was out of town this weekend and we normally go to a local restaurant every St. Patty's Day for their All-You-Can-Eat Patty's Day dinner, but since Alan was gone, I decided to have a potluck here.  We had some friends and their kids over and it was a lot of fun.  It was easy for me, I just threw the corned beef in the crock pot and walked away.  We also made rainbow chip cupcakes with homemade buttercream icing -

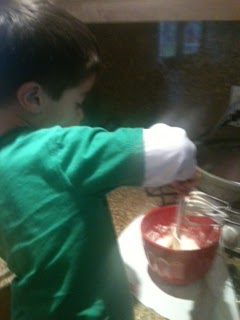
Sorry, I had to use my iPhone for these shots - here he is stirring...
And pouring in more sugar... there is a serious amount of confection sugar in buttercream icing...
Yup - I let him use the mixers.  I was nervous about this, but I was very serious when I told him how/where to put his hands and we never had the mixer above a low speed... Can you see how he bites his bottom lip while he concentrates?  I love that -
And since it was St. Patty's Day, I let him put as much green food coloring into the icing as he wanted.  He was pretty impressed that the icing changed color -

For the cupcakes I used a rainbow chip cake mix - which I thought was a pretty good and an easy alternative to doing a rainbow batter like I was originally planning that I had pinned on Pinterest...
These look super fun, but I was trying to take it easy and not over do-it, which I have a tendency to do...

But, I had to kind of over-do-it...


Adam and I did make little treat holder's to give to his friends - I used a 3-D Leprechaun Hat from Silhouette and they turned out so cute!  And very easy to assemble!


We filled each of the hats with a little bit of kraft shred and then "gold and silver"  - which were rolo's, peanut butter cups and kisses!  They were super cute!

That's it for us today!  See you Wednesday!
Andrea

Monday, March 12, 2012

Pinned Up Monday!

Good Morning!

I hope that everyone enjoyed their weekend... I had an interesting weekend... I broke my ankle!  Yup.  So, on top of the slipped vertebra in my lower back, I'm hobbling around in an air cast.  Which is an improvement, I was on crutches over the weekend, which wasn't feeling very good with my back!

Soo, when I first became best friend with Pinterest, I saw this...
And I immediately thought of my BFF, Jen.  She's originally from here (CA) and now resides in Kentucky.  I thought that it would be cute to make state pillows for people that love where they live and/or where they came from.

I thought that a state loving pillow cover could be very fun, so I made a few to sell in my shop!  I used my Silhouette Cameo and Flocked Heat Transfer for this - I love the way it turned out!  Take a look!


I used my yellow and white chevron fabric and sewed the cover first.  I formatted the state on my Silhouette and then added the heart.


I really really really like the look of the gray and yellow!  Since my BFF is in Kentucky, I made a KY pillow for her, I thought that the 2 pillows would look good together...
I thought that I would like the yellow on red, but the red pattern is noticeable through the state and I am not a fan of that!  I may do another layer of the yellow on top of the yellow state - I think I can do 3 layers of the heat transfer...

The best part is that I can do all of the states!  And some countries!  I love my Silhouette!  I'm planning on sending these pillow across the country tomorrow!

Hope you enjoyed my Pinterest moment!
Andrea


Monday, February 20, 2012

Pinned Up Mondays!

Hello!

Happy President's Day!  Yay for a 3 Day weekend! 

Well, today is Pinned Up Monday, which is all about recreating what I've seen or been inspired by with Pinterest!  I'm really enjoying myself with the Pinned Up Monday's series, it's fun to actually make something that is inspired by something else - full circle :)

So, my soon-to-be Sister'n'Laws bridal shower is in a few weeks so we started working on the shower decor... the theme of the wedding is rustic elegance and we were thinking it would be fun to use the same theme for the shower!  So, here's my Pinterest inspiration...

Aren't those pretty?  I love the yellow with the sunlight streaming through.  Beautiful!

I decided to go with a variation of these.  I'm not going to be hanging mine for the shower (although I may after the shower), they'll be spread on tables so we did a few varieties.

I grabbed some of my old sheet music and cut it into strips.  I used my heart Fiskar's punch and punched out a heart so that I would have the negative in my sheet music and glued the strip to the jar.  I then wrapped some Baker's Twine around the jar and tied a bow.  So quick, easy and cheap!

I plan on filling these with water and using a smoke free floating candle in them - my plan is that you'll be able to see the flame through the heart... you know... burning love?  Too cheesey? 

We also had some smaller, fatter jars and did a slight variation with those.  We used the punched hearts from the previous jars and some burlap.  We glued the burlap onto the jar, glued the heart to the burlap and wrapped some Baker's Twine around it, tying a bow to finish it off.


Aren't they cute?   Again, so cheap, quick and easy! 

Well, that's it for today.  My back is slowly getting better and I've been able to get back in the hang of things very slowly... so I'm hoping to work on some projects that I'll be sharing with all of you!  Just keep checking in - my posts may be a little erratic right now, but I'm hoping to get back on schedule soon!

Have a great week!
Andrea

Monday, February 13, 2012

Pinned Down Monday

Hello!

I'm sorry I missed last weeks Pinned Down Monday - it was a rough week.  Adam, my little guy, ended up with pneumonia.  He started off with a flu/head congestion bug 2 weeks ago that progressed to asthmatic bronchitis and then turned into pneumonia.  So, along with my back still being hurt, but getting better with PT, we had a very sick little boy.  We also celebrated Adam's birthday last week, but had to cancel the little family party since he was sick.  I don't know about everyone else, but this years germs seem pretty potent!

Anyways, Adam and I worked on his classroom Valentines on Saturday and they turned out super cute.  I got the idea from Pinterest....

Courtesy of thefryfamilyblog.blogspot.com via Pinterest

I thought these were so cute!  I found some plastic shovels online - The Giant Party Store - for a decent price - it's a little early in the season to find plastic shovels at stores!  I ordered red ones (I wanted them to be a little boyish in a pink and red heart Holiday!), enough for his class and used my Silhouette Cameo to design the tag.

So, I played with a few different designs - I ended up using a scallop circle shape that I had in my library - I sized the wording to fit in.  I also colored in my words and changed the setting from cut to none so that I could do a print and cut with these tags.

After I designed my tag, I printed them out.  Super fast and easy.  I used Bazzill white cardstock, my printer didn't have any problem with it!  If you have a Silhouette (I have the Cameo now - love it! - but this also works on the SD), remember to use registration marks before you print!  This is how your Silhouette will know where to cut after you've printed your design!
Once you have your printed sheet, grab your mat and cut your tags.  The Silhouette Cameo will walk you through the process, from how to position the paper on the mat to different cutting settings and reading the registration marks.  It's very easy to follow.
My Cameo cut the circle's perfectly!  All of them were perfectly placed and the paper had cut through all the way!  Yay!  I also cut the red scallop circles with my Silhouette.

Now the fun part!  Adam and I put all of the tags together super quick!  He actually distressed all of the edges of the white circles (I swear, he's totally into distressing), I then put glue on the back of the white circle and he stuck it to the red.  Then Adam wrote his name on the back of the tags... the first 2 or 3 he did on his own, but after that I helped him.  We made these a few weeks ago (before I hurt my back), so I just set them aside till Valentine's Day was closer.

On Saturday we assembled his Valentines Treats.  I explained what Valentines was all about and that he would be giving a treat bag to each child in his class.  He was pretty enthused.  So, he grabbed his shovel and I poured the candy's onto the table or into bowls and he scooped the candy into the cello bag and then added the shovel.  I then tied them with red/white baker's twine and he would thread the twine through the hole on the tags (I told myself that working on his hand-eye coordination made up for the candy that he was sneaking when he thought I wasn't looking!) and I tied the bows.


 Didn't those turn out so cute?  The red shovel handle is sticking out from the cello bag and we have a mixture of Hershey Kisses and M&M's in the bag.  I'm sure that other parent's are going to have their kids give out "healthy" treats, so I don't feel so bad about giving the kids a bag of candy with a shovel so they can get the most candy in the their mouth quickly!
Adam saw my picnic basket on the shelf and grabbed it and started putting his treats in it - so cute!  I love it!  Or, I guess I Dig It.

I had so much fun making these Valentines - and I like how Adam got to be so hands on.  I remember making Valentines and crafts with my mom as a child and how special that was.  It's really about making your child feel like they're helpful, that they're a valuable member of your household team.  I think he's going to be pretty proud tomorrow at Preschool giving out the treats to his friends!

I'll see you back here tomorrow with another Valentine's post!
Have a great day!
Andrea

Monday, January 16, 2012

PInterest Mondays!

Hello!  Happy Monday!

In December I did a special series called "25 Days of Pinterest", and I LOVED doing it!  It was so much fun, following through on inspiration!  So, I decided to go ahead and continue the series, but modify it a little!  So, I'm starting a new series called Pinned Down, which will take place every Monday!

So, today I'm focusing on an obsession of mine - Burlap.  It's such a cool, sturdy, inexpensive, rustic, and natural material to use!  I've been pinning up a storm with burlap because I'm hosting my soon-to-be sis n' laws bridal shower at our home and the theme is "rustic elegance".  I'm very excited, I've been getting so inspired that I had to do a trial run with burlap this weekend!

Here's my Pinterest inspiration...
Did you notice number 1?  The ruffled burlap bag?  Well, I went to my cousin, Susan's, bridal shower on Saturday and I needed a gift bag... so... instead of buying a gift bag (I've been trying to avoid wasteful purchases lately), I made one from my burlap and fabric scraps.

I started with a piece of burlap folded in half - it was roughly 18" x 21" post fold.  I wanted it very large because we were putting a pillow and other goodies in it and Susan is a Stamp'n Up consultant and I wanted her to be able to use if to cart around supplies.
I pinned up the 2 sides and sewed around them to make a pouch.  I did a zigzag stitch with a 1/4" seam allowance.  Put bag right-side out and iron seams so that it lays fairly flat (it's burlap so it's not going to have a super clean edge but it's okay, it's very forgiving)


 Next I made a very wide binding.  I wanted a tri-fold binding, so I started with a 6" x 36" wide piece of fabric.  I folded the piece in half like a hotdog bun and ironed it.

I then opened it back up and folded in the 2 edges about 1 inch and ironed them, so now, if you were to look at the piece, there should be 3 creases.

I then folded it back in half and ironed it again once for good measure!  Hello thick, wonderful binding!

I then pinned the binding to the top of the top so that it would have a nice, clean opening.  Since I pinned the binding on both sides I only have to sew once - hello easy!
Sigh.  Nice. 

Then I grabbed some more fabric scraps and cut 2 strips - I didn't worry about getting them super even and I didn't care about the seam.  I just sewed them wrong side to wrong side and let the seam show.  Again, easy.  And since this is a casual, burlap bag, I felt like rough edges were allowable.  Don't tell my Grandma Grace.
I sewed the strips onto the bag, I wanted them secure so I made a large rectangle with an "x" in it - sturdy sturdy sturdy.  And it looks cool.  Cute huh?  But, could I leave it at cute?  Nope, I had to add just a little more!

So, I grabbed my Stamp'n Up Exclusive Butterfly die and cut a few from the scraps of my binding.

I pinned the butterfly's on the bottom, right corner of the bag to make them look like they were flying up and away...

Then I zig zag stitched the bodies of the butterflies but left the wings free.  Fly free, winged friends!
And there's the finished (I promise) bag.  I love it!  And I had to give it away, which was very difficult but I hope that it it shows my strong character and selflessness... but I guess talking about my selflessness shows another character trait - sigh...

On another note, Page's From the Heart is having a Design Team Sponsored Crop this Saturday, November 21st from 1-9 pm.  Dinner and lots of yummy snacks will be served and you'll have access to all of the members of the team!  We'll be sharing demo's of our favorite tips and techniques and you'll  be making a fun Make-n-Take that I create using QuicKutz latest products!  Fun!  Call Page's to reserve a spot today - (626)358-5334!

See you all soon!
Andrea