Photobucket Photobucket Photobucket Photobucket Photobucket Photobucket
Showing posts with label Pages from the Heart. Show all posts

Wednesday, March 28, 2012

A Card To Match

When I was working on this month's Page's Design Team projects, one of the assignments was to make a card or layout with a handmade embellishment.  I made the pincushion and a card as a gift set...


My hand made embellishment is the button card...

I hand cut the button card from the back side of Her Bureau and sewed on buttons.  I also grabbed a paper doily and cut it in half and then fan folded it so it would have texture.  I added some gold glitter tulle on top of the doily because I love me some sparkle!


I punched the label and added some words from the OA Words Stickers along with some bling.  The ladies silhouette is a sticker from the Words sheet that is popped up off the scallop circle and covered with Crackle Glaze.


I used scraps from the Shadow box to add a little something in the top right corner along with a word sticker...  I also took a pair of scissors and rubbed the edge of the scissors along the paper to distress the papers and give them an antiqued look.

If you didn't see my past few projects, I had October Afternoon's Farmhouse line to play with, which I love and is used on the card!

I'll see you Friday with some Easter fun!
Andrea

Wednesday, March 21, 2012

Page's Design Team Reveal

Hello!

Today I'm sharing my project from Page's March assignment. 

I had October Afternoon's Farm House Line, which I love!  If you remember, I primarily used Farm House for my 1 Sketch, 6 Cards set... I think it's such a versatile line, it's easy to use and play with and so pretty with the typical OA colors and vintage feel!

Tray Shadow Box
Supplies:
October Afternoon Farm House Her Bureau
October Afternoon Farm House Attic Trunk
October Afternoon Farm House Words Stickers
Wilton Cake Doily
Inksentials Crackle Glaze
Buttons
Dew Drops
Twine
EK Success Scallop Border Punch
Bazzil Cardstock
Pearl Ribbon
Tulle
Old Book Pages
Fiskars Heart Punch
Sewing Machine


I found this cardboard tray in the $1 Aisle at Target and loved the pattern - I wasn't sure what I was going to do with it, but I knew that I could figure out something!


I started off with covering the bottom, inside of the tray with patterned paper.  I wasn't sure if I was going to leave this as a tray, but I started covering the sides with strips of border punched paper and ended up turning the tray into a shadow box. 

I started treating the shadow box as I would a page layout.  I started layering papers and stickers and did a lot of hand cutting from the Her Bureau sheet.

I also used a lot of dimensional tape to add height to the layout and keep it interesting.


I put crackle glass on the handcut key and Pride and Prejudice Book.  I added sparkly tulle behind the book for some extra pazzaz. 


And my final embellishment was this cute, sewn heart garland.  I draped it across the top of the box and a little down the sides.


And, of course, the cutest embellishment in the shadow is Little Miss Stella! 

Well, that's it for me today!  I hope this project makes you rethink how you can use a supply, like the tray, and create something that you want to display in your home!

I'll post the heart garland tutorial tomorrow, so check back in!
Have a great day!
Andrea

Friday, February 24, 2012

I *heart* St. Patty's Day!

Hello!

Happy Friday!  Yay! 

As some of you know, I am lucky enough to design the QuicKutz Club projects for Pages From the Heart - which is an awesome deal!  Lifestyle Crafts/QuicKutz sends me their new release and I figure out a fun project for Kathy's club members - it's pretty fun! 

For Valentine's Day, QuicKutz released their Sweetheart Line - which was super cute!  My favorite part was the nesting hearts - but take a look at these super cute dies!


Aren't those cute?  I love them!  I think I'll use the donut's for my sister-in-laws bridal shower card - they're doing donuts in place of a wedding cake!

Kathy was giving her club this die as their Club Die...
It's a Heart Doily die - so pretty!  You might be thinking that a heart in February is a pretty easy product to work with... except that the club was AFTER Valentine's Day.  Ugghhhh.  I didn't want to make a Valentine's project that no one would be able to use for a year!  So, I grabbed my hearts and thought, "Hmmm, what else can I made with hearts?".  And then I made this!

A Shamrock!  Perfect for our next Holiday, St. Patrick's Day!  I used this die...
Which is a Nesting Heart Die - you get 5 nesting hearts in this package!  And I used the largest and 2nd largest dies to create my shamrock petals along with the doily heart.
I also used the QK Nesting Circles to cut out 3 rolled roses for the shamrock center, used a manila tag and some fake cream flowers.  I gathers shimmery tulle and placed that behind the flowers/tag/ribbon.

So cute, huh?! 

For the stem I used a kabob skewer and covered it with paper.  I glued the stick onto the back of the shamrock and covered it with a circle glued on top of the stick for support.

That's it!  I'm feeling pretty lucky, how about you?

Have a great day!
Andrea

Tuesday, December 27, 2011

PB Inspired Paper Crafting

Good Morning!

I hope that your Christmas weekend was full of family, friends, laughter and fun!  I know ours was... we had so much fun and excitement that my body couldn't take it and today I ended up with a sinus infection!  But, watching this...

happy little face is well worth any yucky after Christmas germs!

And here's a little gift idea that I made last week that was inspired by a Pottery Barn item that I've been conventing for, umm, like 7-10 years...


Maybe it's a little hard to tell what it is...  but it was inspired by these...


They used to have some that had vases for flowers or candles were attached to the wall with wire or something like that...
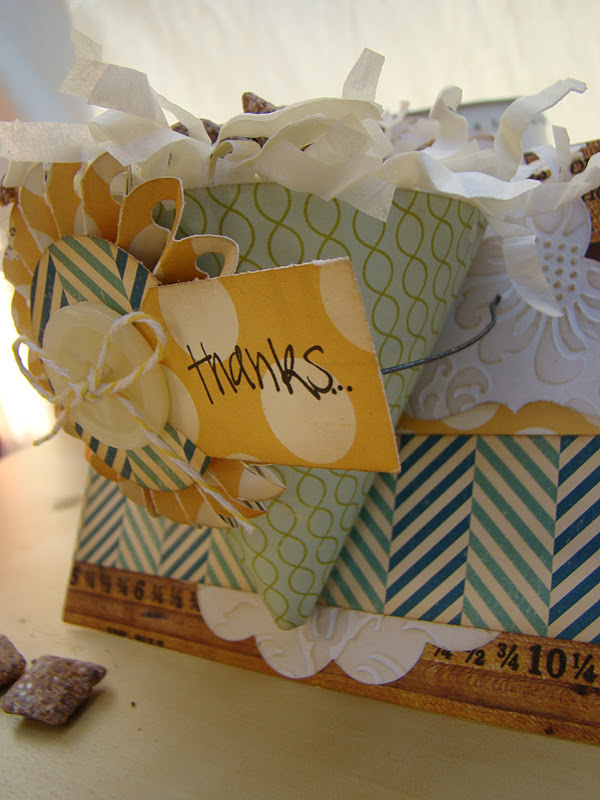
So I made a little hostess gift with that same idea - a "vase" attached to the "wall" that holds goodies!  This picture might be easier to see what it is.  It's a little cone (similar to a tussy mussy) that is attached to an easel base with floral wire...


 The cone is actually the Life Style Crafts Party Hat turned upside down so it can hold goodies.  The rosette on the front of the cone is from Life Style crafts as well...


The easel that holds the cone is from LifeStyle Crafts as well, it's the Card and Card Easel kit...  And, if you noticed, the scallop circle that is behind the cone is embossed with the Life Style Crafts Damask Embossing folder and then cut from the Cupcake Stands Scallop Circle...


 Sorry, I can't seem to get a picture of the embossing folder, but you get a damask folder and a floral folder in one pack - they're very cool!


 And here's the view from the top - I put some Muddy Buddy's in the cone as the treat.  The tag is an OLD EK punch and I wrote "Thanks" on it.  I love this!  I love that it's a free standing "treat", and you can take the cone out of the wire holder... it's not glued in, it just rests in the wire!  I did use a foam pop-dot to attach the rosette to the cone which does help to catch the cone, but it really doesn't need it.

I used October Afternoon's Farmhouse and Boarding Pass paper lines for this project.  I love the rulers from Farmhouse - I have a thing for vintage rulers and am always on the lookout for them in thrift stores or yard sales!

IF you're part of the Die Cut Club at Page's, you'll be doing this project for club this month!  I know sometimes it's hard to think of different ways to use your dies, but if you just look at their form instead of what their called, sometimes that can help...  A little inspiration never hurt either!

Have a great day! 
Andrea

Sunday, November 13, 2011

Christmas Page Maps

Hello!

Yesterday I spent the day at Page's with fabulous ladies getting in the Holiday spirit!  I must say, I am very cheerful and ready to decorate the house for Christmas today and have only been held back by my reasonable husband... however, I am going to share my absolute most favorite Christmas movie with Adam after nap...
And, since I'm in the Holiday mood, I'm also going to share my November Page Maps samples with you!

I am doing a 2 page layout for Christmas with a sketch that I found in November's Scrapbook Etc.

Everyone will get an entire sheet of WeR's dimensional stickers and we'll be using WeR's paper, along with fun punches and bakers twine (of course!).

We'll also be making a 2 page layout using Fancy Pants paperline that is intended to showcase your fall or Thanksgiving paper.  I'll share that layout later this week!

I will be teaching these layouts at Page's From the Heart next Saturday, call to sign up and I hope to see you there!

Hope you do something cheerful today!
Andrea

Tuesday, October 18, 2011

It's Been Too Long...

So sorry... it's been too long!

Alan and I had our 5th Anniversary last weekend.  We spent a few days without the baby... which was fantastic but I also felt like I was missing my right arm... Mommy-hood is so interesting.

Today I want to share a project that I made for the Page's Design Team.


It's a Boo-tiful and Spooktacular Carousel.  I loved creating this carousel using the Authentique Glowing Paper line, along with the Icons and Headlines from Authentique.  I used a hat box lid for the base, wooden skewers for the sticks and a toilet paper roll for the center tube that holds the top up!


I used a super fun ribbon that looked like a spider web and a scallop circle on the top with a fake spider.


I really wanted the top of the carousel to be awesome, so I alternated between a pinwheel and a raven to adore the top. 
I also used the nesting ghost and the bat from the Be Spooked Life Style Crafts latest Halloween line.

The fence is a Martha Stewart border punch.

I used different Icons and elements on the "ride" part of the carousel.

You can see more pictures and a better description of this project at the Page's blog! 

Don't forget, I'll be at at Little Penelope Lane's Home Boutique this Friday, and then teaching my 13 Day's of Halloween Advent Calendar at Page's on Saturday!

Take care, have a great week!
Andrea

Tuesday, August 2, 2011

Click your heels 3 times...

and follow me to this magical land of Oz - eerrrr - Pages.

Here's my Magic of Oz mini... it's actually made from a hardback book.  I know, I know, some of you are going to have issues with that, but I figure that I'm saving an old book from a certain gloomy thrift shop doom.
You know how much I love detail cutting, so Dorothy is all hand cut.  So are the poppy's... and the Magic of Oz banner...

The book is composed of 6 pages, the Wizards page is one of my favorites.  I used a Glitz hot air balloon stamp and (gasp), more detail cutting.


I cannot do anything without crackle accents or stickles, so this page has them both!  Oh, and did I mention this is a pocket page? 

Even though Dorothy is not my favorite character (I'm partial to the Cowardly Lion - I think it's the hair-do), I figured that she's pretty much the central character so I have her on the cover and on one of the pages... She's a total fame mongur.

She's stamped and colored with Stamp'in Up Watercolor Pencils and blending pens and, yes, she's hand cut.  So is the Capitol Slippers advertisement (said in the same manner as in Mary Poppins).

Okay, that's all I"m going to share, but I still have a Tin Man page, Cowardly Lion page, Scarecrow page and The Good Witch and Wicked Witch page but a girl has to play hard to get sometimes!  There's still room for this class on Sunday, August 7th at Page's From the Heart.  You can also visit my Etsy shop to purchase the book there.

Hope to see you on the yellow brick road!
Andrea

Friday, April 29, 2011

A few pages to share

Here's a few page layouts that created using a PageMaps pdf from 2010 - these are for my Page's from the Heart Page Map class.  Take a look - I used JilliBean paper with a smidge of WeR - I really like the way these pages came out -


Contact Pages if you'd like to take the class!

Hope everyone has a great weekend!
Andrea