Yay! Today is Pinned Up Monday, which is the day that I share a project that was inspired or totally copied by something I saw on Pinterest! Today I'm sharing a project that my husband and I made for my Mother-In-Law for Mother's Day... here is the pin-spiration
{Photo courtesy of shelterness.com via Pinterest}
I don't know about you, but I feel like with spring came a crazy amount of succulents! I'd never really appreciated how pretty succulents can be, the different colors and shapes, textures. I think I'd always thought of a cactus as those tall, armed poky guys that you avoided at all cost. Or what Snoopy's cousin, Spike, called home. This spring, my appreciate of succulents has grown ten fold... Here's what Alan and I made...
My Mother-in-Law is a flower/garden/planting enthusiast. And since we were trying to break free of the normal Adam framed photo present, I thought a hanging succulent garden would be perfect for her. Here's a little of what we did...
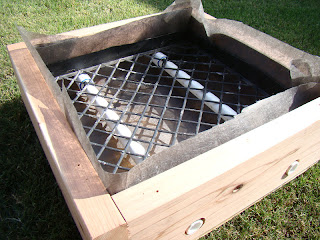
We bought a few 2' x 4' beams of redwood. It stays nice, doesn't need to be treated and is super pretty. It's more expensive than most of the other wood, but it's worth it. My husband made a planter box with plywood for the backing and redwood for the sides. He lined/stapled weed blocker fabric to the inside of the box. He then grabbed PVC pipe, drilled holes in them for watering and attached them to the box. We used the planter container that holds the pods of plants from the garden/home improvement stores and stapled them into the box. We made the box to fit the size of the containers. We thought this would help hold the plants and soil better than nothing.
(drilled PVC pipes)
{where PVC pipe meets box - you can water directly into the pipes and will help with drainage}
We filled the bottom of the box with pea gravel - up to the plastic container. We then made a cactus soil mix, with part sand and part soil. We cut chicken wire to fit the top of the planter and stapled it to the planter - this will help keep your succulents in place when you hang it from the wall.We put the cactus soil in, on top of the gravel and I started adding the different succulents. It was a little hard to pack the soil around the plants due to the chicken wire, so you may notice that you have to repack a few times before you hang your planter. To make this project a little more cost efficient, we used some drought tolerant ground cover as well as succulents.
We added a lip all around the planter when I was done planting. While I was doing research on how to create a succulent garden, I read that you should plan your succulents in a flow, or diagonal, with similar colors clustered together to give your planter the biggest "wow" factor. I used the ground covering in the bottom right and top left corners and filled the middle section with the succulents, so that they traveled in a diagonal. The effect was super pretty, I loved the colors and shapes that the plants created...
Here's some tips that I found while researching...
1. Let the planter lay flat for up to 2 weeks in the spot that you'll eventually hang it. This lets the plants root and it also prepares them for the climate they'll be living in.
2. You can use cuttings from succulents instead of purchasing plants - its a little more cost effective. There's plenty of online stores that sell cuttings, lots on Etsy.
3. If you use plywood for the backing, you'll probably need to replace it in a few years from watering.
4. As your succulents grow, you'll have to remove them and replace them with smaller ones - they'll grow and grow and outgrow your planter.
5. Don't over water! Succulents are drought tolerant, I read that you should only water once every 4 days but I think you'd have to figure this out with trial and error depending on where your planter is.
6. Lowes Creative Ideas site was the most helpful for me - it gave detailed plans, supply list and suggestions. Better Homes and Gardens had the layout suggestions that were most helpful.
That's it for me today! Have a great day!
Andrea


No comments:
Post a Comment